Understanding Affiliate Programs for Advertisers
Affiliate programs are one of the most effective ways to expand reach and drive measurable results on Snipesearch Adclicks. Unlike impression-based or click-based models, affiliate campaigns reward publishers only when a real action takes place, such as a sale, a subscription, or a lead. This performance-driven structure ensures that every penny of your ad spend is tied to meaningful outcomes rather than passive engagement.
On the Snipesearch Adclicks platform, affiliate campaigns operate as a partnership between advertisers and publishers. Advertisers provide the offer, set the payout for each conversion, and supply creatives like banners and tracking links. Publishers, in turn, select relevant offers from the marketplace and integrate them into their websites or social channels. Whenever their visitors complete the defined action, both sides benefit: the advertiser secures a customer, and the publisher receives a commission.
This system creates a low-risk, high-value environment. Advertisers know they are paying for tangible results, while publishers gain access to a potentially lucrative revenue stream. Setting up your affiliate program properly on Snipesearch Adclicks is therefore critical. The platform provides a clear, step-by-step framework, but understanding each stage in detail will help you build campaigns that are both compliant and profitable.
The following guide takes you through each step of creating your first affiliate campaign, from navigating the dashboard to launching a fully optimized program.
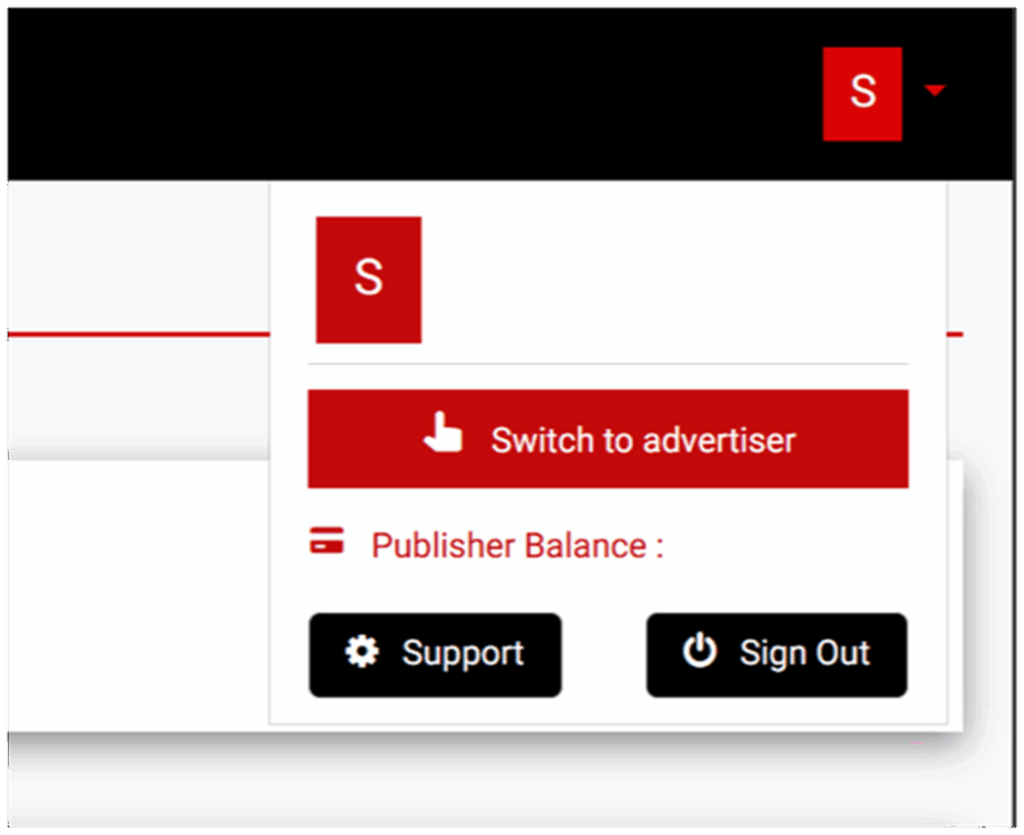
Step 1: Switching to the Advertiser Dashboard
The Snipesearch Adclicks ecosystem is designed for dual roles: you can act as both a publisher and an advertiser under the same account. Publishers are those who monetize their websites by displaying ads, while advertisers are the ones who design and fund campaigns. Since affiliate programs are created from the advertiser side, your first task is to make sure you are working within the correct environment.
Switching to the advertiser dashboard is simple but essential. If you remain in the publisher view, you will not see the tools needed for campaign creation. At the top-right corner of your interface, you will find a circle or square icon containing the first letter of your username. Clicking on this reveals a dropdown menu. From there, choose “Switch to Advertiser,” and the system will load the advertiser dashboard. This area of the platform is where all campaign-related functions are housed, including budget controls, targeting settings, and ad creation wizards.
Confirming this switch ensures you start on the right foundation. Without it, any attempt to create an affiliate program will be blocked, as the publisher dashboard lacks the menus required. Treat this as your starting checkpoint: only once you see the advertiser interface should you proceed with campaign setup.
- Locate your profile icon at the top-right corner of the screen.
- Select “Switch to Advertiser” from the dropdown menu.
- Verify that the advertiser dashboard is now active before moving on.
By completing this step carefully, you avoid missteps later in the process and guarantee access to the full range of tools needed to build a robust affiliate program.
Step 2: Accessing the Ads Menu
Once you are inside the advertiser dashboard, the next destination is the Ads menu. Think of this as the cockpit of your campaigns — everything you build, analyze, or adjust runs through this central hub. On the left-hand navigation panel, locate the “Ads” option. Clicking on it opens up the core control center where all advertising activity is managed.
Within the Ads menu, you have the ability to launch new campaigns, view those that are live or paused, and revisit past efforts for performance review. This section also provides direct access to reporting, allowing you to measure results such as conversions, cost efficiency, and return on investment. For affiliate campaigns in particular, the reporting function is vital: it shows you not just how many users clicked your ads, but how many followed through with a purchase or sign-up.
Getting familiar with the Ads menu early on saves time when scaling. Once you start managing multiple campaigns simultaneously, navigation speed becomes essential. Knowing exactly where to create, monitor, and optimize your affiliate programs will streamline your workflow and prevent unnecessary errors.
- Navigate to the left-hand panel and click “Ads.”
- Use this menu to create new campaigns, manage existing ones, and analyze results.
- Familiarize yourself with the reporting section, as it is key to evaluating affiliate conversions.
By grounding yourself in the Ads menu before creating your first campaign, you build a habit of organization. This not only makes setup smoother but also equips you with the confidence to adjust campaigns on the fly as you gain experience.
Step 3: Creating a New Ad
Inside the Ads menu, click “Create Ads.” This opens the campaign builder, a guided tool that walks you through setting up your affiliate program step by step. At this stage, your primary task is to choose “Affiliate” as your pricing model. This ensures the system knows you are running a performance-based campaign where publishers are paid for completed conversions rather than clicks or impressions.
Once selected, the builder prepares the remaining fields you’ll need to complete in later steps, such as targeting, budgets, and creative uploads. For now, the focus is simply on starting the process correctly and making sure you’ve entered the affiliate campaign pathway. Think of it as setting the foundation: by choosing the right model at the outset, you align all subsequent options with the structure of an affiliate program.
Confirm you are in the guided builder and ready to proceed to the next step.
Open the Ads menu and select “Create Ads.”
Choose “Affiliate” as your pricing model to unlock affiliate campaign settings.

Step 4: Selecting the Ad Format
Once you’re in the campaign builder, you’ll arrive at the section where ad formats are chosen. Snipesearch Adclicks offers a range of advertising types — from banners and e-commerce units to video placements — but for this setup, the format you need is “Affiliate.” By selecting Affiliate, the platform automatically configures your campaign to operate as a conversion-based program.
This choice is not just a label; it activates affiliate-specific mechanics behind the scenes. The system will expect you to define payout rates for successful conversions, supply creatives in standard sizes, and configure tracking codes to verify actions. Without this selection, your campaign would run under a different model such as CPC or CPM, which would break the structure of an affiliate program.
- Choose “Affiliate” from the ad format options.
- Confirm the builder switches into affiliate mode, unlocking CPA-based settings.
- Ensure you remain in this mode for the rest of the setup, as it determines how your campaign will track and pay out.
By making this decision here, you align the rest of the builder’s steps with the affiliate program framework, ensuring that your budget, creatives, and tracking are all tied to measurable conversions.
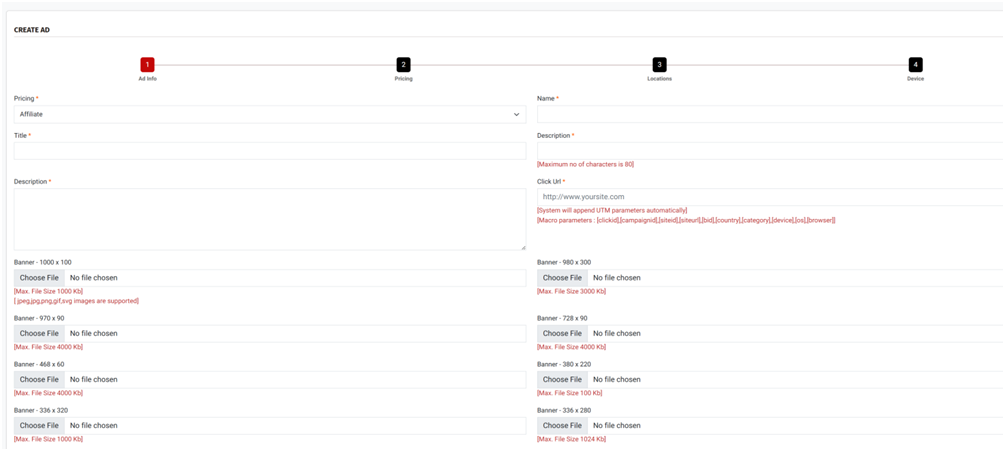
Step 5: Filling Out Basic Ad Information
Once your payout and budget are defined, the campaign builder moves on to the program details. This stage is critical because it gives your affiliate campaign its identity and ensures it can display properly across the network.
Start with the campaign name. This is an internal label, so avoid spaces and keep it simple for easy tracking. The public-facing identity comes from your title, which is what publishers and users will see. It should be clear, professional, and tied directly to the offer you’re promoting. You’ll also be asked for two descriptions: a short version capped at 80 characters for quick placements, and a longer description that gives more detail about the benefits of your offer. Together, these descriptions set expectations for affiliates and end-users.
Next is your destination URL. Snipesearch Adclicks automatically appends UTM parameters and macros to this link so every click and conversion is tracked accurately. These macros include variables like [clickid], [campaignid], [siteid], [device], [os], and others, giving you granular reporting once your campaign is live.
Finally, you must upload banners — and unlike general ad campaigns, an affiliate program requires every supported banner size to be provided. This ensures maximum compatibility across publisher sites, as different placements call for different formats. All banners must meet the listed file size limits, and acceptable formats include JPEG, JPG, PNG, GIF, and SVG.
Here are the required banner sizes:
- 1000 x 100 (Max. 1000 KB)
- 980 x 300 (Max. 3000 KB)
- 970 x 90 (Max. 4000 KB)
- 728 x 90 (Max. 4000 KB)
- 468 x 60 (Max. 4000 KB)
- 380 x 220 (Max. 100 KB)
- 336 x 320 (Max. 1000 KB)
- 336 x 280 (Max. 1024 KB)
- 320 x 100 (Max. 4000 KB)
- 320 x 50 (Max. 4000 KB)
- 300 x 50 (Max. 4000 KB)
- 300 x 250 (Max. 4000 KB)
- 300 x 600 (Max. 4000 KB)
- 250 x 250 (Max. 4000 KB)
- 200 x 200 (Max. 4000 KB)
- 160 x 600 (Max. 4000 KB)
- 160 x 300 (Max. 100 KB)
- 120 x 600 (Max. 4000 KB)
Uploading the full set is not optional — it is a requirement for your program to be approved and go live. This step is often time-consuming, but it guarantees your offer can be displayed on any publisher’s site, regardless of which ad slots they use.
- Provide a campaign name, title, and short/long descriptions.
- Enter your destination URL; tracking macros are added automatically.
- Upload all required banner sizes with the correct file types and weight limits.
Completing this step thoroughly sets your program up for approval and ensures publishers have everything they need to display your ads seamlessly. Skipping a size or ignoring the requirements will delay launch and reduce the reach of your campaign.
Once all uploads are set and all fields are filled in click next to continue.
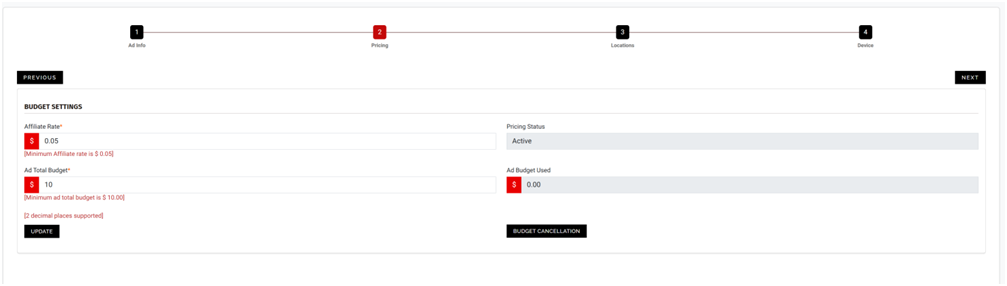
Step 6: Setting Budgets and Tracking Codes
Once your banners and campaign details are complete, the next priority is setting financial parameters and implementing the required tracking codes. Both are crucial: one controls how much you’re prepared to spend, the other ensures conversions are verified accurately.
Begin by defining your affiliate payout rate. This is the amount you will pay publishers per successful action, such as a sale or sign-up. Snipesearch Adclicks requires a minimum of $0.05 per conversion, but the actual rate should be competitive enough to motivate affiliates. Next, allocate your total campaign budget. The minimum is $10, and both values can be set with two decimal places, giving you precise financial control. Importantly, after entering these numbers you must click Add Budget before moving forward. If you forget, your campaign will not activate when submitted.
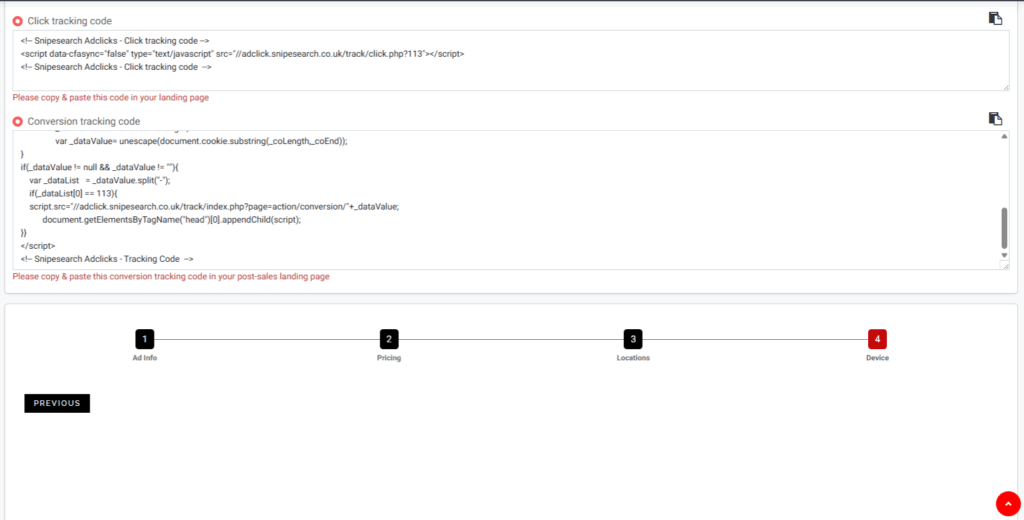
After setting your budget, install the two required tracking codes. The click tracking code goes in the header of your website so that every page registers user clicks. The conversion tracking code belongs on your success or confirmation page (for example, the checkout completion screen). These scripts allow Snipesearch Adclicks to confirm both user activity and conversions in real time. The admin team reviews your click code before approval, while the conversion code is checked at random. If clicks are being recorded but valid tracking cannot be detected, your account will be investigated; if fraud is proven your funds may be permanently forfeited. Proper installation and testing of both scripts is therefore mandatory.
- Set your affiliate payout rate (minimum $0.05).
- Allocate your total campaign budget (minimum $10) and click Add Budget.
- Install click and conversion codes in the correct places before proceeding.
By completing this step properly, you safeguard the financial and technical integrity of your affiliate program.
Once you’ve typed these values in, you must click Add Budget. Typing the numbers alone does nothing; unless you press this button, the settings are not saved and your program will remain inactive.
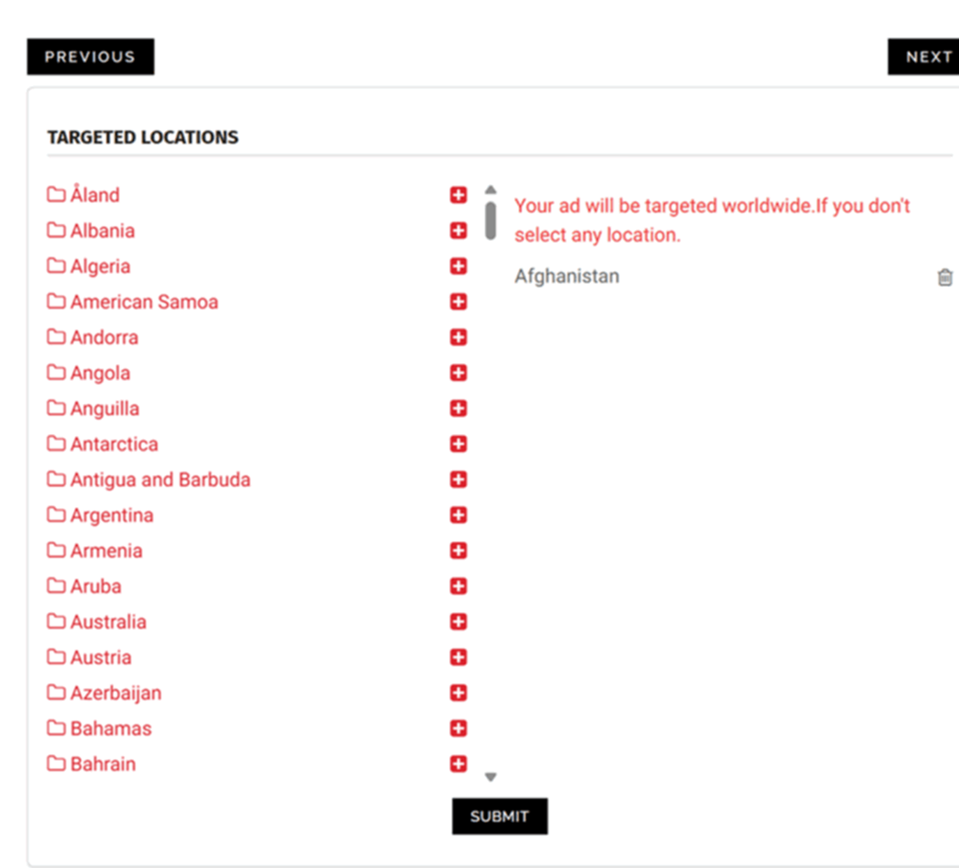
Step 7: Location Targeting
Once budgets and tracking are secured, configure your location targeting. This setting determines where in the world your program will run, and it directly impacts both traffic quality and budget efficiency.
You can select global targeting (ads delivered worldwide), country targeting (restricted to one or more countries), or city targeting (drilled down to specific metropolitan areas). The right choice depends on your offer. If your service is UK-only, for example, restrict delivery to the UK or key UK cities. Running globally will simply waste budget on audiences who can never convert.
After choosing your locations, you must click Submit before pressing next. If you don’t, the system defaults to global targeting and ignores your selections. Always double-check that your chosen regions are listed in the summary box before moving on.
- Choose global, country, or city-level targeting to match your product availability.
- Click Submit to save — without it, nothing is stored and your campaign defaults to global.
- Confirm your selections appear in the summary before advancing.
Step 9: Device and Browser Targeting
The last configuration step is device and browser targeting. This allows you to specify the environments where your ads will appear.
You can filter by device type (desktop, mobile, tablet), operating system (Windows, iOS, Android, Linux, etc.), and browser (Chrome, Safari, Edge, Firefox, etc.). This is especially important if your landing page or app only works on specific systems. For example, running an Android app campaign on iOS devices wastes impressions; serving a Chrome-only site to Safari users is equally ineffective.
As with previous steps, it is vital that you click Update after making your selections. If you don’t, the system reverts to “all devices and browsers” and your filters are lost. More importantly, if you forget to update, the campaign will not go live. After clicking Update, the targeting window clears — this is normal — but your saved selections remain active. At this point, you can either review your work or use the Preview button in the top-left to check how your banners appear across placements.
- Select the devices, OS, and browsers that match your campaign goals.
- Always click Update to save filters. Without it, your campaign defaults to all devices and may never launch.
- Use Preview to confirm banner presentation before proceeding
Launch and Monitoring
At this stage, your affiliate program is complete. You can revisit previous tabs to check.
- Budgets are saved via Add Budget and Update in step 2.
- Location targeting has been saved with Submit in step 3.
- Device/browser filters have been saved with Update.
- All banner sizes are uploaded and previewed successfully.
From there, the focus is on monitoring and optimization. Use reporting tools to track performance, identify high-converting affiliates, and adjust your rates, creatives, or targeting as needed. The better you monitor and refine, the stronger your returns.ps your budget focused where conversions are most likely. You can if you wish leave the page, everything has been saved step by step. You can also click preview in the top left to check how your banners render.
MAKE SURE YOU INSTALL THE CODE WITHIN 72 HOURS OF SETTING UP YOUR CAMPAIGN.
Relevant Links
- Support: https://support.snipesearch.co.uk/
- FAQ: https://adclick.snipesearch.co.uk/index.php?page=index/faq
- Contact Form: https://adclick.snipesearch.co.uk/index.php?page=user/support
Stay Connected
- Snipesocial: https://www.snipesocial.co.uk/pages/snipesearch
- Twitter: https://twitter.com/snipesearch_uk
- Facebook: https://facebook.com/snipesearch
- LinkedIn: https://linkedin.com/company/snipesearch/
- VK: https://vk.com/snipesearch_uk
- Focus: https://focus.xyz/snipesearch
- YouTube: https://youtube.com/@snipesearch
- diaspora: https://diaspora.snipesearch.net/people/7431fcf0806c013e936e00163c6e7bdf
Analytic Tools
- Rommie Visitor Analytics: https://rommie.net/
- StatCounter: https://statcounter.com/