CPM Banner campaigns on Snipesearch Adclicks trade on predictable reach: you pay for every 1,000 impressions, not for clicks or conversions. This is the right format when you need sustained visibility for launches, seasonal pushes, or brand-led offers where a strong visual creates demand over time.
On Adclicks, CPM buying is prepaid from your account balance, campaigns can be cancelled at any point, and any unused funds credit back to you. Platform minimums keep entry simple: the CPM floor is $0.01, minimum total budget is $1.00, and minimum daily budget is $1.00.
Impressions are counted fairly and consistently: a view registers only after a 1-second load delay, and the system caps to one billable impression per ad per IP per hour to prevent inflation. With category, geo, device, time, and language controls layered on top, CPM Banners become a precise tool for saturating the right audience with the right creative at the right moments—without paying extra when curiosity spikes.
Step 1: Switching to the Advertiser Dashboard
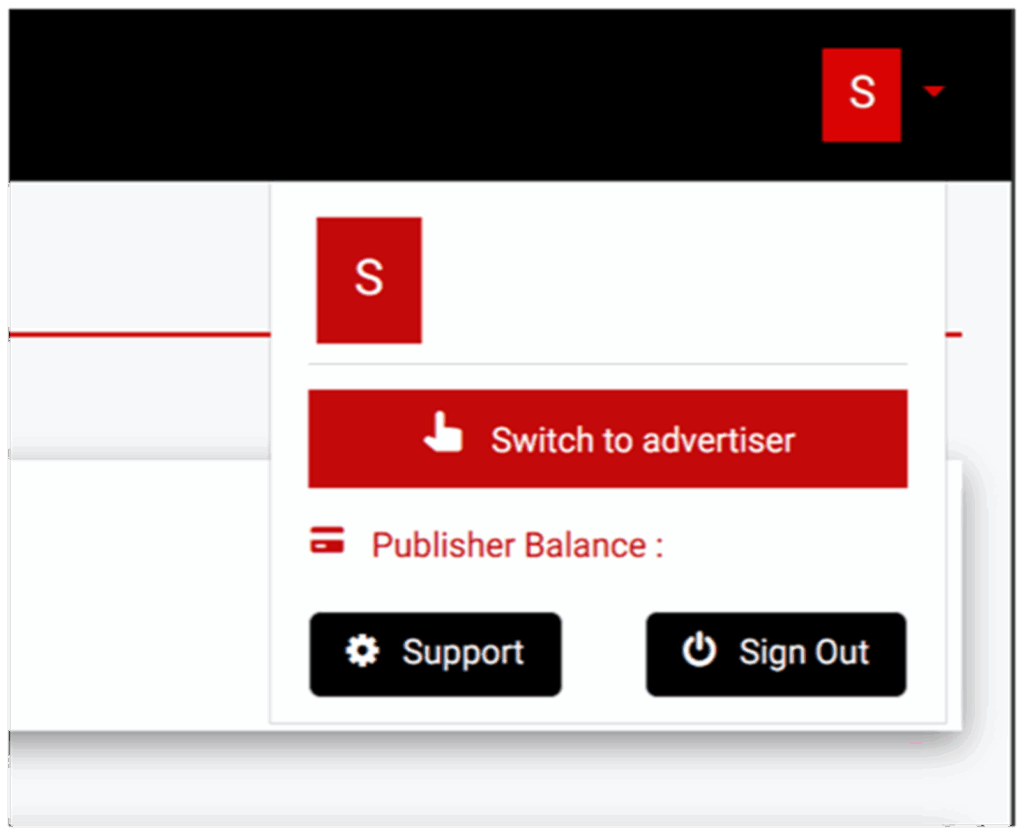
Start by confirming you’re operating as an advertiser, not a publisher. Ad creation, pacing, spend limits, and reporting live on the advertiser side of the account. If you’ve ever added sites or generated ad codes, your profile may still be in publisher view; switch now so the campaign builder and budget tools are available and any settings you save are applied to ads, not placements.
- In the top-right, open the profile menu (your initial inside a circle or square), then choose Switch to Advertiser.
- Verify the header and left navigation now show Ads, Reports, Billing, and Tools geared for advertisers.
- If you manage both roles, make a habit of checking attempting to edit live campaigns.
Action: Switch to the advertiser dashboard before proceeding.
Step 2: Accessing the Ads Menu
All CPM Banner activity in Snipesearch Adclicks begins from the Ads section on the left-hand navigation. This is the central point for building, managing, and analysing all banner campaigns. From here, you can create new ads, review existing ones, and access performance reports—all within one expanded menu.
Click Ads in the left-hand menu. The section expands directly beneath the sidebar, showing three core options: Create Ads, Manage Ads, and Ad Reports. Each serves a specific role in campaign management—Create Ads launches the ad builder, Manage Ads displays all active and archived campaigns, and Ad Reports opens performance tracking tools for impressions, spend, and CPM data.
Getting familiar with this structure speeds up your workflow. With all tools grouped in one expandable menu, you can move quickly between creation, analysis, and optimisation without navigating away from the dashboard.
• Click Ads in the left-hand navigation to expand your campaign options.
• Choose Create Ads, Manage Ads, or Ad Reports as needed.
• Return to the same expanded menu any time to switch between campaign tasks instantly.
Action: Left-hand menu → Ads → expand → select Create Ads, Manage Ads, or Ad Reports.
Step 3: Creating a New Ad

Click Create Ads to launch the guided builder. The workflow moves in a logical sequence—from format and pricing model through creative, destination URL, sizing, budgets, and targeting. Each field directly influences where your banners can show, how aggressively the system bids for inventory, and how cleanly results map back to your landing pages. Treat this as calibration rather than data entry: small choices compound into large delivery differences once impressions scale.
Action: Ads menu → Create Ads.
Step 4: Selecting the Ad Format
Choose Banner as your format. On Snipesearch Adclicks, banners are image-based placements that render across search surfaces, partner sites, and social inventory where display units are supported. For CPM buying, banners are ideal because you’re paying for exposure, and exposure is exactly what standard IAB-like sizes deliver: consistent viewable real estate, predictable placement patterns, and repeatable reach at scale.
Visuals do the heavy lifting here—logos, product shots, and short value props build familiarity over multiple impressions—so a CPM buy compounds brand memory even when users don’t click immediately.
Supported sizes include 1000×100, 980×300, 970×90, 728×90, 468×60, 380×220, 336×320, 336×280, 320×100, 320×50, 300×50, 300×250, 300×600, 250×250, 200×200, 160×600, and 120×600.
Pick two or three sizes to start that cover both desktop and mobile canvases (for example, 300×250 and 728×90 for broad coverage, plus 320×50 for handhelds), then add more variants as performance data accumulates. Creative discipline matters: high-contrast imagery, a single headline, and a clear call-to-action that matches the landing page will carry further than dense copy or small text that disappears at mobile scale.
Keep file weights lean to help viewability and ensure impressions are actually seen; faster loads also align with the platform’s one-second impression rule, which only registers a view after the ad has had time to render. If you previously ran CPA text ads, resist the urge to cram those lines into artwork—reframe the message visually and let the landing page handle details.
- Select “Banner Ads” as the format, planning at least one mobile and one desktop size for coverage.
- Use clean, legible creative with a single message that aligns 1:1 with the landing page promise.
- Start with two to three core sizes; expand to additional sizes after you see early placement data.
Action: Select Banner Ads as your format.
Step 5: Choosing the Pricing Model (CPM Deep Dive)
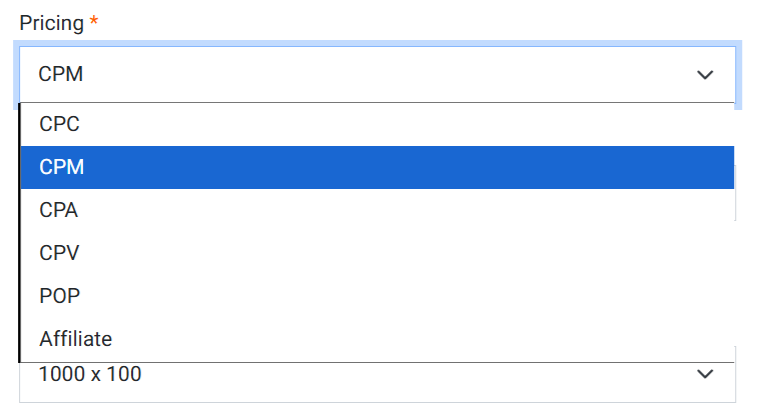
Set the pricing model to CPM. CPM (Cost per Mille) is the price you pay for every 1,000 billable impressions. It’s a reach-first model: you’re buying certainty of visibility rather than paying only when a user clicks or converts. On Snipesearch Adclicks, CPM campaigns are prepaid from your account balance, can be paused or cancelled at any time, and any unused balance credits back to you.
Platform minimums are straightforward: the minimum CPM rate is $0.01 per 1,000 impressions, the minimum total budget is $1.00, and the minimum daily budget is $1.00. Impressions are counted when the unit has been on page long enough to load (a one-second delay) and are capped at one billable impression per ad per IP per hour to prevent inflation from repeated reloads. Think in concrete math as you set your starting bid: Cost = (Impressions ÷ 1,000) × CPM. If you buy 100,000 impressions at a $0.50 CPM, you’ll spend $50.
This clarity lets you plan flighting, dayparting, or size mixes without guesswork. If your objective is brand recall or top-funnel education, CPM makes sense; if you require hard outcomes, you can still measure post-view actions with analytics while enjoying stable delivery. Pair CPM with tight targeting (category, geo, device, language) to keep impressions concentrated on the audience that actually needs to recognize your brand. Frequency is handled indirectly by your daily budget and supply; if you need stricter exposure control, narrow geography or devices to keep repetition high within your core audience rather than spreading thin.
- Choose CPM as the pricing model; plan budget with the simple formula (impressions ÷ 1,000) × CPM.
- Use platform minimums to test cheaply: CPM floor $0.01, total budget ≥ $1.00, daily budget ≥ $1.00.
- Tighten targeting to concentrate impressions where recall matters most; adjust CPM upward only if delivery lags.
Action: Select CPM as the model and set an initial CPM bid that matches your reach target.
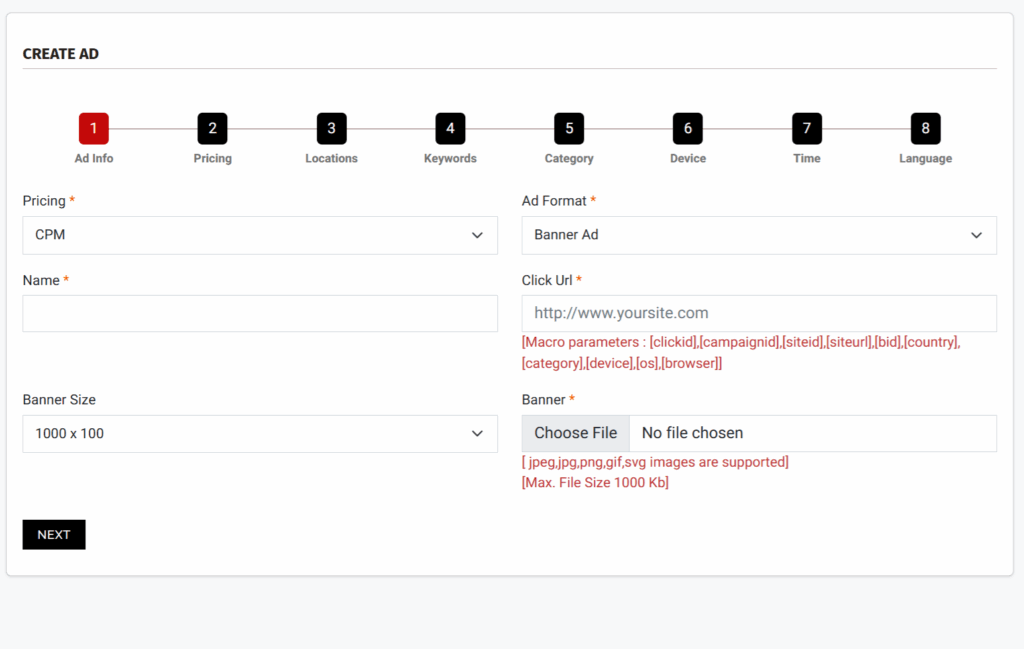
Step 6: Filling Out Basic Ad Information

Complete the core fields carefully—these govern where your banners can run, how clicks are tracked, and how reports line up to your analytics. Pricing should reflect CPM, Ad Format should be Banner, and Name should follow a taxonomy that makes sense at a glance (Brand | Offer | Size | Geo | Device | CPM). The Click URL must resolve to the exact landing page that fulfils the banner’s promise; if you use analytics parameters, append them now so every click is attributable from day one.
The platform supports macro parameters you can insert into the URL for diagnostics or partner tracking: [clickid], [campaignid], [siteid], [siteurl], [bid], [country], [category], [device], [os], [browser]. These macros will be replaced at runtime, allowing you to capture source context in your logs.
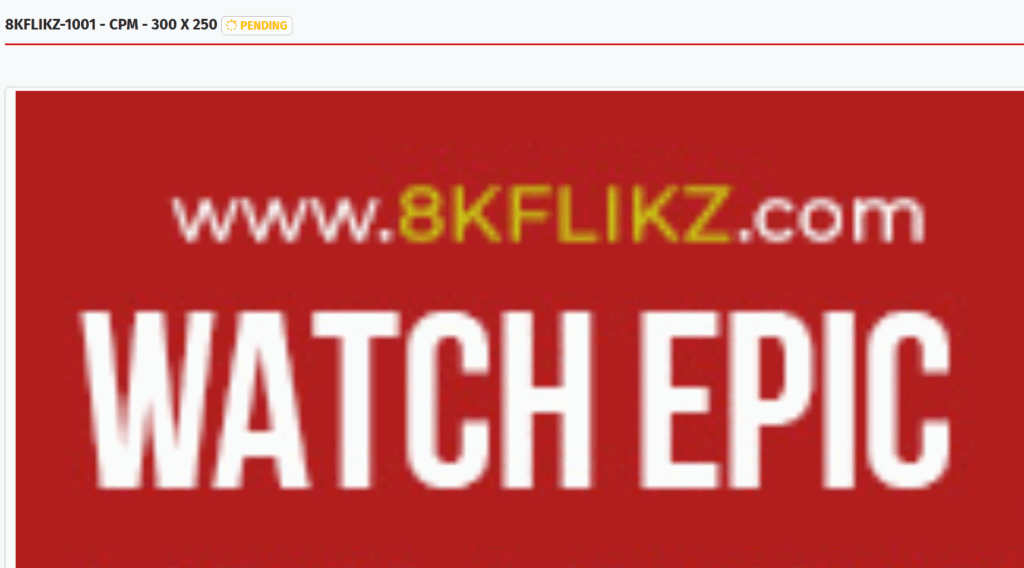
Select the Banner Size that matches your creative file, then upload the artwork. Acceptable formats are jpeg, jpg, png, gif, and svg, with a maximum file size of 1000 KB. Keep assets optimized; heavy files slow down render and can harm viewability. If you are porting a previous example (for instance, “8KFLIKZ-1000” with a 1000×100 unit), make sure the dimensions in the file name, the selected size in the form, and the actual pixel dimensions of the image all match exactly to avoid rejection or distorted rendering.
Before saving, sanity-check the destination in a private window to confirm the page loads quickly on mobile and desktop and that the headline reinforces the same message the banner carries—consistency protects your CTR and keeps post-click engagement clean.
- Set Pricing to CPM and Ad Format to Banner; use a consistent naming convention that encodes size and geo.
- Provide a fully qualified Click URL; add UTM and platform macros ([clickid], [campaignid], etc.) as needed.
- Choose the exact Banner Size and upload a ≤1000 KB image in a supported format (jpeg/jpg/png/gif/svg).
Action: Fill in all ad details (Pricing: CPM, Format: Banner, Name, Click URL with any macros, Banner Size, Banner file) and save.
Step 7: Previewing Your Ad Example

After you click Next, the preview shows the banner full page width (depending on browser, dont worry if it does, in the end users website it always renders the actual image size, this simply allows you to check the image for errors). Check sharpness, contrast, and headline legibility at that scale, then reduce your browser width to sanity-check smaller breakpoints. Click through to verify the destination and that any macros resolve correctly. If edges blur, type breaks, or the composition feels cramped at full width, replace the file and re-preview; if you’re comparing resolutions, use duplicated workflows so each version previews and reports independently.
• Validate legibility at full-width and at narrower viewports; confirm clean scaling with no stretching.
• Test the click-through and parameter handling; ensure landing page promise matches the banner.
• If you need a different resolution, use a separate workflow so each preview maps 1:1 to a single file.
Action: Use the preview to verify responsive render, clarity, and click-through before proceeding.
Step 8: Setting Budgets and CPM Rates

Open Budget Settings and enter your pricing and pacing. Set the CPM Rate first; this is your cost per 1,000 impressions. The platform minimum is $0.01, with a system suggestion usually at the same floor for initial delivery.
Next, specify the Ad Total Budget (minimum $1.00) and the Ad Daily Budget (minimum $1.00, two decimal places supported). These two fields define both the lifetime cap and the per-day throttle that controls exposure and spend cadence.
Think in reach math: Impressions ≈ (Total Budget ÷ CPM) × 1,000. If you set a $5.00 total budget at a $0.50 CPM, you are authorizing roughly 10,000 impressions, subject to targeting availability. Your daily budget then governs how fast those impressions can accrue; a $2.00 daily cap would pace to about 4,000 impressions per day at the same CPM.
Use these numbers to back into flight length. If you need a three-day burst for a launch, set a daily budget equal to one-third of your total. If you’re exploring new geos or sizes, start with conservative daily caps and the CPM floor, then raise CPM only if delivery lags at your chosen targeting. Remember that CPM, targeting breadth, and available inventory interact: tight geo + narrow device + single size may underdeliver at the minimum CPM; widen one variable or increment CPM in small steps until you see steady pacing. Keep notes in the ad name or a separate log so later optimizations have context.
- Enter CPM Rate (≥ $0.01), Ad Total Budget (≥ $1.00), and Ad Daily Budget (≥ $1.00) to control cost and pace.
- Estimate reach with Impressions ≈ (Budget ÷ CPM) × 1,000, then set daily caps to shape your flight.
- If delivery is light, first widen size/geo/device; increase CPM in small increments only as needed.
Action: Define your CPM rate, set total and daily budgets → Add Budget (if you → Next.
Step 9: Selecting Location Targeting
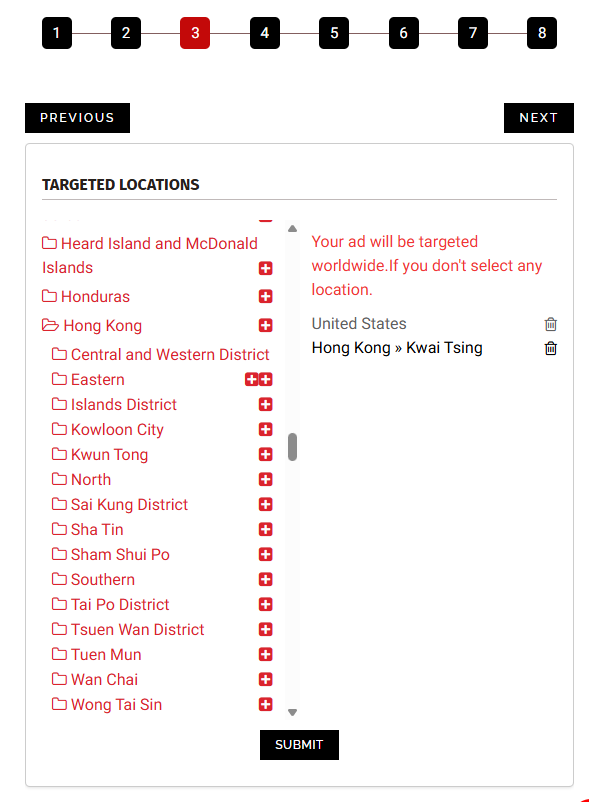
Choose where impressions should accrue. By default, leaving this section untouched risks serving globally, which dilutes frequency and wastes early spend. Start with a focused geography that matches your offer, language, shipping, or service region.
Country-level targeting is a safe first pass; city or region targeting helps when you need dense repetition in specific markets or when supply at your size is abundant and you’d rather concentrate awareness. Use consistent logic with creative: a banner showing a local price, currency, or event should not run outside that area.
After selecting locations, click Submit before moving forward; skipping this confirmation reverts the setting and may broaden delivery unintentionally. For multi-region plans, build parallel ads or campaigns segmented by country or city to preserve clean reporting and enable CPM, budget, and creative variations per market.
Early tests benefit from one region at a time; once you confirm performance and pacing, scale laterally by duplicating the winning setup and swapping only the geo and any localized elements on the banner or landing page. Keep compliance in mind: if your ad references regional regulations or age limitations, restrict the geo to jurisdictions where the claims and terms apply.
- Pick country, region, or city targets that match offer and language; avoid default global reach.
- Align creatives and currencies to the chosen geo; segment markets into separate ads for clean data.
- Click Submit to lock targeting before continuing; confirm the selected locations display as active.
Action: Choose your target locations → Submit → Next. (failing to hit submit will lead to location being set to global, make sure you hit submit before clicking next)
Step 10: Adding Keywords
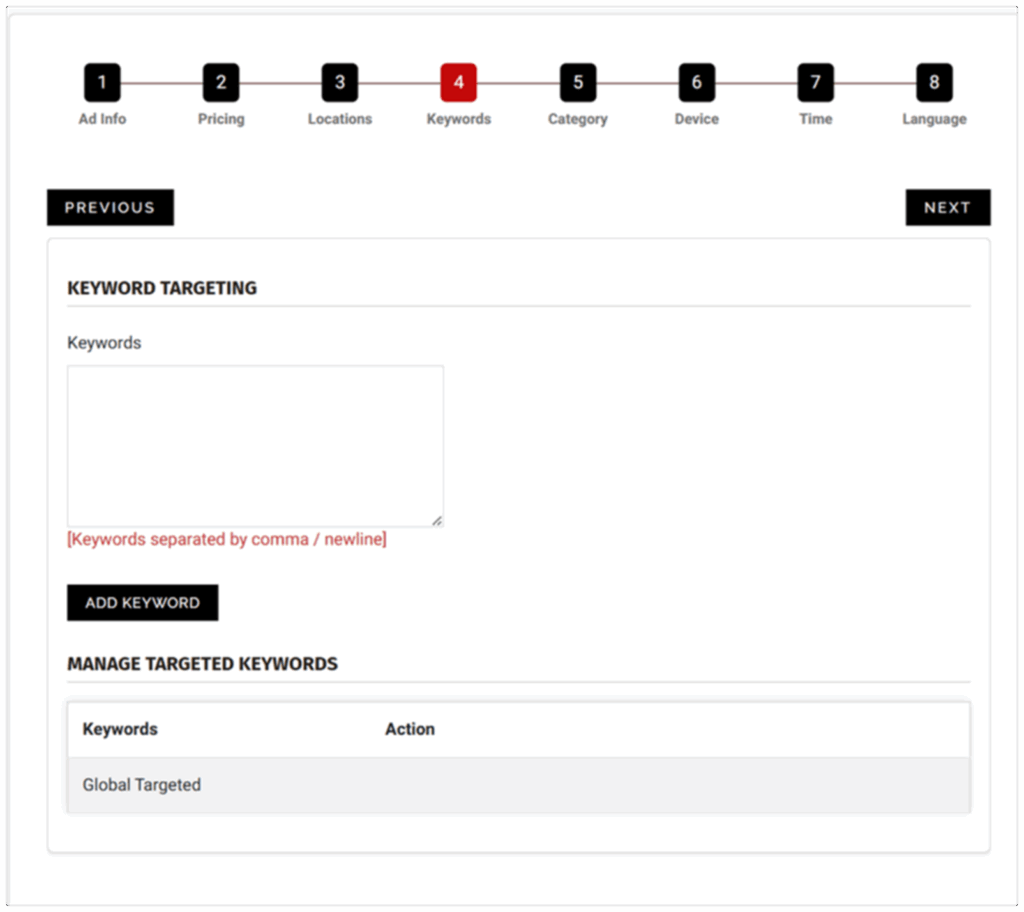
Keywords are simple tags that tell Snipesearch Adclicks what your banner is about so it can sit next to the right pages and searches. You can add 20–250 of them. Pick words that match your banner and the first lines on your landing page. If your banner says “Half-price custom T-shirts,” your keywords should talk about T-shirts and deals—not random clothing terms. Banners show at the size you chose, and you use one size per workflow, so keep one clear idea per workflow and match your keywords to that idea.
Keywords are optional. You can run CPM Banners with no keywords at all and let the system place your ad across the network (Run of Network, or “RON”). RON is often the right starting point when you already set a language and a category, because those two filters do most of the steering. With RON, your ad is eligible for a wide range of pages and surfaces, which helps fill your daily budget, smooth delivery, and keep “filler” inventory healthy. It’s also easier for beginners: you launch faster, you learn where impressions naturally appear, and you can add keywords later if you want more control.
Use RON when you’re new, when you’re running a brand message that fits many pages, when you need steady delivery at a low CPM, or when your main filter is language (and maybe country) rather than topic. Think of RON as “show my banner anywhere that matches my language/category settings.” If the banner and landing page are safe for general audiences, RON is fine. If you see placements you don’t like after a short test, you can tighten things by adding a small set of keywords, changing the category, or narrowing your geo.
Use keywords when your message is specific, time-sensitive, or tied to a clear topic. Keywords act like tags that say “put me next to pages about this.” They don’t raise your CPM by themselves; they simply narrow where the system can show you. Start light: 30–60 plain words and short phrases that exactly match your banner and the first lines on your landing page. Keep spellings simple. Avoid stuffing look-alikes (“shirt, shirts, tee, tees”) just to hit the limit. If delivery becomes too slow, you can switch back to RON or add a few broader words. If delivery is too loose on RON, you can add a few sharper words to guide it. You can move between RON and keywords at any time; you don’t need to choose forever.
A simple way to decide: look at your banner. If it’s a general message (logo, tagline, “Summer Sale”), RON plus language is usually best—fast, wide, and cheap. If it’s a very specific promise (“Free next-day delivery on custom mugs”), keywords help you avoid showing up beside unrelated content. Either way, keep one banner size per workflow and keep the words matched to the picture. After two or three days, open your reports. If you ran RON, note the pages and placements that looked strong; you can add a few words that describe those topics to lean into them. If you ran with keywords and pacing felt slow, remove the tightest phrases and keep the simple ones. Small changes beat big swings.
Choose one of these and keep it tidy:
- RON (no keywords): best for learning fast, filling budget, and broad brand messages when language is set.
- Light keywords (30–60): best for gentle steering without choking delivery; add or remove a few each week.
- Tight keywords (very specific): best for narrow offers, short promos, or when you must avoid loose matches.
Action: Decide RON or keywords. If RON, leave the keyword box empty and rely on language/category/geo. If keywords, add 30–60 simple terms that match your banner and page → Add Keyword → Next. If you do not click ad keyword, it will not save and will default to RON, add keyword is essentially your confirmation.
Step 11: Selecting Categories
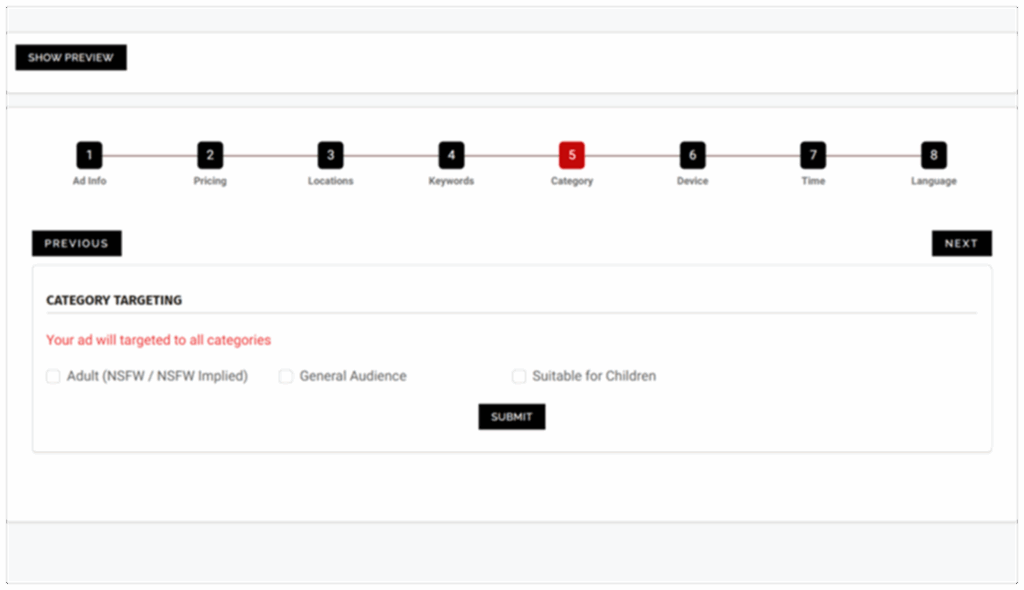
Category selection gates eligibility and approval. Choose Adult (NSFW / NSFW Implied), General Audience, or Suitable for Children based on your creative and destination. If any part of the ad or landing page leans adult, isolate it in its own campaign and select Adult. If the experience is built for under-13 users, choose Suitable for Children and respect stricter rules. Most mainstream offers belong in General Audience. A correct category accelerates review, prevents misplacement, and ensures impressions accrue only where allowed.
- Match the category to both creative and landing page; when in doubt, split into separate campaigns.
- Keep adult or child-directed content segregated with dedicated workflows and labels.
- Recheck category when you localize creatives; compliance depends on the served market.
Action: Select the correct category → Submit → Next (ADVERTS WILL NOT BE APPROVED WITHOUT A CATEGORY) .
Step 12: Device and Browser Targeting
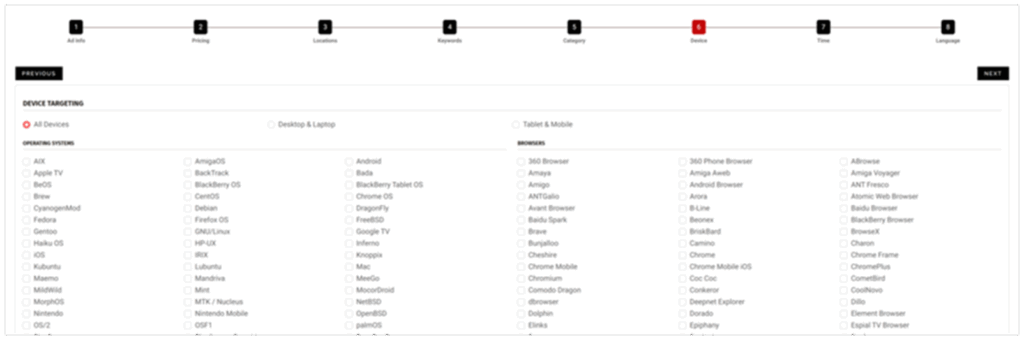
Target by device type, operating system, and browser to keep impressions where your offer works best. If your flow requires a desktop-only step, exclude mobile to protect viewability and post-view value. If your product is mobile-first, focus on iOS and/or Android and the browsers your analytics show as dominant. Because the banner renders full page width, verify that your chosen resolution reads cleanly on the targeted environments. Save changes before leaving; if you skip Update, the system assumes all devices and browsers.
- Choose Desktop, Mobile, or both; refine by OS and browser that match your experience.
- Select nothing if you want to target everything.
- Click Update to lock targeting; duplicate workflows for platform-specific tests.
Action: Select your target devices and browsers → Update → Next.
Step 13: Time Targeting
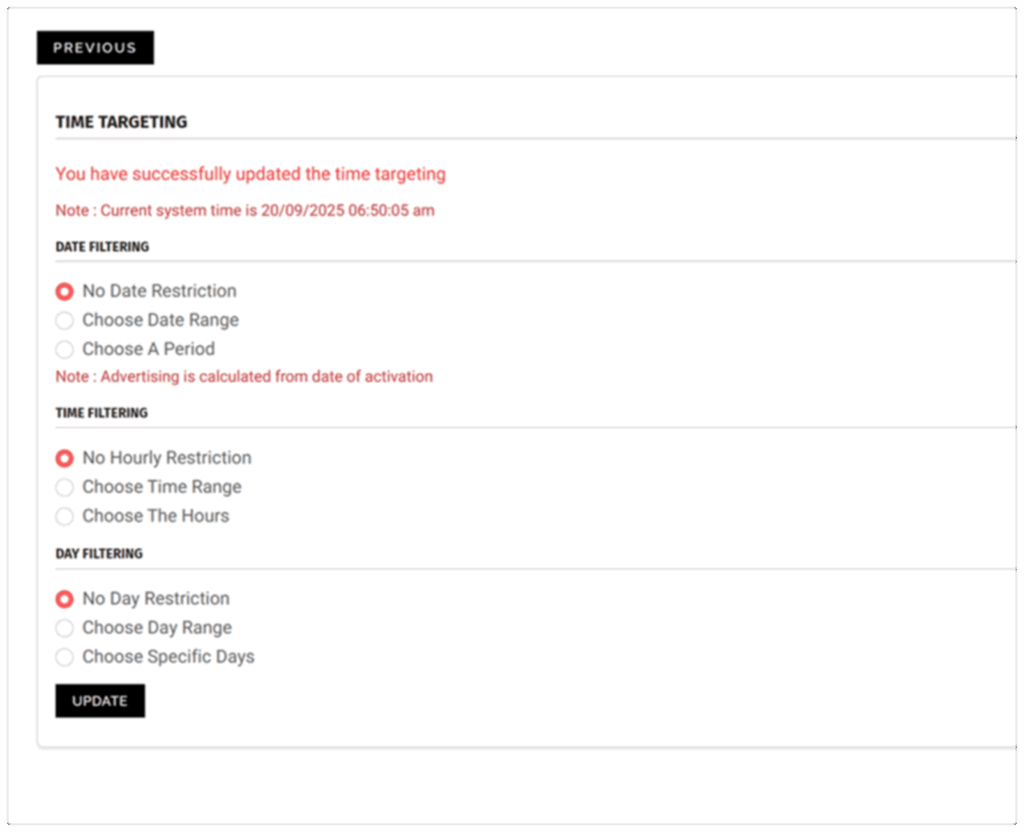
You don’t have to set a schedule at all—leaving everything blank runs your banner all day, every day, which is the best choice for most beginners. Only add a schedule when you have a clear reason, like a weekend sale, store hours, a live stream, or a time when your audience is usually online. There are three simple controls: a start/end date (when your campaign should begin and stop), hours of the day (show only during certain times), and days of the week (show only on chosen days). If you’re unsure, keep it always-on first, look at results, and later you can copy the ad and test a simple schedule (for example, evenings only) to see if it performs better.
• Use always-on when you’re new or want steady delivery—no settings needed.
• Add dates for short promos, and add hours/days only if you know your buyers are active then.
• Keep schedules simple (one or two blocks); too many tiny windows can slow delivery.
Action: Leave blank for 24/7, or set date/time/day filters if needed → Update → Next.
Step 14: Choosing Languages
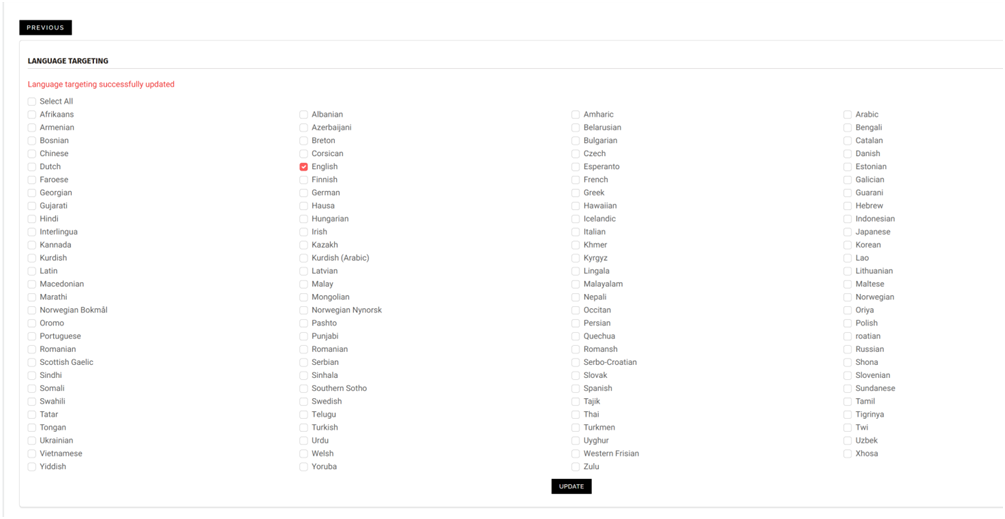
Language targeting ensures impressions appear for users whose browser language matches your creative and landing page. Create separate workflows per major language so copy, compliance, and measurement stay clean. If your destination is English-only, restrict to English; if you localize, mirror that choice in both artwork and page content. After selecting languages, click Update; the page will refresh, the ad will show as pending, and you may exit the wizard or continue refining.
- Select the browser languages that match your banner and landing page; avoid “all languages” by default.
- Keep one language per workflow when possible for simpler reporting and optimization.
- Press Update to save; confirm pending status, then adjust or publish as needed.
Action: Select language targeting → Update.
Relevant Links
- Support: https://support.snipesearch.co.uk/
- FAQ: https://adclick.snipesearch.co.uk/index.php?page=index/faq
- Contact Form: https://adclick.snipesearch.co.uk/index.php?page=user/support
Stay Connected
- Snipesocial: https://www.snipesocial.co.uk/pages/snipesearch
- Twitter: https://twitter.com/snipesearch_uk
- Facebook: https://facebook.com/snipesearch
- LinkedIn: https://linkedin.com/company/snipesearch/
- VK: https://vk.com/snipesearch_uk
- Focus: https://focus.xyz/snipesearch
- YouTube: https://youtube.com/@snipesearch
- diaspora: https://diaspora.snipesearch.net/people/7431fcf0806c013e936e00163c6e7bdf
Analytic Tools
StatCounter: https://statcounter.com/
Rommie Visitor Analytics: https://rommie.net/