Step 1: Switching to the Advertiser Dashboard
Before you can create a campaign, you must ensure you are in the correct dashboard. Beginners can get confused between the publishing dashboard and the advertiser dashboard, so let’s clear this up. The advertiser dashboard is where you control all aspects of your ads: creation, budgets, targeting, and reports. Without switching, you won’t have access to the options needed to set up campaigns. To switch, look at the top right corner of your screen, where you’ll see an icon with the first letter of your name. Click the down arrow and select “Switch to Advertiser.” This simple step ensures you are in the correct place to start building ads.
Action: Switch to advertiser dashboard.

Step 2: Accessing the Ads Menu
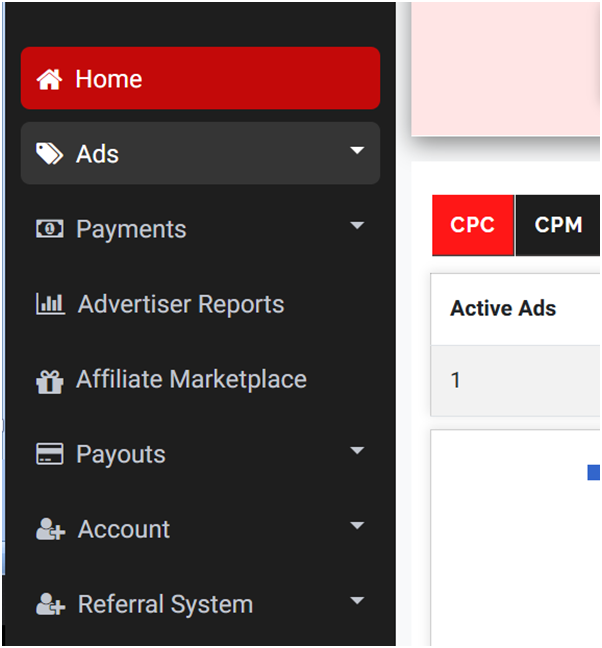
Once you’re in the advertiser dashboard, the next step is to find the tools for creating and managing ads. All advertising features are grouped under the Ads menu. This is where you will build new campaigns, edit existing ones, and track performance. For beginners, it’s helpful to think of this menu as your control hub. Every advertising action flows through here, so getting comfortable navigating this section will make the process smoother later. On the left-hand side menu, click “Ads,” and a dropdown will open.
Action: Left-hand menu → Ads.
Step 3: Choosing to Create a New Ad
With the Ads menu open, you’ll notice there are three options available: Create Ads, Manage Ads, and Ad Reports. Click “Create Ads.” This section provides a step-by-step workflow where you will set up everything from the ad type to the targeting preferences. Think of this as the starting line for your advertising journey on Snipesearch Adclicks.
Action: Ads menu → Create Ads.

Step 4: Selecting the Ad Format
When starting out, one of the first decisions is what type of ad format you want to run. Different formats serve different purposes: text ads are clean and simple, banner ads are visual, ecommerce ads are product-focused, and interstitials grab full attention. For beginners, text ads are the easiest to start with because they focus on your message and call to action. In the setup window, select “Text Ad” to keep things straightforward.
Action: Set ad format to Text Ad.
Step 5: Choosing the Pricing Structure
Now it’s time to decide how you’ll pay for your advertising. The pricing structure determines how your budget is spent and what type of performance you get in return. Options include CPC (cost per click), CPM (per thousand impressions), CPA (per action), POP (guaranteed traffic), CPV (per view), and Affiliate (per sale). Since this is a CPC tutorial, we will focus on CPC, which means you only pay when someone clicks your ad. This is beginner-friendly because it ties cost directly to results.
Action: Select CPC pricing model.
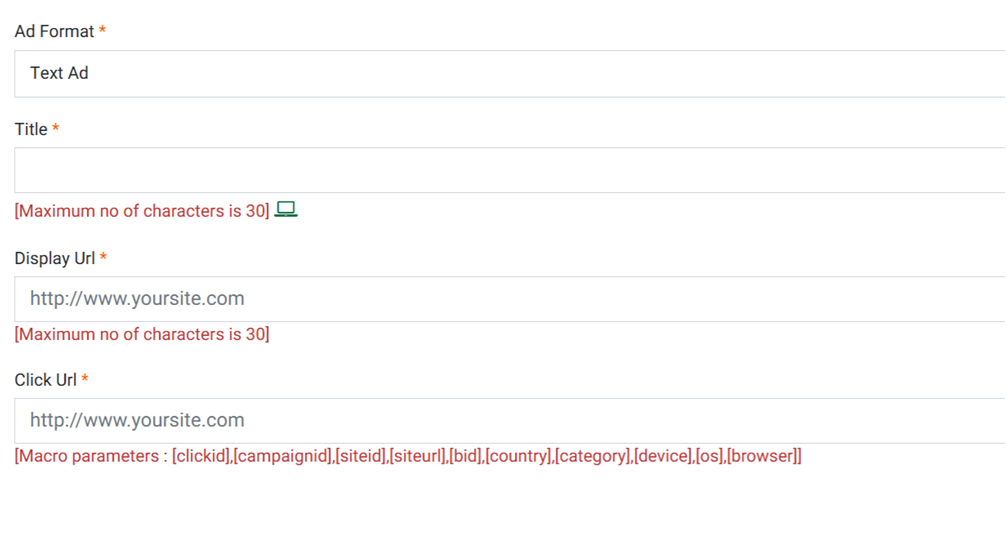
Step 6: Filling Out Basic Ad Information
This step is about giving your advert its identity. Don’t rush here, careful wording makes a huge difference. You’ll enter details such as the name of your ad, the title (up to 30 characters), a short description (up to 80 characters), display URL, call-to-action (CTA) button text, and click URL. Each field plays a role in convincing users to click. Take your time to craft these carefully. Once complete, click “Next.”
Action: Fill in Name, Title, Description, Display URL, CTA, and Click URL.
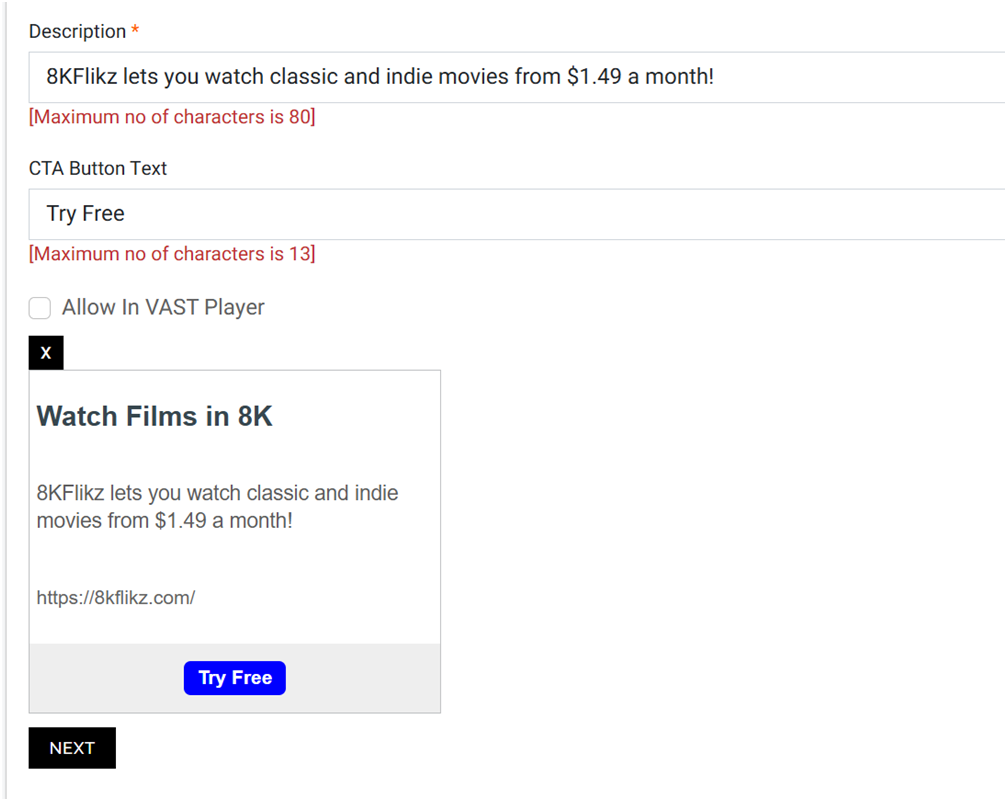
Step 7: Previewing Your Ad Example
Once your details are entered, the system will automatically generate a preview of your advert. This preview is extremely helpful because it shows you exactly how users will see your text ad in real placements. This visual confirmation allows you to spot errors, adjust text, and ensure your message looks clean and professional. The preview appears in a 300-wide box so you can check formatting before moving on.
Action: Review the generated preview.
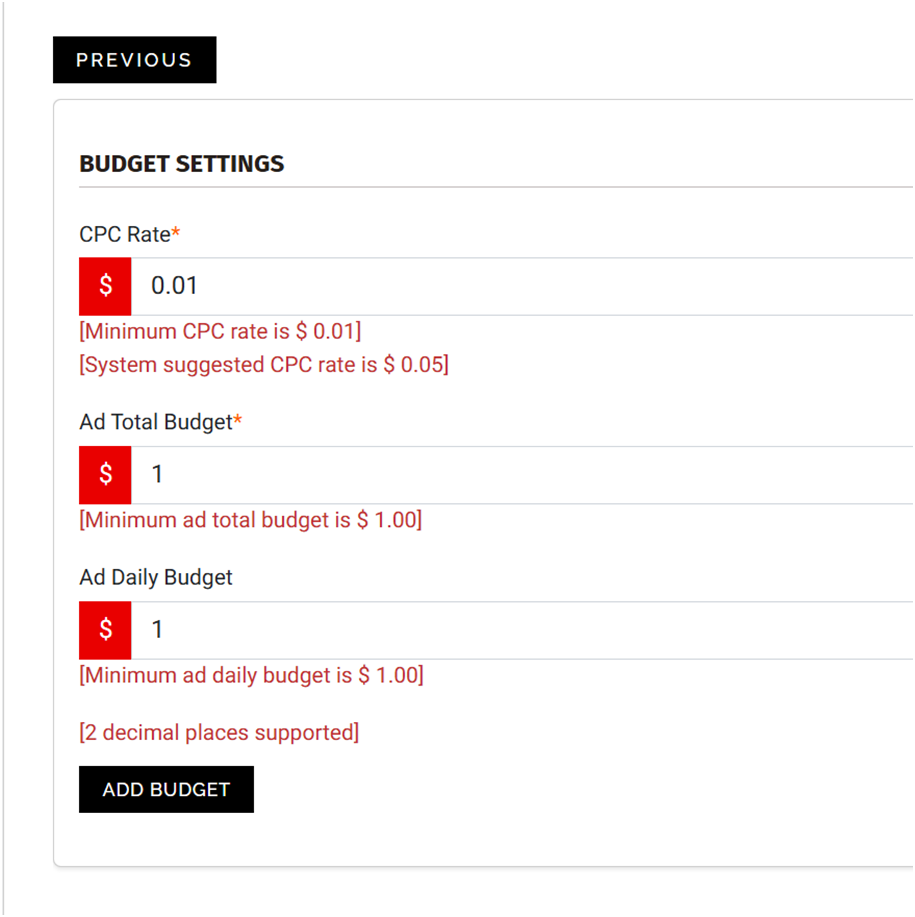
Step 8: Setting Budgets and CPC Rates
Advertising requires careful budget management. In this step, you’ll choose your CPC rate (minimum $0.01, suggested $0.05), total budget, and daily budget (minimum $1.00 each). Beginners often ask whether to spend more upfront, but it’s usually better to start with smaller amounts and scale up once you see results. The platform will guide you with suggested rates, but you can always adjust later. Click “Add Budget” to save your finances and then continue.
Action: Set CPC rate, total budget, and daily budget.
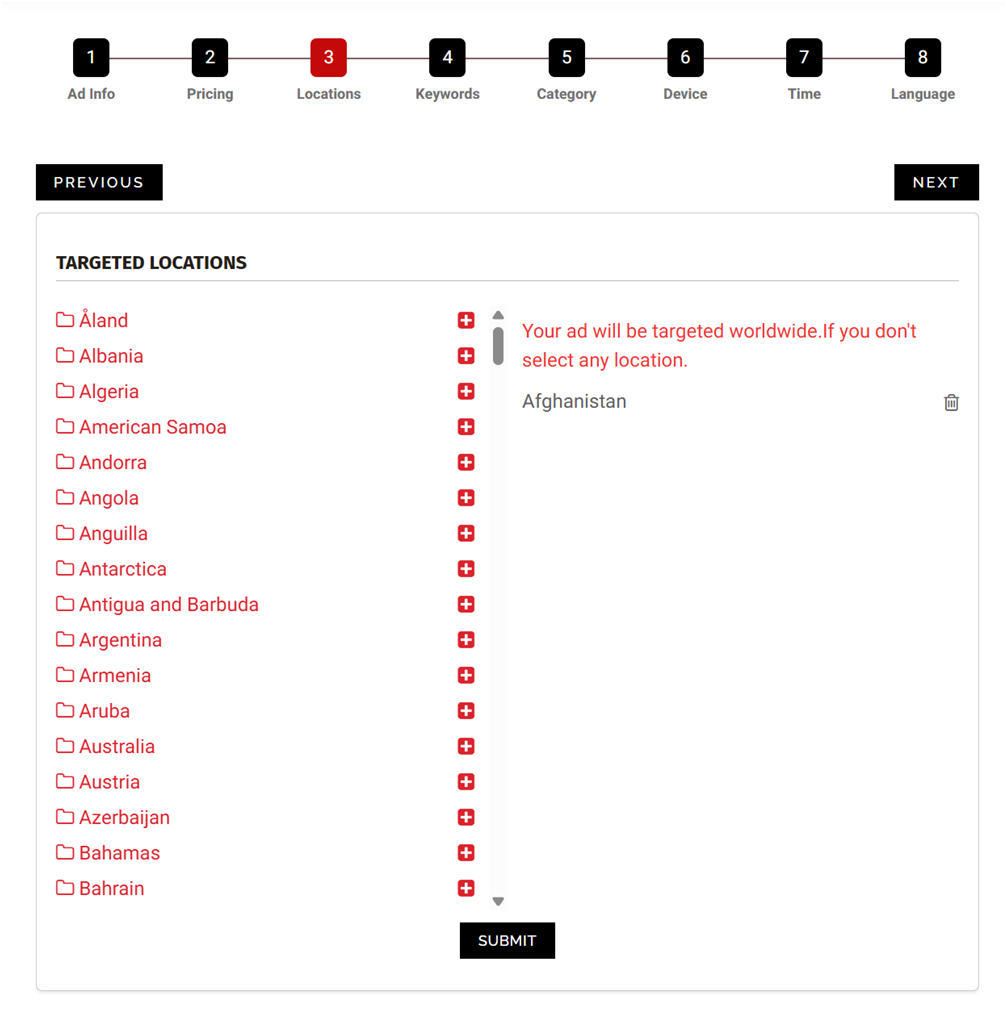
Step 9: Selecting Location Targeting
Location targeting ensures your ads reach the right audience geographically. If you’re promoting something global, you can skip detailed targeting and let ads show everywhere. But if your offer is city-specific, narrowing down will save money and improve results. Beginners often overlook this, but refining your reach can be the difference between wasted clicks and conversions. Use the plus symbol to add countries or regions, then submit to confirm before continuing.
Action: Choose location targeting → Submit.
Step 10: Adding Keywords
Keywords decide where your ads show. Without keywords, your ad runs on the network generally (called RON: run of network). While this brings traffic, it’s often unfocused. You are encouraged to add keywords because they help match your ad to what people are actually looking for. Enter 20–250 comma-separated phrases that describe your offer, then click “Add Keyword” and continue.
Action: Enter keywords → Add Keyword → Next.

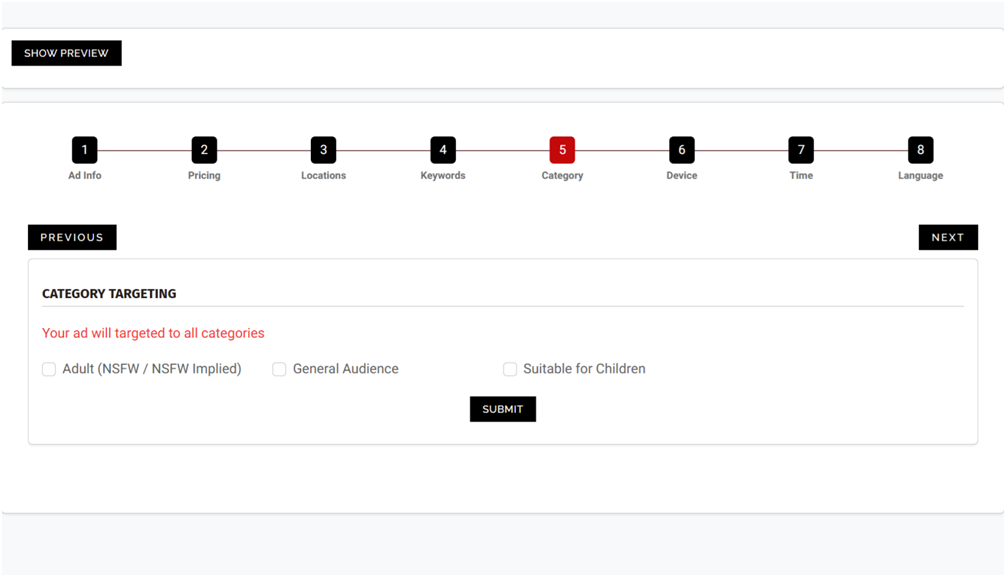
Step 11: Selecting Categories
Categories allow you to tell the platform what type of content your ad fits best with. This ensures relevance and compliance. Think of categories as broad themes. An adult offer goes in NSFW, a kids’ product in “Suitable for Children,” and a car repair video in “General Audience.” Select all that apply, click submit, and continue.
Action: Select relevant categories → Submit → Next.
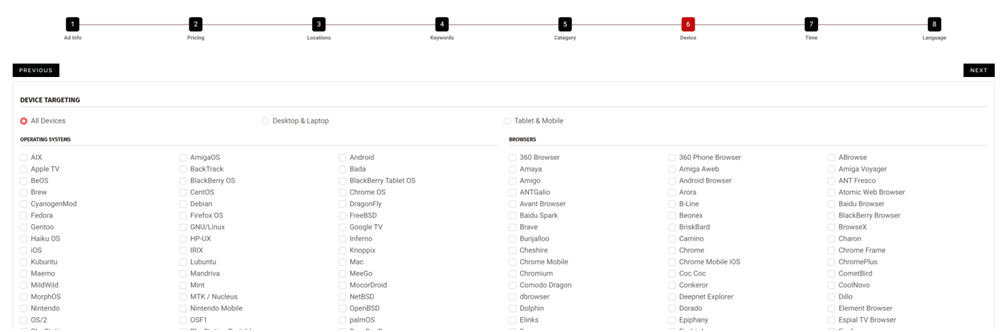
Step 12: Device and Browser Targeting
Device and browser targeting on Snipesearch Adclicks is exceptionally precise compared to any other ad network. Every campaign can be refined to show ads by exact device types, operating systems, and even specific browsers. This level of control allows advertisers to ensure that every click is highly relevant, reducing wasted spend. Beginners may find the long list intimidating, but it’s what sets Snipesearch apart — whether you want to target mobile Chrome users, exclude desktops, or run broad campaigns, the system adapts with unmatched precision. For example if you wanted to target firefox on the specific ubuntu variant “lubuntu” you could.
Action: Select devices and browsers → Update → Next.
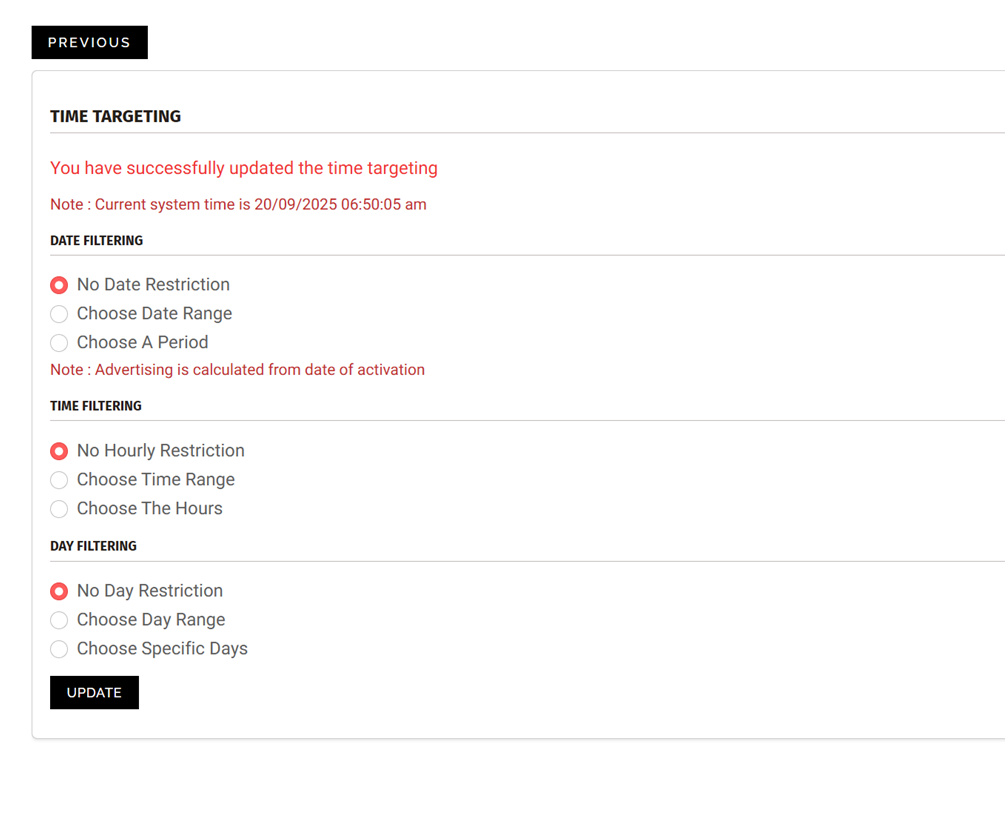
Step 13: Time Targeting
Time Targeting gives you unmatched control over exactly when your ads appear, ensuring your campaign reaches your audience at the most effective moments. This is crucial for businesses that can only respond to clicks during certain hours, for time-sensitive promotions, flash sales, or limited-time offers. Beginners might overlook this, but mastering it ensures every dollar is spent efficiently. The system allows you to precisely schedule ads by Date, Time, and Day, so you can fully customize when your campaign is active.
- Date Filtering: You can choose No Date Restriction, which allows your ad to run indefinitely starting from activation, or you can select a Specific Date Range to target a campaign only for certain days or months. For example, if you’re running a holiday promotion, you can limit the ad to the exact dates of that campaign, ensuring no budget is wasted outside of the promotion period.
- Time Filtering: You can set No Hourly Restriction for ads that run all day, or choose a specific Time Range to show ads only during particular hours. This is ideal for businesses that want traffic when staff are available to respond or when peak user activity occurs. For instance, a restaurant can show ads only during lunchtime and dinner hours to capture high-conversion traffic.
- Day Filtering: This allows you to either run ads Every Day, select a Range of Days, or pick Specific Days individually. For example, if your offer is only valid on weekdays, you can exclude weekends, ensuring that ad impressions are aligned with when your service or product is available.
If you want your ad to run non-stop, simply leave all fields blank and proceed. Once your filters are configured, click Update and then Next. This level of scheduling precision ensures your campaign only runs at optimal times, maximizing engagement while reducing wasted impressions.
Action: Set date, time, or day targeting → Update → Next.
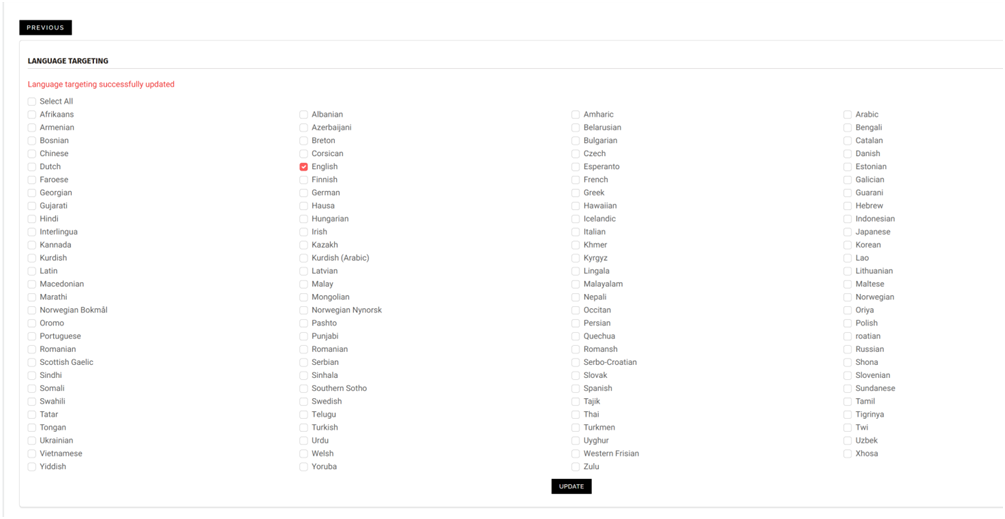
Step 14: Choosing Languages
Language Targeting ensures that your ads are shown in the language your audience understands, which dramatically improves engagement and click-through rates. For beginners, it’s important to know that creating separate ads for each language is often more effective than trying to cover multiple languages in one ad. You can select one or multiple languages depending on your campaign goals.
When you click Update, a confirmation message saying “Language targeting successfully updated” will appear at the top of the page. Your ad is now live, but you will remain on the same setup page. From here, you have several options: click Preview Ad at the top to see how your ad looks, navigate back to any of the previous steps to refine settings, or simply leave the page knowing your changes are saved. This setup ensures that beginners won’t lose progress and can comfortably make adjustments without confusion.
Action: Select languages → Update.
Relevant Links
Support: https://support.snipesearch.co.uk/
FAQ: https://adclick.snipesearch.co.uk/index.php?page=index/faq
Contact Form: https://adclick.snipesearch.co.uk/index.php?page=user/support
Stay Connected:
Snipesocial: https://www.snipesocial.co.uk/pages/snipesearch
Twitter: https://twitter.com/snipesearch_uk
Facebook: https://facebook.com/snipesearch
LinkedIn: https://linkedin.com/company/snipesearch/
YouTube: https://youtube.com/@snipesearch
Rommie Visitor Analytics: https://rommie.net/
StatCounter: https://statcounter.com/