
Cost-per-action advertising is powerful but requires precision. With Snipesearch Adclicks, you’re working in an ecosystem that balances transparency, manual review, and self-service tools. Below is the full expanded walkthrough of how to run CPA text campaigns in 2025.
Step 1: Switching to the Advertiser Dashboard
Before you even think about budgets or targeting, you need to be sure you’re in the Advertiser Dashboard. Many beginners start out as publishers because they’re looking to monetize content first, but CPA campaigns live on the advertiser side of the platform.
Here’s what you’ll see:
- In the top-right corner, there’s a circle or square with the first letter of your username.
- Click the down arrow beside it.
- Choose Switch to Advertiser.
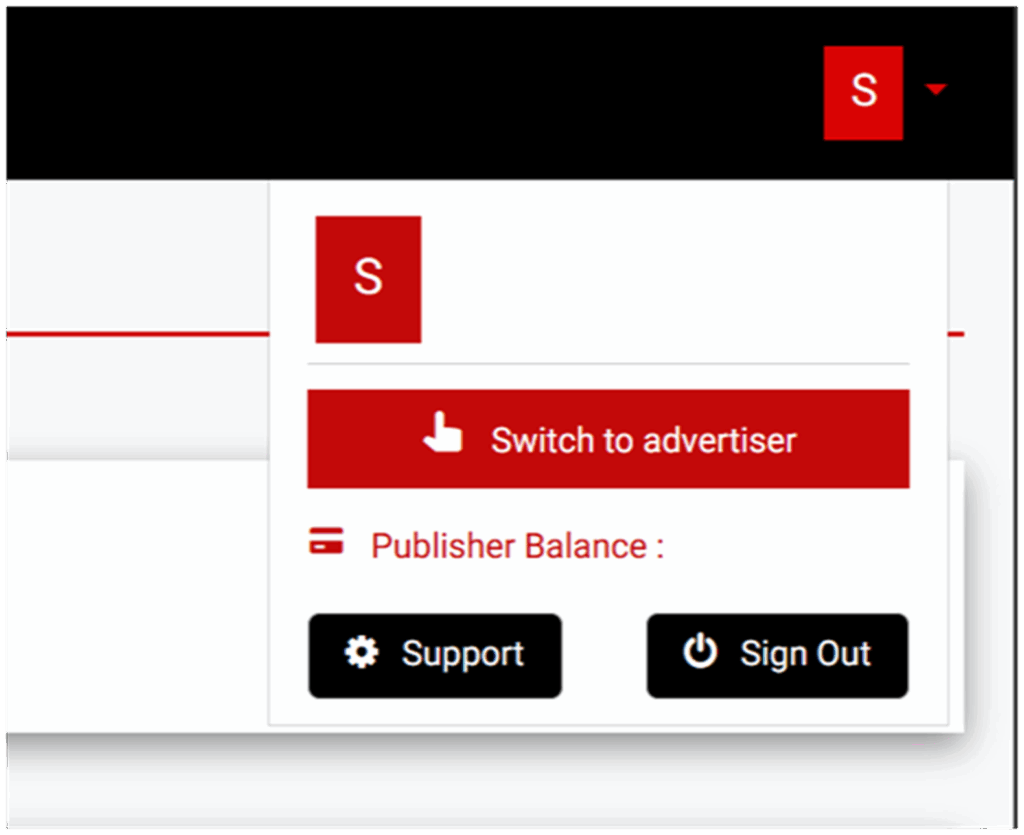
Pro Tip: If you’re both a publisher and advertiser, it’s smart to bookmark both dashboards in your browser. That way you can jump between them with one click instead of manually switching every time.
Action: Switch to advertiser dashboard before proceeding.
Step 2: Accessing the Ads Menu
Now that you’re in the right dashboard, head to the left-hand navigation panel and click Ads.
This section is where the real work happens. From here, you can:
- Launch new campaigns (CPA, CPC, CPM).
- Review active and paused ads.
- Access detailed reports on performance.
- Duplicate past campaigns as templates for new ones.
Why it matters:
The Ads menu acts as your control center. Think of it like a cockpit — every switch, knob, and lever you need to fly your campaign is here. If you get used to its structure early, you’ll avoid confusion later.
Action: Navigate left-hand menu → Ads.
Step 3: Creating a New Ad
Inside the Ads menu, click Create Ads. This launches the guided campaign builder.
You’ll now be asked to set up everything from ad format to targeting, budgets, and tracking codes. The workflow is designed step by step, but don’t rush it — every field here determines how your CPA campaign performs.

Why it matters:
CPA campaigns require more careful preparation than CPM or CPC because you only pay for conversions. That sounds safe, but poorly configured ads may never convert, and you’ll sit scratching your head wondering why. The “Create Ads” section is where you build the structure that decides success or failure.
Action: Ads menu → Create Ads.
Step 4: Selecting the Ad Format
Snipesearch Adclicks offers multiple ad formats:
- Text Ads – Short, keyword-driven ads.
- Banner Ads – Visual creatives.
- Popup Ads – Full attention grabbers.
- Video Ads – Ideal for longer engagement.
- Ecommerce Ads – Showcase products directly.
- Popup Ads – Raw Traffic
- Affiliate Ads – Network Growth
For this guide, we’re focusing on CPA text ads. Why? Because they’re the most straightforward to test and scale for performance-based marketing.
Why text ads work for CPA:
- They’re intent-based. Users searching for “download free antivirus” or “sign up for yoga classes” are already primed.
- They blend naturally into search and content, avoiding “banner blindness.”
- They let you test multiple variations quickly without needing graphic designers.
Example:
- Title: Start Your Free Trial Today
- Description: No credit card required. Sign up now and get instant access.
- Display URL: yourwebsite.com
Action: Select Text Ads as your format.
Step 5: Choosing the Pricing Model (CPA Deep Dive)
This is where you define how money flows in your campaign. Snipesearch supports multiple payment models, but here you must select CPA (Cost Per Action).
What CPA means in practice:
- You don’t pay for views (like CPM).
- You don’t pay for clicks (like CPC).
- You only pay when the user completes the desired action.
Examples of “actions”:
- Filling out a lead generation form.
- Signing up for an account.
- Subscribing to a newsletter.
- Completing a purchase.
- Installing software or an app.
Why CPA is harder but more rewarding:
- Harder: Conversions require persuasive copy, optimized landing pages, and correct tracking setup.
- Rewarding: ROI is measurable because every dollar spent = a real outcome.
Minimums on Snipesearch:
- CPA rate starts at $0.05/action.
- Minimum campaign budget is $5 USD.
Action: Select CPA model, define your target action, set starting bid.
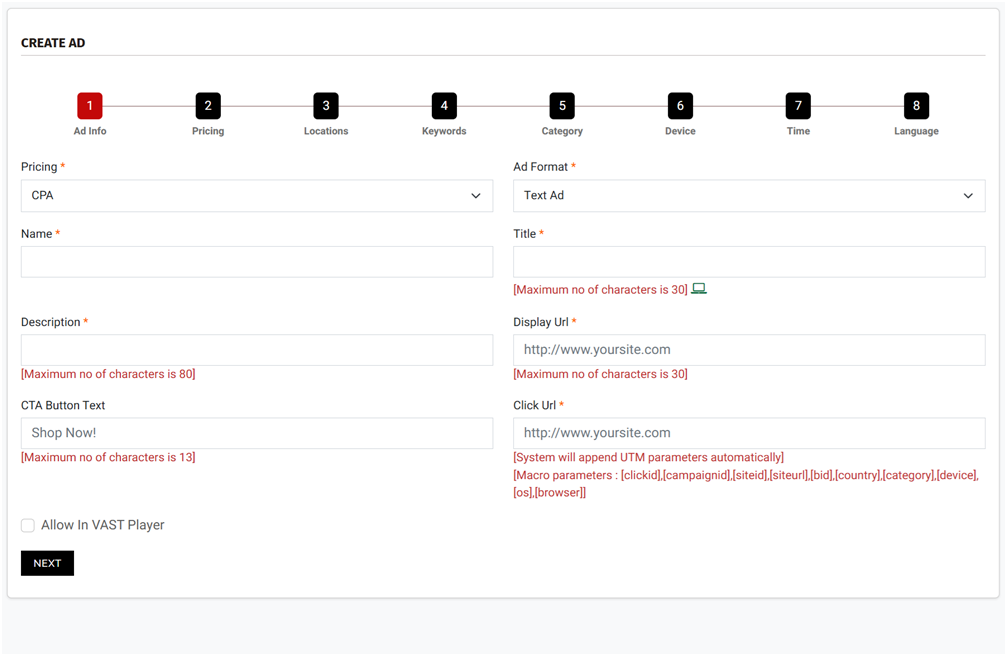
Step 6: Filling Out Basic Ad Information
This stage defines the public face of your campaign. The campaign name is for your records only, but it’s best to make it descriptive so you can distinguish it easily later. Titles and descriptions are limited in character length and need to be sharp, clear, and appealing because this is what users see first. The display URL should look clean and trustworthy while the destination click URL must be a working page that matches the promise of your ad. If there’s a mismatch, users will lose trust and conversions will collapse. The CTA button text is your final chance to guide action and should match the tone of your offer. If your campaign is designed for a media site with VAST enabled, remember to allow this setting so your ad can also run in compatible placements.
- Campaign Name
- Title (30 characters max)
- Description (80 characters max)
- Display URL
- Destination Click URL
- CTA Button Text
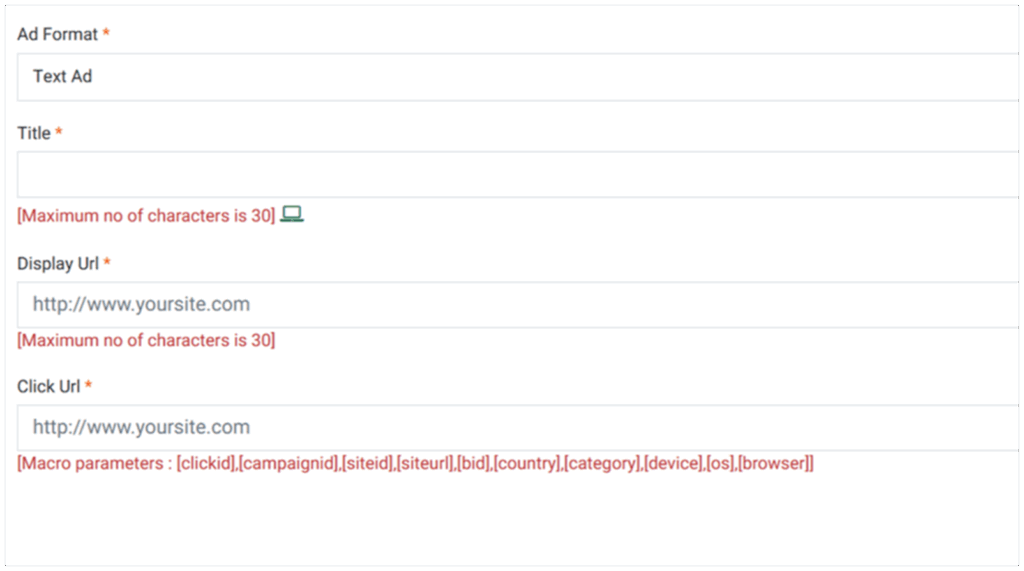
Action: Fill in all ad details carefully and save.
Step 7: Previewing Your Ad Example
Once the information is filled in, the system generates a live preview of your text ad. This step is not optional; it is the checkpoint that ensures everything appears as you expect. The preview shows how the ad will render in standard placements, and if VAST is enabled you can see how it fits in video-supported environments. This is your chance to confirm that nothing is cut off, that the call-to-action is visible, and that the display URL looks professional. Skipping this review risks pushing out an ad that confuses or repels users. Always pause here, check alignment and flow, and if possible, share the preview with a colleague before moving forward.
Action: Review the preview carefully and click Next.
Step 8: Setting Budgets and CPA Rates
Budgets and CPA bids control the pace and reach of your campaign. Snipesearch Adclicks enforces a minimum CPA rate of $0.05 per action and a minimum campaign budget of $5 USD, which ensures campaigns are viable for both advertisers and publishers. In practice, you should consider your CPA rate not as a cost but as a ceiling on what you’re willing to pay for a successful conversion. Setting this rate too low will result in little to no delivery, while setting it too high without monitoring can exhaust your funds quickly. Daily caps are especially useful in CPA campaigns, because they allow you to gather performance data in controlled amounts instead of risking the entire budget at once. Starting with a modest but competitive bid and scaling once you see consistent conversions is usually the safest approach.
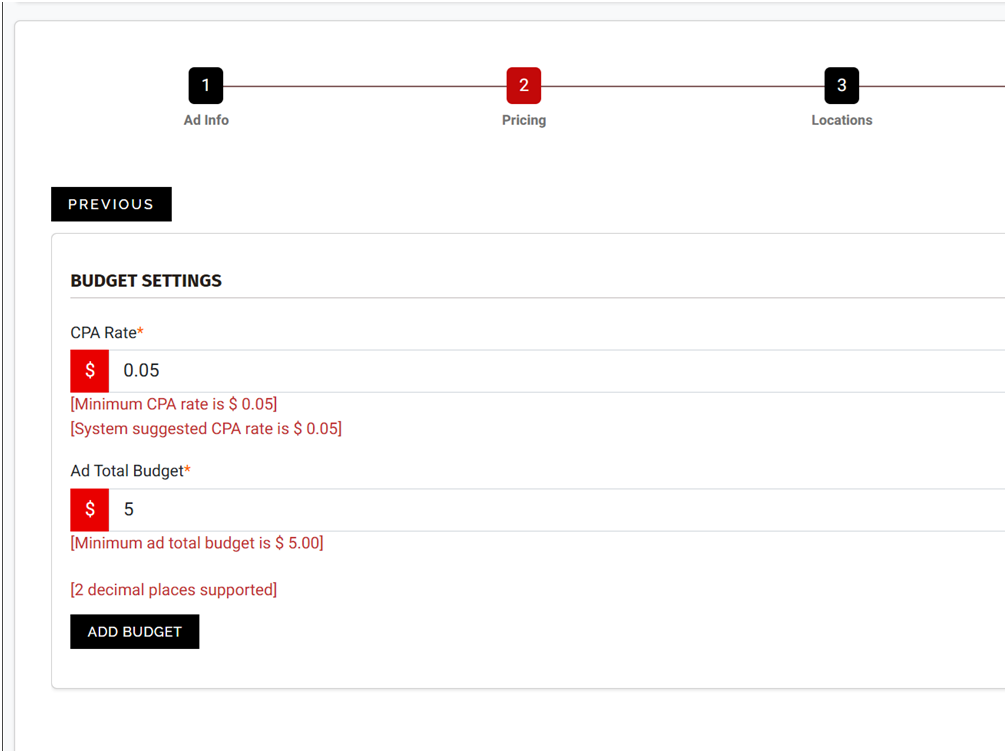
Action: Define your CPA rate, set total budget and daily budget → Add Budget → Next.
Step 9: Selecting Location Targeting
Relevance is everything in CPA campaigns. If you serve ads in countries or regions where your offer is not available or not legally valid, every impression is wasted. Location targeting in Snipesearch Adclicks allows you to specify exactly where your ads should appear, whether that is globally or restricted to particular countries, cities, or regions. A common beginner’s mistake is forgetting to click the submit button before moving on, which results in the campaign defaulting to global targeting and burning budget on irrelevant traffic. For advertisers, it is always better to start narrow with a single region, test how your offer performs, and then expand coverage once you know the funnel is solid. This reduces wasted spend and improves your data quality from the start.
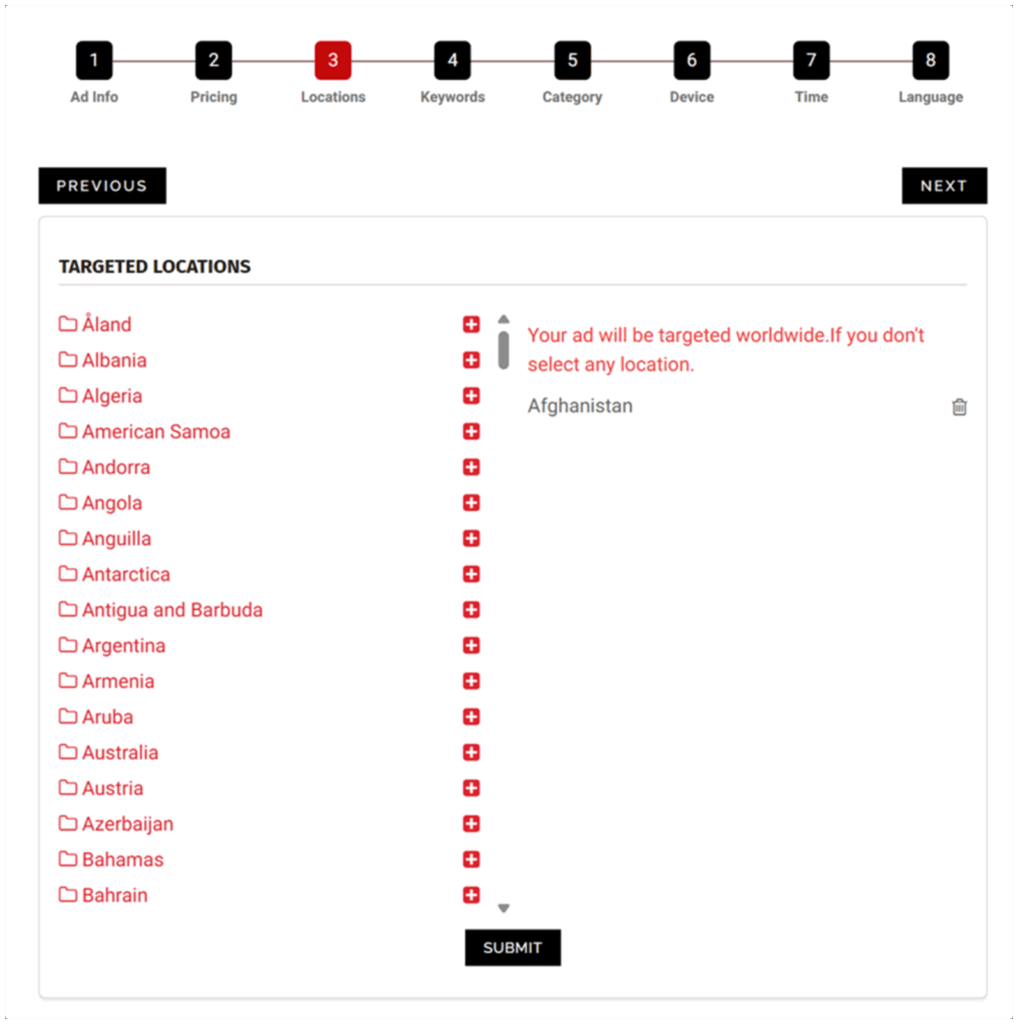
Action: Choose your target locations → Submit → Next.
Step 10: Adding Keywords
Keywords are the backbone of targeting in text-based CPA campaigns. They dictate when and where your ad appears by aligning with user intent. Without keywords, your campaign defaults to run of network placement, which may generate broad impressions but little meaningful action. With carefully chosen keywords, you match your ads to people actively searching for what you provide. Snipesearch allows between 20 and 250 keywords, which means you can cast a wide net while still remaining specific. Long-tail phrases tend to perform better in CPA because they capture intent more directly. For example, a user searching “download calorie tracker app free” is more likely to convert than someone searching “fitness.” Another common mistake is typing in a list of keywords and moving on without hitting the add keyword button, which means none of them are actually saved.
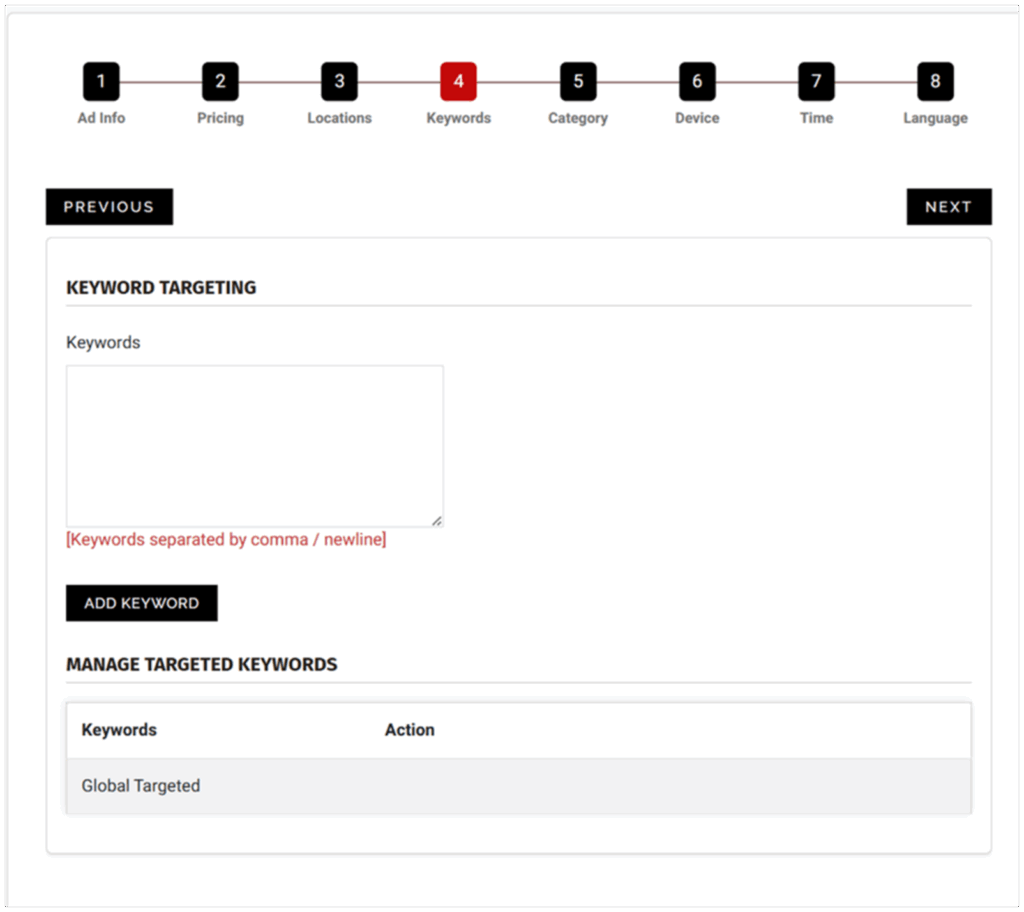
Action: Enter 20–250 relevant keywords → Add Keyword → Next.
Step 11: Selecting Categories
Every campaign on Snipesearch Adclicks must be placed in one of three categories: Adult (NSFW / NSFW Implied), General Audience, or Suitable for Children. This system may feel simple compared to other platforms, but its simplicity is intentional. The review team checks every submission manually, and clear category rules reduce errors and disputes. Selecting the right category is not optional; it directly affects whether your campaign is approved, where it appears, and who can see it.
If your offer contains sexual content, explicit imagery, or even strong adult themes implied through language, you must select Adult. This ensures your ads only appear where they are permitted and protects your account from compliance issues. If your ad or landing page is specifically designed for children, such as toys, games, or educational material for under-13 audiences, you must select Suitable for Children, which applies stricter rules and filters. The vast majority of campaigns will fall under General Audience, which is the default for mainstream content such as blogs, products, news, or software.
A practical rule to follow is that if even part of your content leans toward adult or child-directed, isolate that with a separate adcode or campaign. Labeling it correctly for that placement avoids putting your entire site in the wrong category. Incorrect classification slows approval and can lead to disapprovals. Getting it right the first time ensures your campaign goes live quickly and serves to the intended audience.

Action: Select the correct category → Submit → Next.
Step 12: Device and Browser Targeting
Device and browser targeting is one of the most powerful tools in the Adclicks system. Most networks stop at “mobile versus desktop,” but here you can refine by operating system, browser, and even specific distributions. This level of detail matters in CPA campaigns because every conversion attempt has to start with an eligible user. Serving ads for an iOS-only app to Android users wastes impressions and delivers no actions.
For advertisers, the key is to think about compatibility and audience behavior. If you are promoting a Chrome extension, then showing your ad to Safari or Edge users makes no sense. Similarly, if your service only works on Windows, targeting Linux adds no value. By narrowing down to only the devices and browsers that support your offer, you ensure every impression has the chance to convert.
This targeting feature also works as a testing tool. You can run two versions of the same ad, one restricted to iOS Safari and another to Android Chrome, then compare conversion rates to decide where to focus budget. The important thing to remember is that once you set these filters, you must hit update before moving to the next screen. If you forget, the system will assume you want to target all devices and browsers, which can dilute results.
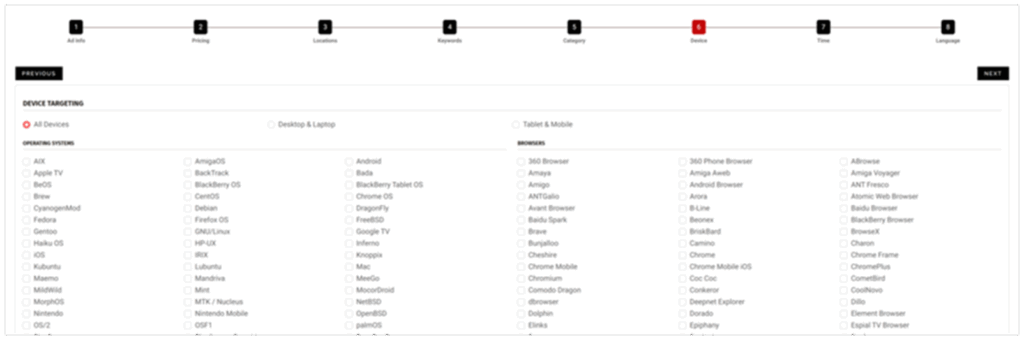
Action: Select your target devices and browsers → Update → Next.
Step 13: Time Targeting
Time targeting ensures your ads run when they are most effective. In CPA campaigns, this matters more than in CPM or CPC because conversions are tied to user readiness. If your business operates during the day, then late-night impressions will rarely translate into completed actions.
The platform gives you three levels of control. Date targeting lets you schedule campaigns for a fixed period, such as during a holiday promotion. Time targeting narrows delivery to specific hours in the day. Day targeting allows you to include or exclude certain weekdays. Combining these filters produces highly efficient schedules. For example, a CPA campaign for a restaurant voucher could run only on Thursdays and Fridays, from 10 a.m. to 7 p.m., during the month before a special event.
Precision here avoids wasted spend and aligns your ads with user behavior. If you want your campaign to run without restriction, you can leave the fields blank and continue. As with device targeting, you must click update before hitting next or your filters will not apply.

Action: Set date, time, and day filters as needed → Update → Next.
Step 14: Choosing Languages
Language targeting ensures your ads are served to users who can actually understand them. This is particularly important for CPA, where conversion depends on comprehension of the offer and the landing page. Running an English-only signup form to non-English speakers lowers success rates drastically.
When setting this option, it is better to create separate campaigns for each major language rather than grouping them. This way, you can tailor copy to the audience, compare performance, and refine bids. Once you select the languages, the system will confirm your update, and you can either continue to preview the ad in its final form or go back to refine earlier details.
After confirming your languages with Update, the campaign is fully saved. The system does not advance you automatically since this is the last page. You may stay here to refine your targeting further, pressing Update each time you adjust, or leave the builder once your settings are complete.
Action: Select language targeting → Update.
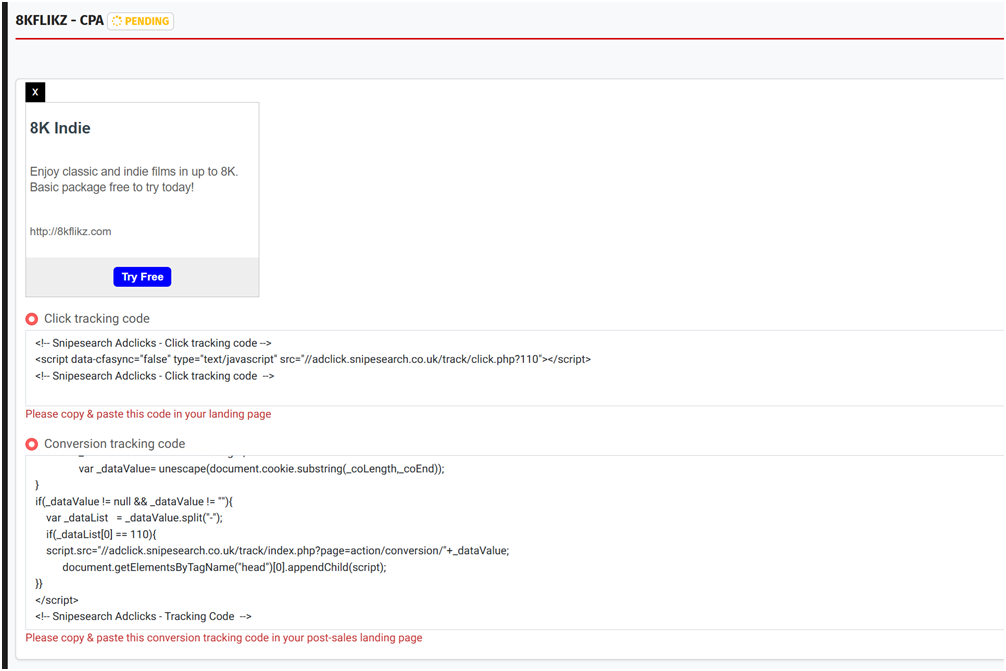
Step 15: Installing the Tracking Code
No CPA campaign can function without proper tracking. At the top of your campaign setup page, you will see two pieces of code: a click tracking code and a conversion tracking code. The click tracking code must be placed in your site’s header so that every visitor interaction is recorded. The conversion tracking code must be placed on the confirmation or thank-you page after the action you are paying for is complete.
These codes are how the system verifies that your conversions are real. If they are not installed or working correctly, the campaign will be declined at approval or paused later if no conversions are tracked within 30 days despite recorded clicks. It is essential that you or your developer add these snippets within 72 hours of submitting your ad.
A campaign without tracking is blind. You cannot optimize if you do not know which keywords, devices, or time slots are producing results. Worse, without conversion tracking, the system cannot charge correctly, and your campaign may be blocked entirely. Installing the code once takes only a few minutes but ensures your CPA efforts are measurable and scalable.
Action: Install click tracking code in header and conversion code on confirmation page while awaiting approval
Relevant Links
Support: https://support.snipesearch.co.uk/
FAQ: https://adclick.snipesearch.co.uk/index.php?page=index/faq
Contact Form: https://adclick.snipesearch.co.uk/index.php?page=user/support
Stay Connected:
Snipesocial: https://www.snipesocial.co.uk/pages/snipesearch
Twitter: https://twitter.com/snipesearch_uk
Facebook: https://facebook.com/snipesearch
LinkedIn: https://linkedin.com/company/snipesearch/
YouTube: https://youtube.com/@snipesearch
Rommie Visitor Analytics: https://rommie.net/
StatCounter: https://statcounter.com/