
Banner advertising remains one of the clearest and most measurable ways to attract visitors and brand awareness online. When paired with a cost-per-click (CPC) model, banners shift from a passive branding tool into an active traffic driver—you pay only when someone is genuinely interested enough to click through to your site. Snipesearch Adclicks brings this logic into a self-serve environment where advertisers can design, target, and monitor campaigns with precision.
CPC Banner Ads appear across search surfaces, partner sites, and approved social placements within the Snipesearch ecosystem. Each click represents a verified engagement, tracked and billed transparently in real time. Instead of paying for views that may or may not lead to interaction, CPC keeps spend tied directly to audience response, allowing you to control exposure, pacing, and conversion quality from day one.
Supported banner sizes include 1000×100, 980×300, 970×90, 728×90, 468×60, 380×220, 336×320, 336×280, 320×100, 320×50, 300×50, 300×250, 300×600, 250×250, 200×200, 160×600, and 120×600. These options ensure your creative can fit neatly across mobile, tablet, and desktop inventory without distortion.
Step 1: Switching to the Advertiser Dashboard
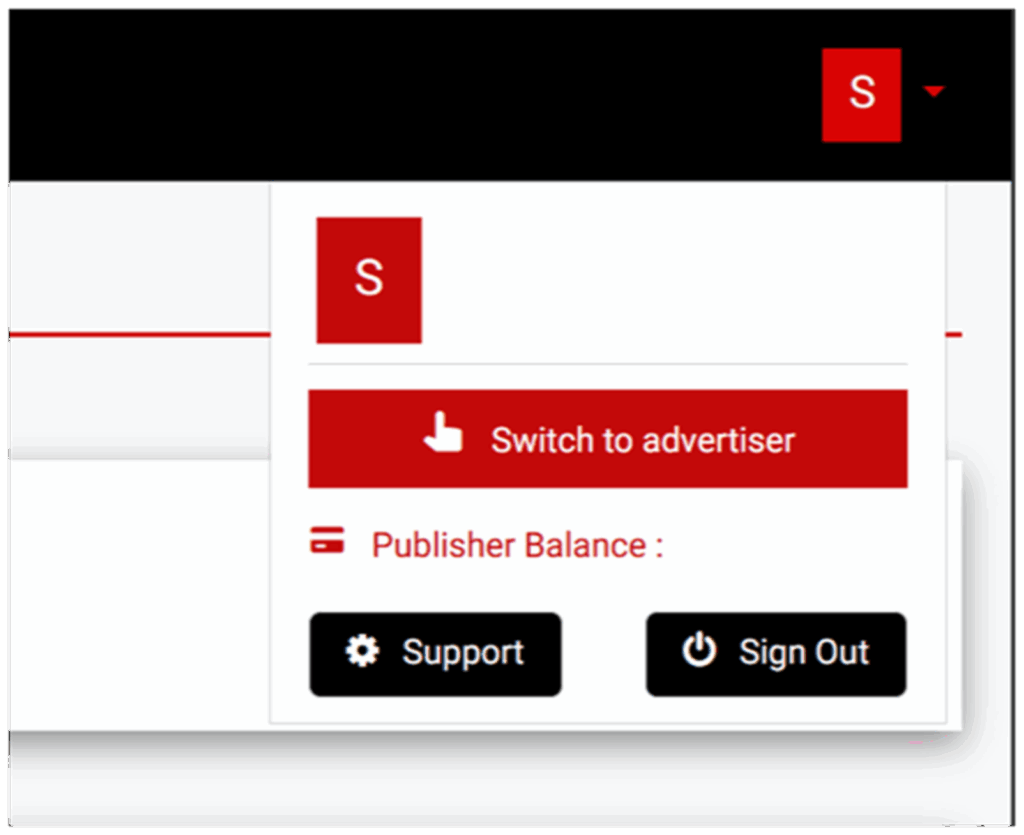
Every CPC Banner campaign begins from the advertiser side of your Snipesearch Adclicks account. This view contains all tools for campaign creation, budgeting, and analytics. If your profile is still set as a publisher, you’ll only see placement options and revenue statistics—not the modules for building ads. Before making any edits or uploads, confirm that you’re inside the advertiser dashboard.
Once logged in, open your profile icon in the top-right corner of the interface. Choose “Switch to Advertiser.” The page will refresh, and you’ll notice the header and sidebar update to show advertiser-specific menus—Ads, Reports, Billing, and Tools. That’s the correct workspace for everything related to banner creation and performance tracking.
If you manage both roles under the same account, it’s good practice to check your active view each time you return to Adclicks. Editing from the wrong role can cause settings to apply to placements instead of campaigns, which might delay ad approval or cause data to record incorrectly.
• Click your profile icon and select “Switch to Advertiser.”
• Ensure the navigation displays Ads, Reports, Billing, and Tools.
• Confirm you’re not still viewing publisher data before continuing.
Action: Switch to the advertiser dashboard before building your first CPC Banner campaign.
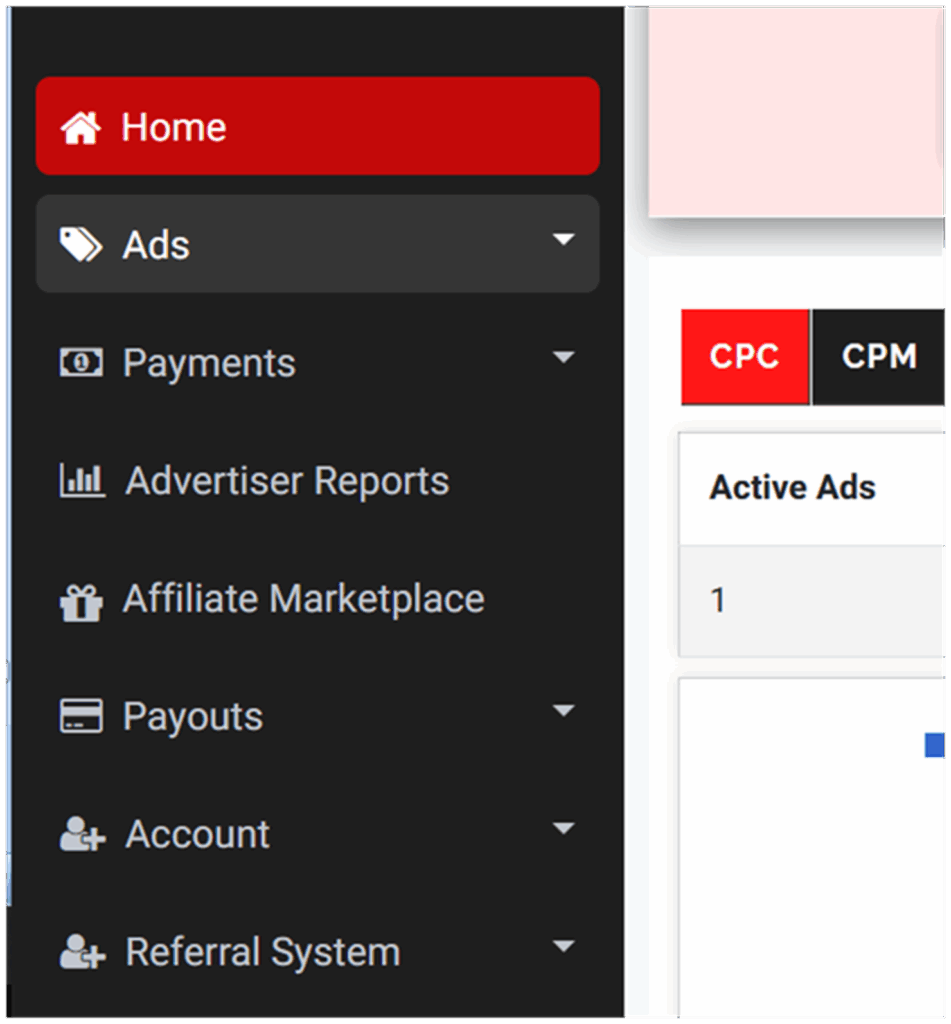
Step 2: Accessing the Ads Menu

All CPC Banner activity starts from the Ads section in the left-hand navigation. This is where every advertising function—creating, managing, and reporting—resides. The menu doesn’t take you to a new page; it simply expands to show the available tools in place, allowing you to work quickly without reloading the interface.
Click Ads on the left-hand side. The menu will expand immediately beneath it, displaying Create Ads, Manage Ads, and Ad Reports. These three options form the core workflow for CPC banners: Create Ads opens the builder used to launch new campaigns, Manage Ads lets you review and adjust existing ones, and Ad Reports provides performance summaries for analysis and optimisation.
Using this menu keeps navigation simple—you can move between creation, adjustment, and reporting without ever leaving your main dashboard view.
• Click Ads on the left-hand menu to expand the advertising options.
• Choose Create Ads, Manage Ads, or Ad Reports to continue your work.
• Use the same expanded menu whenever you need to switch between campaign tasks.
Action: Left-hand menu → Ads (expand) → select Create Ads / Manage Ads / Ad Reports.
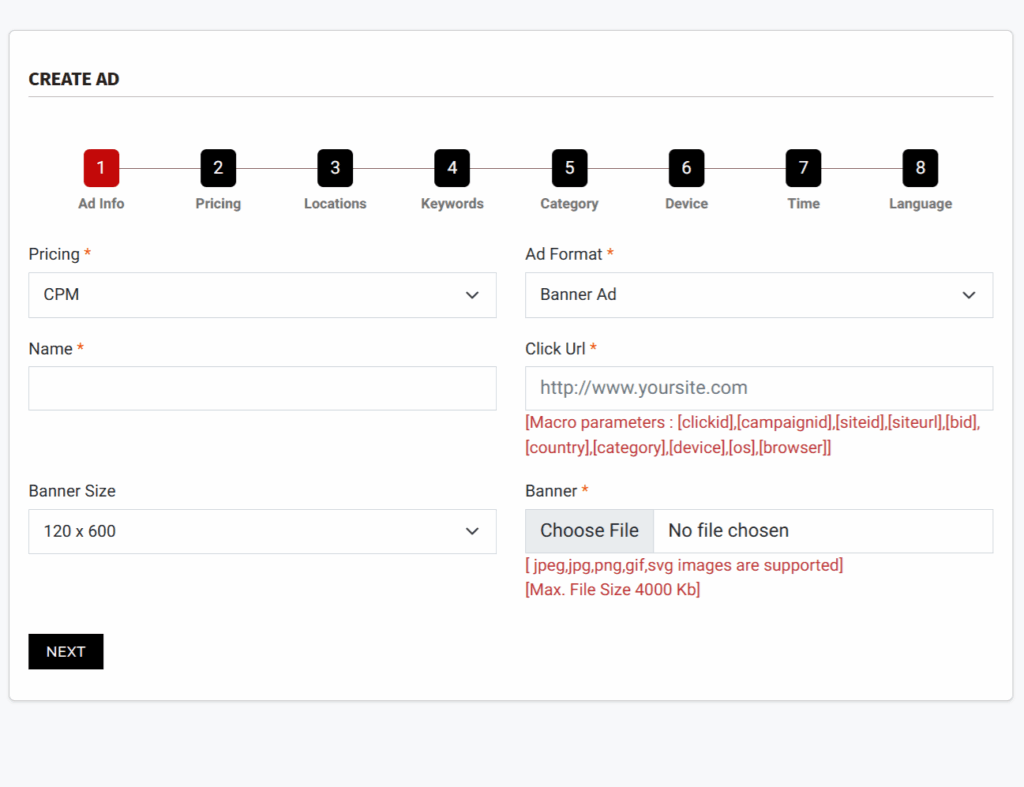
Step 3: Creating a New Ad
Select Create Ads to begin the guided builder. The process follows a logical flow—choose format, select pricing model, upload artwork, define your destination URL, allocate budget, and set targeting. Each step influences not just where your banners appear but also how efficiently the system bids on your behalf and how accurately results map to your analytics.
Think of this stage as calibration, not simple data entry. A few careful decisions here—such as naming structure, banner dimensions, and URL tagging—will make later optimisation effortless. The clearer the setup, the cleaner your performance data will be when evaluating cost-per-click, conversion rate, or return on ad spend.
• From the Ads menu, click Create Ads to launch the guided setup.
Action: Ads → Create Ads → follow the builder to begin your CPC Banner campaign.
Step 4: Selecting the Ad Format
Choose Banner as your format. On Snipesearch Adclicks, banners are image-based placements shown across search results, partner websites, and social inventory where display units are supported. In a CPC (cost-per-click) model, you’re paying only for genuine interest—each click represents a user choosing to visit your destination page. This gives full control over spend and allows you to focus on engagement rather than impressions alone.
Visuals carry most of the work here. A strong image, clear logo, and short headline can build familiarity across multiple exposures. Text should stay minimal—just enough to make the offer obvious—because a CPC banner’s real task is to earn a click, not explain everything. Keep creative messages aligned with your landing page so the visitor’s experience feels continuous from banner to destination.
Snipesearch Adclicks, supports these standard sizes: 1000×100, 980×300, 970×90, 728×90, 468×60, 380×220, 336×320, 336×280, 320×100, 320×50, 300×50, 300×250, 300×600, 250×250, 200×200, 160×600, and 120×600. Use these specifications exactly—images that don’t match the stated dimensions may display incorrectly or be rejected during review.
Keep file sizes lean so banners load instantly. The system counts an impression only once an ad fully renders, so fast-loading creatives increase your measurable visibility. Avoid the temptation to reuse text-based CPA or search ads; instead, communicate visually and let your landing page handle detail and persuasion.
• Select Banner Ads as your format, preparing at least one mobile and one desktop version for full coverage.
• Use clean, simple visuals with one core message that matches your landing page promise.
• Start with two or three core sizes, expanding once early placement data reveals which perform best.
Action: Select Banner Ads as your format before continuing.
Step 5: Choosing the Pricing Model (CPC Deep Dive)
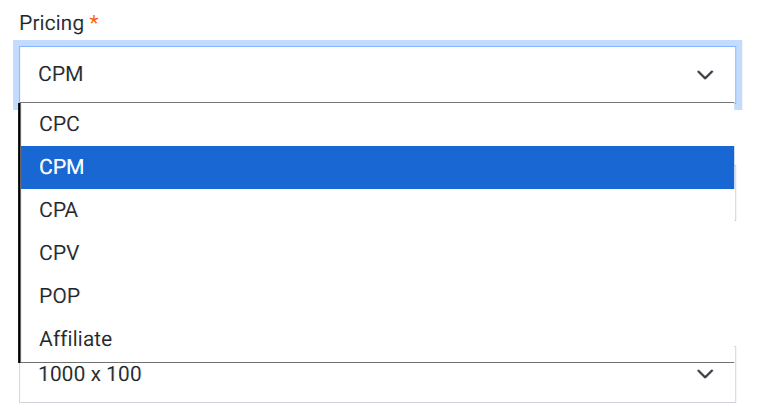
Set your pricing model to CPC. This determines that you’ll be charged only when a user clicks your banner, not when it simply appears on screen. Snipesearch Adclicks provides clear minimums for this model to help you plan small-scale tests before committing to larger spends.
Minimum CPC rate: $0.01
Minimum total ad budget: $1.00
Minimum daily ad budget: $1.00 (two decimal places supported)
These thresholds make it easy to experiment—start with a small, controlled budget to measure click-through rate (CTR), cost per visitor, and pacing. Because CPC bidding is tied to engagement, delivery speed and position depend partly on competitiveness: a slightly higher bid can help capture more placements if inventory is limited.
Budget settings define both your campaign’s total cap and its daily spend limit. The total budget controls how much you’ll ever spend on that ad, while the daily cap smooths out delivery so you don’t use your entire allocation at once. Adjust these fields to match your goals and test duration.
If your focus is awareness or long-term exposure, CPM would be a better model—but for measurable outcomes and direct traffic generation, CPC remains ideal. It allows you to monitor cost per click precisely, compare creative variations, and maintain stable, repeatable delivery.
• Choose CPC as your pricing model.
• Use platform minimums to test affordably: CPC ≥ $0.01, total ≥ $1.00, daily ≥ $1.00.
• Plan your daily limit so pacing remains steady throughout the day.
Action: Select CPC as the model, then set total and daily budgets before continuing.
Step 6: Filling Out Basic Ad Information
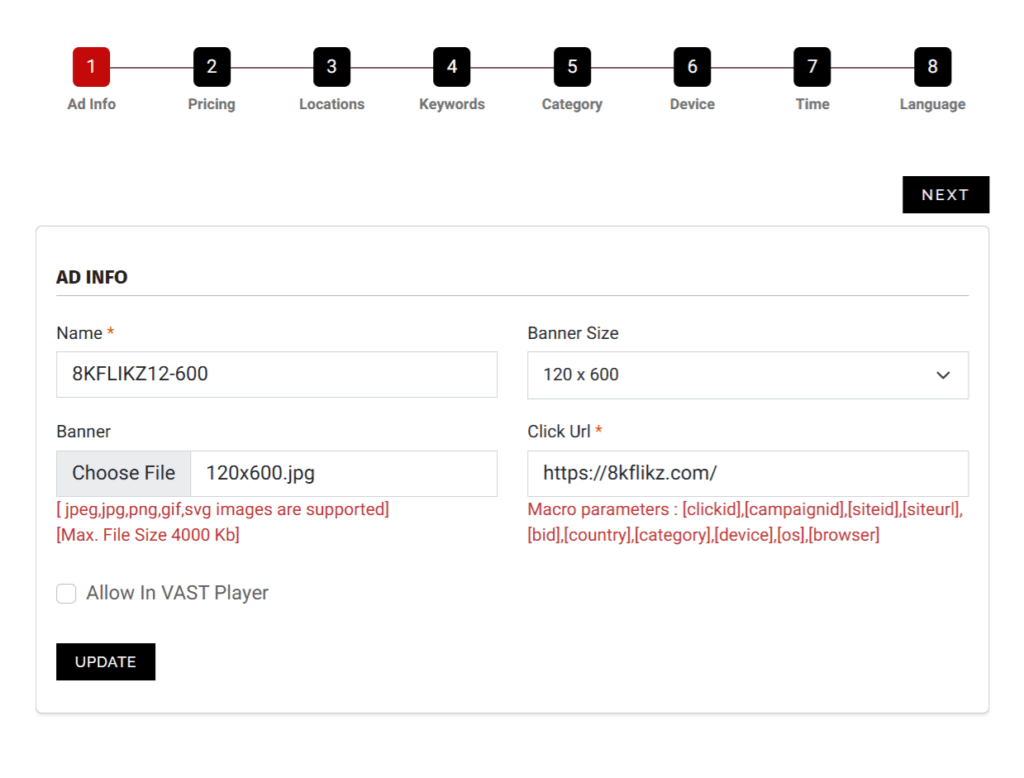
This section defines how your banner behaves and where it leads. Complete each field carefully so clicks and reports line up correctly. Pricing should be set to CPC, and Ad Format should remain Banner. Give your campaign a short, clear name that identifies it instantly—for instance, include the brand or product name and banner size so it’s easy to recognise later in reports.
Your Click URL must point directly to the landing page that matches the banner’s offer. If the ad promotes a particular deal or event, send visitors there directly. The platform supports macro variables you can add for tracking, such as [clickid], [campaignid], [siteid], [siteurl], [bid], [country], [category], [device], [os], and [browser]. These are automatically replaced at runtime to give full context in your analytics logs.
Next, select the Banner Size that matches your uploaded image. Snipesearch accepts jpeg, jpg, png, gif, and svg formats, with a maximum file size of 1000 KB. Make sure the image’s pixel dimensions exactly match the selected size; mismatched assets can distort or fail during rendering. Optimise artwork so it loads quickly across all connection types—fast banners perform better both for visibility and click-through rate.
Before saving, test your landing page in a private browser window to confirm it loads correctly on desktop and mobile, and that the message on the page matches the message on the banner. This alignment protects CTR and maintains consistency for users who click through.
• Set Pricing to CPC and Ad Format to Banner.
• Enter a full Click URL and append macros if you need click-level diagnostics.
• Choose the correct banner size and upload a ≤1000 KB image in one of the supported formats.
Action: Complete all fields accurately → upload creative → confirm destination → Next.
Step 7: Previewing Your Ad

After you click Next, a preview window displays your banner at full page width. Don’t worry if it appears larger than expected—this expanded view simply helps you inspect the artwork closely for sharpness and clarity. On real placements, the ad will always display at its exact size.
Check every detail carefully. Make sure the image renders cleanly, text is legible, and colours display as intended. If your creative contains fine details or small fonts, shrink your browser width slightly to simulate how it might appear in different layouts. Then click on the banner to test the Click URL. Confirm that it opens the correct landing page and that any macros or tracking parameters resolve properly.
If you notice any distortion, stretched elements, or blurred edges, re-upload a corrected image and preview again. You can repeat this as many times as needed before saving. The goal is to ensure what you see in preview matches exactly what the audience will see once live.
• Verify the image renders clearly at both full preview width and smaller browser sizes.
• Test-click to confirm your link opens correctly and macros resolve.
• Replace or re-upload artwork immediately if any display issue appears.
Action: Use the preview to confirm correct render, sharpness, and click-through before proceeding.
Step 8: Setting Budgets and CPC Rates
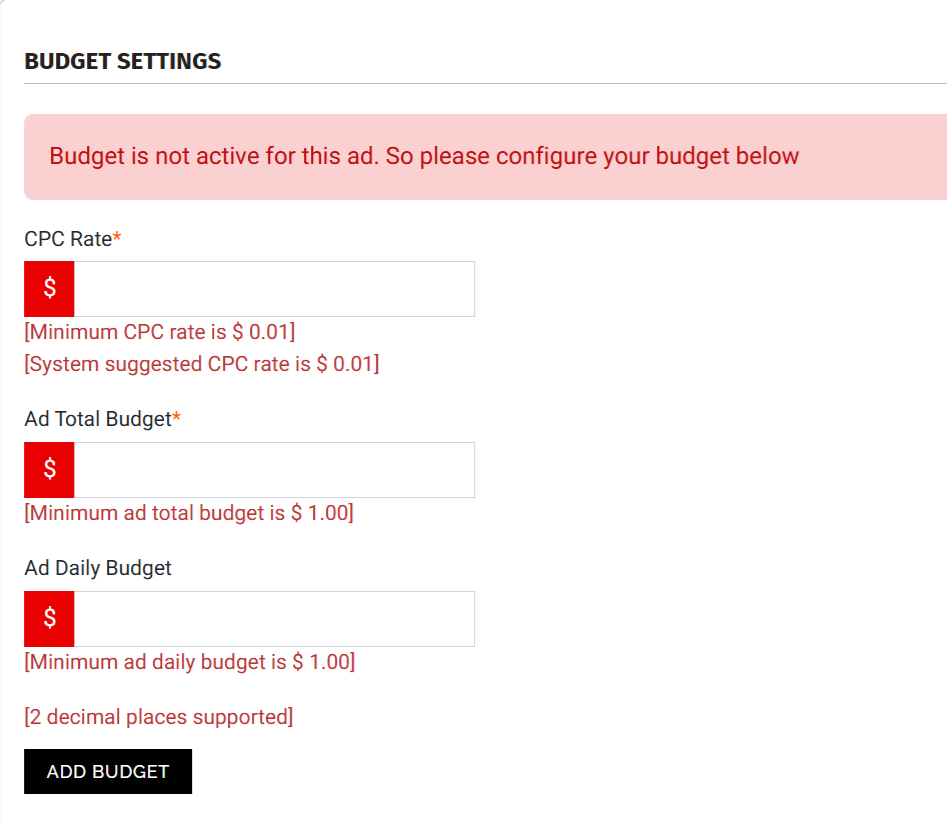
The next page handles Budget Settings. Here you’ll define how much you’re willing to pay per click and how much you want to spend overall.
In CPC Rate, enter your bid amount. The minimum accepted rate is $0.01, and you can increase it to compete more strongly for placements. Setting a slightly higher CPC often improves delivery speed and visibility, especially in competitive categories.
Then define your Ad Total Budget—the maximum amount this specific ad can spend across its full lifetime. The minimum allowed is $1.00.
Finally, specify an Ad Daily Budget, which controls pacing so the system spreads delivery evenly throughout each day. The minimum daily value is also $1.00, with two decimal places supported.
Together, these three values define your bidding and pacing strategy. A low CPC with a small daily cap will yield slow, steady delivery, while a higher CPC and balanced daily limit push your ad into more auctions for faster results. You can adjust these settings anytime if performance data suggests increasing or decreasing your bid.
• Enter your CPC Rate (≥ $0.01).
• Set an Ad Total Budget (≥ $1.00).
• Define a steady Ad Daily Budget (≥ $1.00).
Action: Confirm your CPC, total, and daily budgets → click Add Budget or Next to continue.
Step 9: Selecting Location Targeting
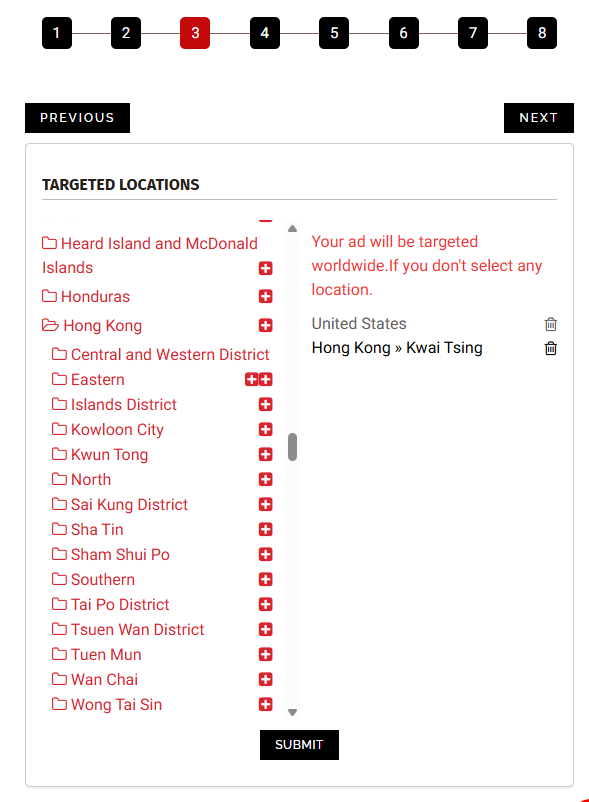
The Locations page determines where your banner impressions will appear geographically. Leaving this section blank makes your campaign eligible to serve globally, which can dilute relevance and waste spend. Always define your target regions carefully before launch.
Start by selecting the country, region, or city that best matches your audience. For example, choose only the markets where your product is available, your language is supported, or your pricing makes sense.
If your ad references a local event, currency, or delivery zone, limit delivery to that area. For broader offers—like digital services—national targeting may be sufficient. Each selected region appears in the targeting list; if you change your mind, simply remove it before saving.
Click Submit once your locations are chosen. Skipping this confirmation reverts the setting and may accidentally re-enable global delivery. For campaigns covering multiple regions, create duplicate ads with individual budgets and creatives so each market can be tracked separately.
• Choose specific countries, regions, or cities that align with your offer.
• Match currency, language, and imagery to the target region.
• Click Submit to confirm—if you skip this, the ad will default to global targeting.
Action: Select locations → click Submit → click Next to continue.
Step 10: Adding Keywords
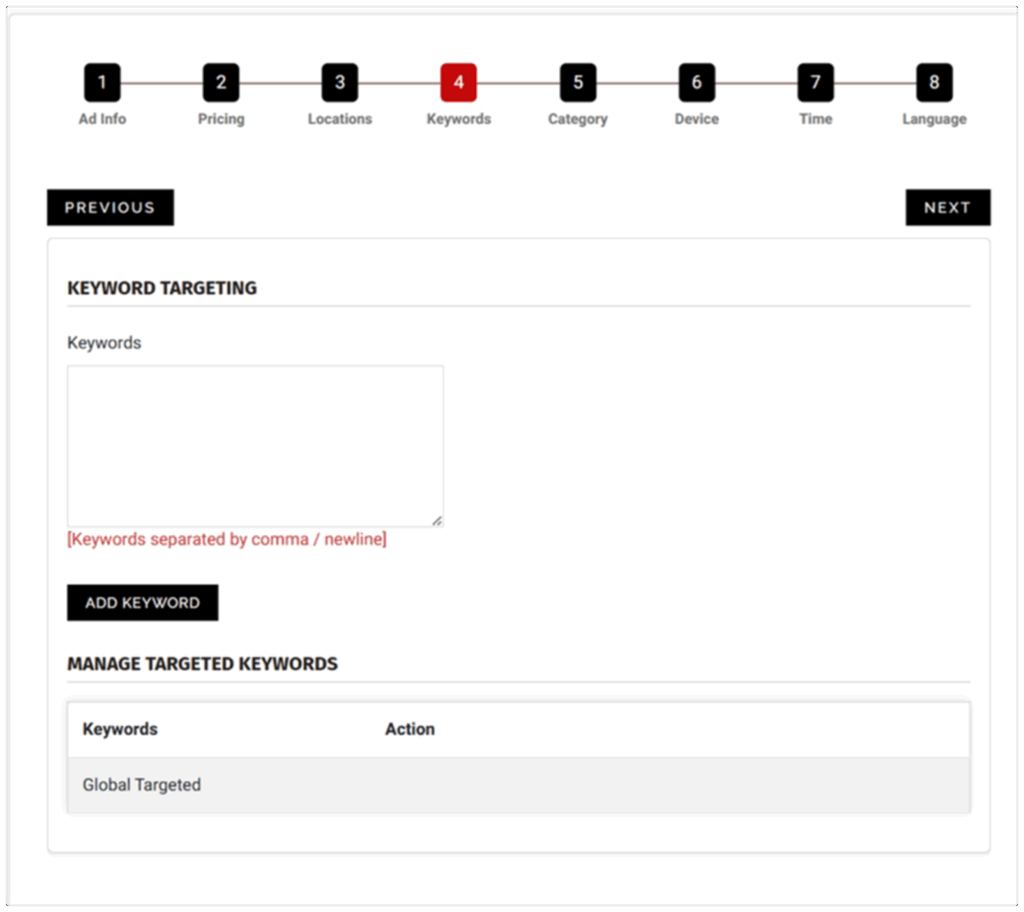
Keywords help Snipesearch Adclicks understand what your banner relates to so it can appear next to relevant pages or search contexts. You can add anywhere between 20 and 250 keywords per ad.
Pick terms that directly match your banner’s content and the first lines on your landing page. If your ad promotes “half-price custom mugs,” focus on terms like custom mugs, personalised cups, or mug printing deals rather than unrelated items.
Adding keywords is optional. You can also run your banner as Run of Network (RON) by leaving the keyword box blank. In RON mode, your banner is distributed across the entire network within your chosen category, language, and location filters. RON is ideal for early testing—it ensures delivery, collects broad data, and helps you learn where your impressions naturally perform best.
Once you understand which placements drive the most clicks, you can refine delivery later by adding or editing keywords. Always click Add Keyword to save your list; if you skip this step, the campaign will default to RON.
• Add 30–60 well-matched keywords for tighter targeting, or leave blank for Run of Network.
• Keep wording simple—avoid duplicates or excessive variations.
• Always click Add Keyword to save before continuing.
Action: Choose between RON or keyword targeting → click Add Keyword → click Next to proceed.
Step 11: Selecting Categories
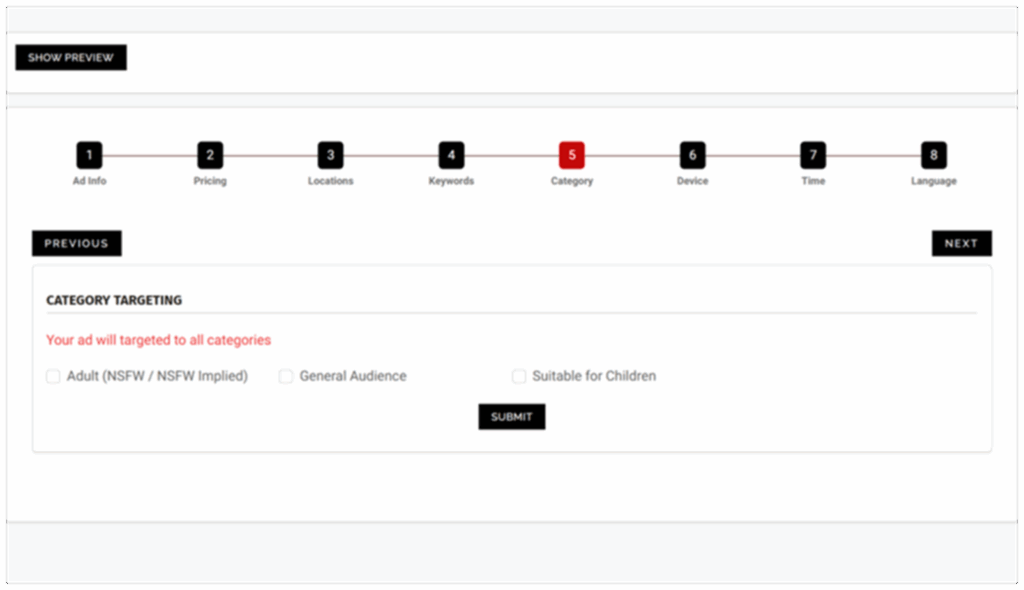
In Snipesearch Adclicks, every campaign must have a category before it can be approved. This setting controls which parts of the network your CPC banner can appear on and ensures compliance with Adclicks’ placement rules. Category selection affects both visibility and approval speed, so choose carefully according to your creative and landing page content.
You’ll see three main choices:
Adult (NSFW / NSFW Implied) – For ads or destinations that include mature themes or restricted material.
General Audience – The standard setting for most offers, suitable for the full Snipesearch Adclicks display network.
Suitable for Children – For campaigns directed specifically at users under 13, subject to stricter delivery conditions.
If an ad or its landing page contains any adult references, separate it into its own campaign and select Adult to prevent rejection. Most advertisers will select General Audience, which covers the broadest reach across Adclicks’ partner inventory. For child-focused brands or educational material, choose Suitable for Children to comply with Adclicks’ child-safety policies.
• Select the category that matches your creative and landing page within Snipesearch Adclicks.
• Keep adult and child campaigns separate to maintain compliance across the Adclicks network.
• Re-check the category after duplicating or localising ads to ensure it remains accurate.
Action: In Snipesearch Adclicks → choose the correct category → click Submit → Next.
Step 12: Device and Browser Targeting
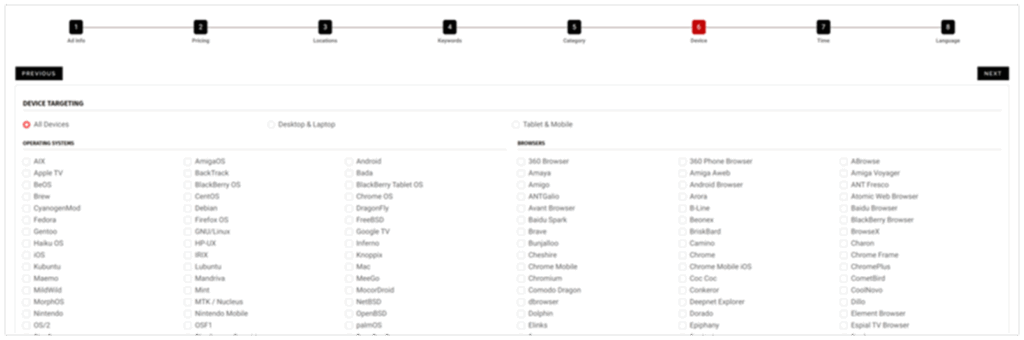
Snipesearch Adclicks allows precise device and browser targeting so your CPC banners display only where they perform best. This helps improve click quality and guarantees that users reach a version of your landing page optimised for their device.
From the targeting panel, select Desktop, Mobile, or both. If your funnel depends on a desktop process, disable mobile to conserve spend. Conversely, if your campaign is built for mobile discovery, keep delivery focused on iOS and Android and select the browsers most relevant to your analytics—such as Chrome, Safari, or Firefox.
Adclicks renders banners responsively, but always preview each creative to verify readability across the environments you select. After adjusting targeting, press Update. If you skip this confirmation, Adclicks will default to “all devices.”
• In Snipesearch Adclicks, choose Desktop, Mobile, or both to define delivery.
• Refine further by Operating System and Browser based on your traffic data.
• Always click Update so Adclicks saves your chosen targeting.
Action: Snipesearch Adclicks → set Device / Browser targeting → click Update → Next.
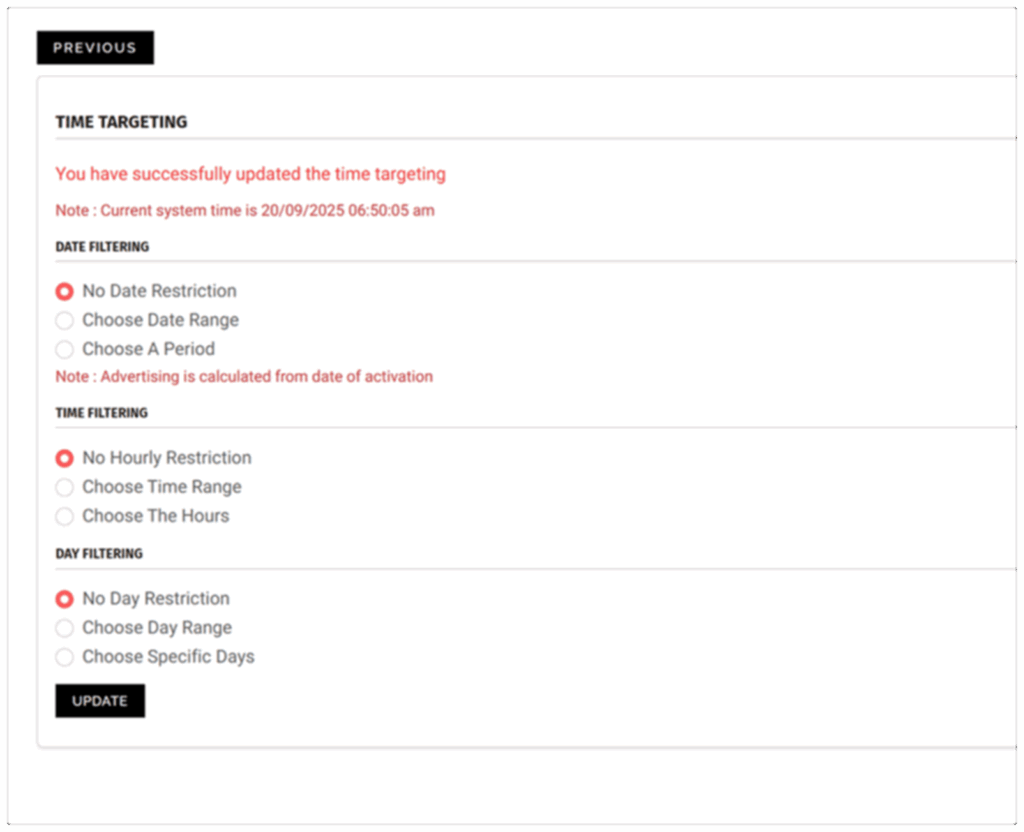
Step 13: Time Targeting
Language targeting in Snipesearch Adclicks ensures impressions appear for users whose browser language matches your creative and landing page. It helps maintain message clarity and improves performance by serving banners only to users who can understand them.
If your destination page is English-only, restrict delivery to English. When you localise content for other audiences, mirror that choice in both your artwork and landing page copy. Each major language should have its own workflow to keep analytics and compliance clear.
After selecting languages, click Update. The page refreshes immediately without leaving the setup screen. Your ad will display a pending status, meaning the system has recorded your selection. You can now continue refining or exit the wizard safely—your language settings will remain saved.
• In Snipesearch Adclicks, select the browser languages that match your banner and landing page; avoid “all languages” by default.
• Keep one language per workflow whenever possible for simpler reporting and optimisation.
• Click Update to save and confirm pending status before closing or publishing.
Action: Select language targeting → Update.
Relevant Links
Support: https://support.snipesearch.co.uk/
FAQ: https://adclick.snipesearch.co.uk/index.php?page=index/faq
Contact Form: https://adclick.snipesearch.co.uk/index.php?page=user/support
Stay Connected
Snipesocial: https://www.snipesocial.co.uk/pages/snipesearch
Twitter: https://twitter.com/snipesearch_uk
Facebook: https://facebook.com/snipesearch
LinkedIn: https://linkedin.com/company/snipesearch/
VK: https://vk.com/snipesearch_uk
Focus: https://focus.xyz/snipesearch
YouTube: https://youtube.com/@snipesearch
diaspora: https://diaspora.snipesearch.net/people/7431fcf0806c013e936e00163c6e7bdf
Friendica: https://friendica.world/profile/snipesearch
Analytic Tools
StatCounter: https://statcounter.com/
Rommie Visitor Analytics: https://rommie.net/