
Running CPM Text Campaigns on Snipesearch Adclicks in 2025
Online advertising has traditionally been dominated by cost-per-click (CPC) campaigns, but many advertisers are now shifting focus to cost per thousand impressions (CPM). CPM campaigns are designed for visibility: instead of paying when a user clicks, you pay for every 1,000 times your ad is displayed. This makes CPM especially powerful for brand awareness, message testing, and large-scale audience reach, since impressions are guaranteed whether users engage immediately or not.
Snipesearch Adclicks provides a straightforward and flexible framework for running CPM ads in 2025. Its precision targeting, real-time reporting, and budget controls allow advertisers to maximize exposure while minimizing waste. For businesses launching new products, strengthening recognition, or preparing remarketing funnels, CPM offers an affordable way to stay visible across the network.
The guide below walks you step by step through setting up a CPM campaign on Snipesearch Adclicks — from switching dashboards to refining language targeting — with everything optimized for 2025.
Step 1: Switching to the Advertiser Dashboard
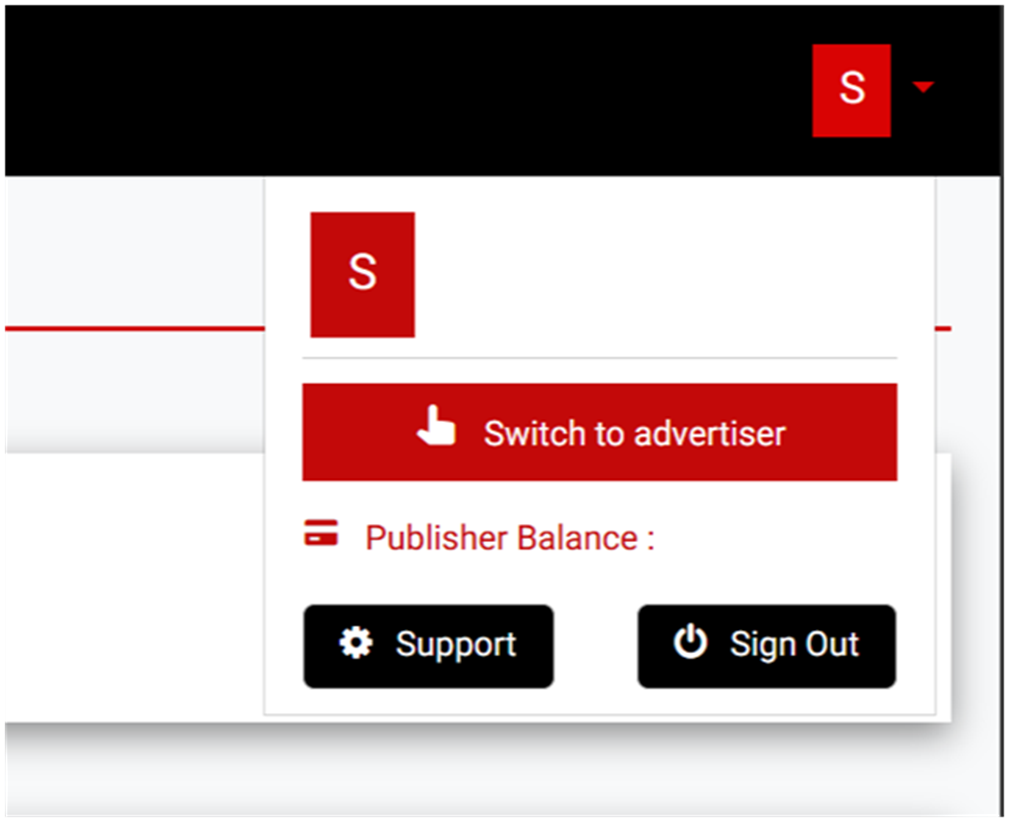
Before you can create a campaign, you must ensure you are in the correct dashboard. Beginners can get confused between the publishing dashboard and the advertiser dashboard, so let’s clear this up. The advertiser dashboard is where you control all aspects of your ads: creation, budgets, targeting, and reports. Without switching, you won’t have access to the options needed to set up campaigns. To switch, look at the top right corner of your screen, where you’ll see an icon with the first letter of your name. Click the down arrow and select “Switch to Advertiser.” This simple step ensures you are in the correct place to start building ads.
Action: Switch to advertiser dashboard.
Step 2: Accessing the Ads Menu
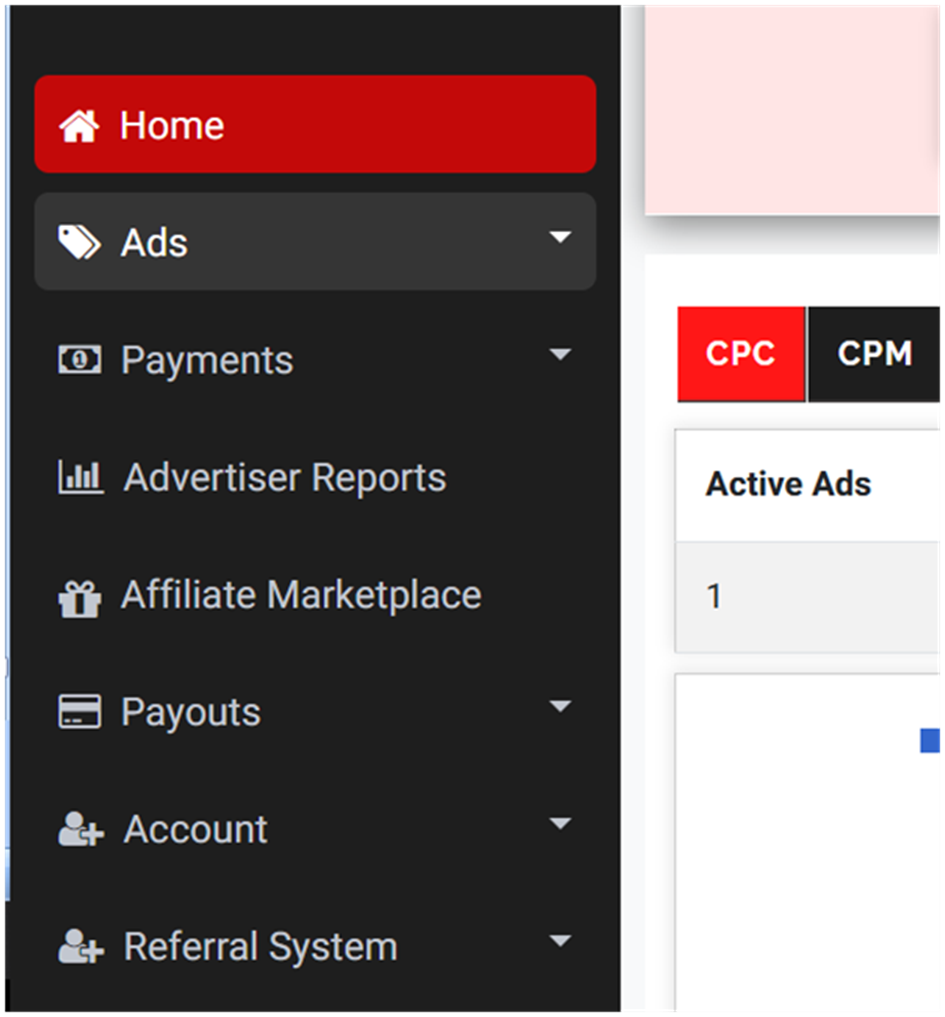
All ad creation and performance tools are organized under the Ads section. Think of it as your control centre. From here you can launch new CPM campaigns, review current ones, and access reports. To open it, click “Ads” on the left-hand menu. A dropdown will appear, showing all options related to advertising.
Action: Left-hand menu → Ads.
Step 3: Choosing to Create a New Ad
Inside the Ads menu, select “Create Ads.” This launches a guided setup where you’ll define your ad type, targeting, and budget structure. It’s the entry point for every new campaign you want to run on Adclicks.
Action: Ads menu → Create Ads.

Step 4: Selecting the Ad Format
Your first major choice is the ad format. Each one serves a different marketing purpose. Text ads are direct and copy-focused, banners deliver visual impact, ecommerce ads highlight products, and interstitials occupy the entire screen for maximum visibility. For CPM beginners, text ads are a smart starting point — simple, lightweight, and easy to optimize.
Action: Set ad format to Text Ad.

Step 5: Choosing the Pricing Structure
This is where you define how your budget will be spent. Snipesearch supports several payment models, but here we’re focusing on CPM (cost per thousand impressions). CPM means you pay every time your ad is displayed one thousand times, regardless of whether someone clicks. It’s perfect for building brand visibility, testing messages, or driving awareness campaigns. Select “CPM” as your pricing model before moving forward.
Action: Select CPM pricing model.
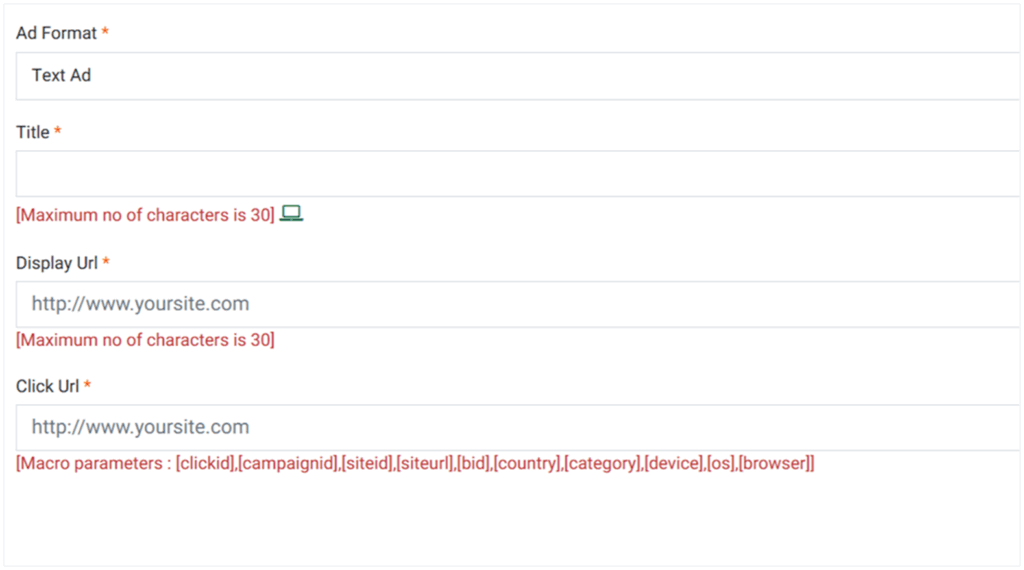
Step 6: Filling Out Basic Ad Information
Next, define the content of your ad. You’ll provide:
- A campaign name
- A concise title (up to 30 characters)
- A description (up to 80 characters)
- A display URL
- CTA button text
- The destination click URL
Even though you’re paying per impression, well-written text increases engagement and ensures that impressions convert into actions. Treat this step as branding — clear, attractive copy will make your CPM spend more valuable.
Action: Fill in Name, Title, Description, Display URL, CTA, and Click URL.
Step 7: Previewing Your Ad Example
The system auto-generates a live preview of your ad so you can check its appearance in real placements. You’ll see a sample 300-pixel box showing how your campaign will render to users. For video-enabled ads, you can also activate the VAST player option to display within video environments. This preview stage is essential to ensure your ad is polished before it goes live. Once complete, click “Next.”
Action: Review the generated preview.
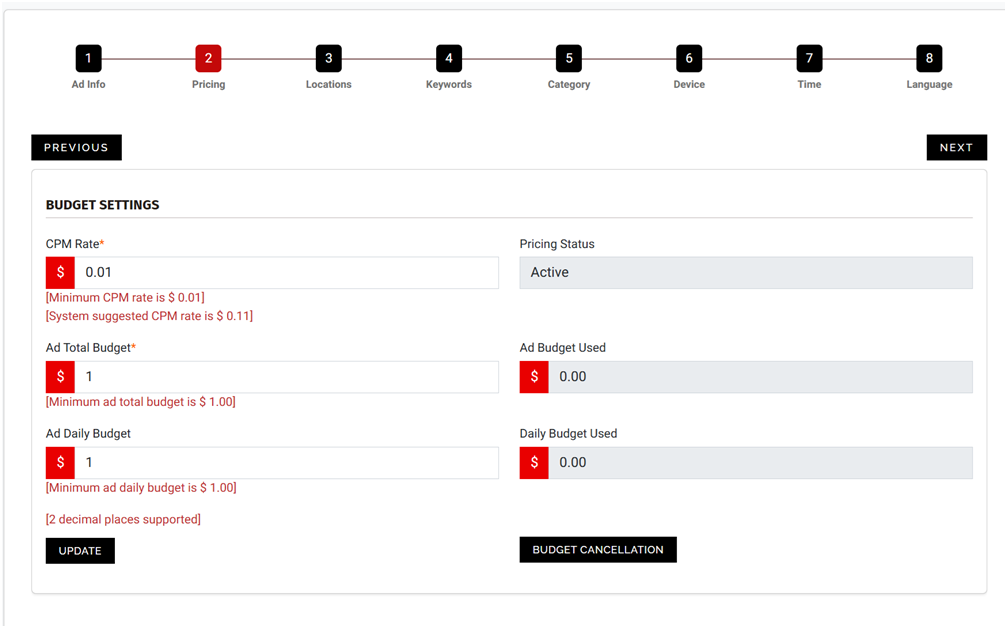
Step 8: Setting Budgets and CPM Rates
Here’s where you balance costs with reach. Set your CPM rate (minimum $0.01, suggested $0.11), along with both total and daily budgets (minimum $1 each). With CPM, higher rates can increase the speed and priority of impressions, but it’s often better to start small and adjust upward as performance data comes in. Use the “Add Budget” button to save your financial settings. Then click Next to continue.
Action: Set CPM rate, total budget, and daily budget.
Step 9: Selecting Location Targeting
CPM campaigns can burn budget quickly if shown to irrelevant audiences. Location targeting helps ensure impressions go to users who matter most. Choose global targeting for international campaigns, or narrow it down to specific countries, cities, or regions if your service is location-dependent. Use the plus symbol to add countries or regions, then submit to confirm before pressing next to continue. IF YOU DO NOT PRESS SUBMIT BEFORE HITTING NEXT THE TARGETIGN WILL NOT BE APPLIED!
Action: Choose location targeting → Submit.

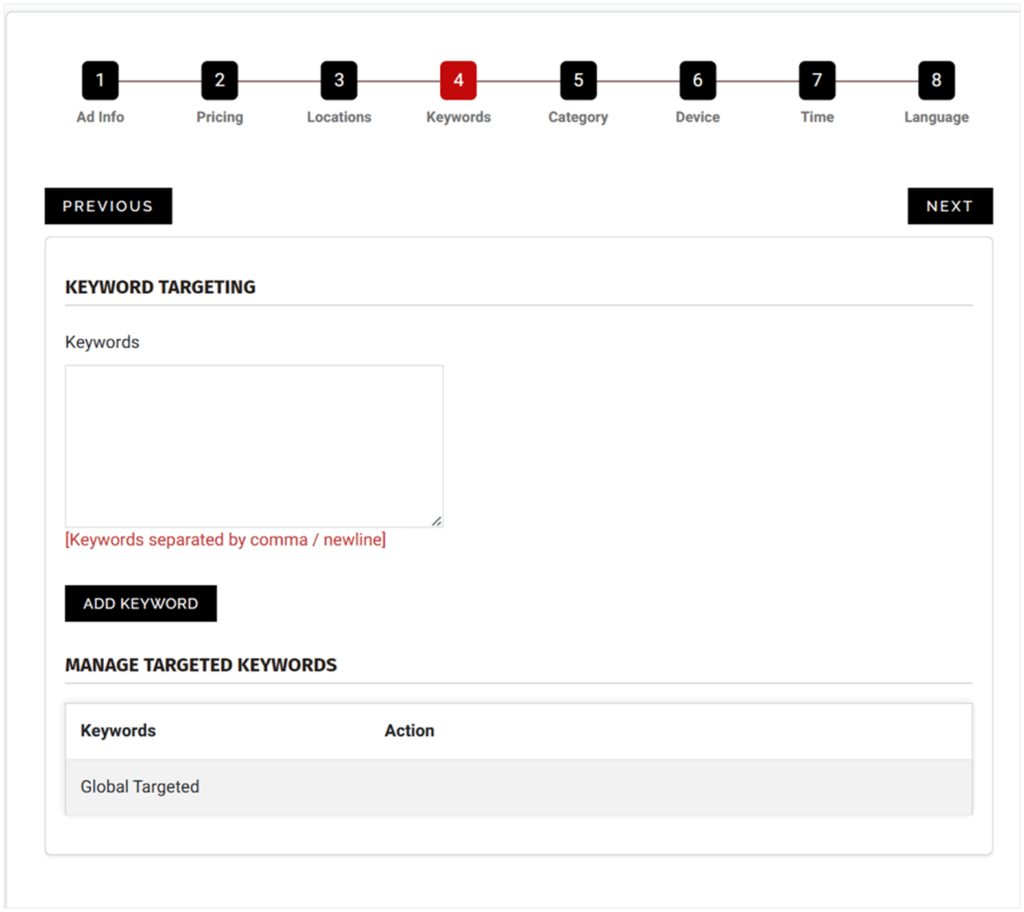
Step 10: Adding Keywords
Even though CPM charges per impression, keywords determine where those impressions occur. Without them, your campaign runs on a broad “Run of Network” basis. Adding 20–250 keywords helps align your ads with relevant searches and page content, increasing the likelihood that impressions lead to actions. . Enter 20–250 comma-separated phrases that describe your offer, then click “Add Keyword” and click next to continue, if you dont press the add keyword box, they will not be applied.
Action: Enter keywords → Add Keyword → Next.
Step 11: Selecting Categories
Categories on Snipesearch Adclicks are deliberately simple and strict: you choose one of three options — Adult (NSFW / NSFW Implied), General Audience, or Suitable for Children. That small set exists because category selection must be unambiguous and enforceable during the manual review process. Choosing correctly protects your campaign from being disapproved, prevents misplacement of impressions, and ensures advertisers only appear alongside appropriate content.
If your offer contains any sexual content, explicit imagery, implied adult themes, or material that would be unsuitable for minors, you must select Adult (NSFW / NSFW Implied). This is not a “nudge” category — it’s the safety valve. Ads classified NSFW are limited in inventory and shown only where advertisers and placements are compatible; running an adult-tagged ad in a general or kid-targeted environment risks removal or account flags. On the flipside, if your creative, landing page, or the page where the ad will appear is clearly intended for children under 13 (toys, children’s games, kids’ educational material, nursery content), select Suitable for Children. This category triggers stricter compliance checks and may disqualify certain advertisers or ad types to meet safety and regulatory standards.
For everything else — typical blogs, news, product pages, tutorials, hobby sites, and broadly consumer-facing content — choose General Audience. General Audience is the default for mainstream offers and captures the bulk of available ad inventory. If your content is mixed but is predominately non-explicit and not child-directed, General Audience is the correct choice. If a particular page crosses a clear threshold into NSFW or is designed specifically for children, create a separate adcode/campaign and tag that placement with the appropriate category rather than tagging your entire site incorrectly.
Practical rules: when in doubt, err on the side of the stricter category for that specific placement — for example, tag a single NSFW article as Adult rather than marking the whole site. Use separate adcodes per placement so you can isolate category differences without affecting other pages. Remember the manual review: wrong or inconsistent category choices will slow approval and can lead to rejected campaigns. Correct category selection improves relevancy, protects advertisers, and reduces the chance of compliance problems. Submit your selections before clicking next to continue.
Action: Select relevant categories → Submit → Next.

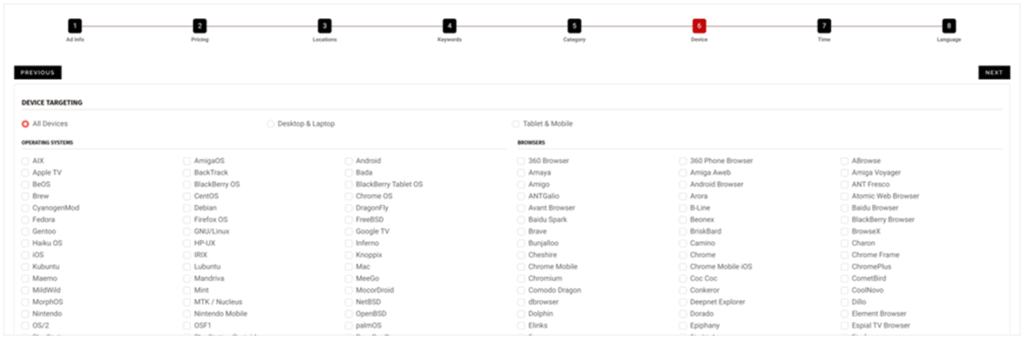
Step 12: Device and Browser Targeting
One of the standout strengths of Snipesearch Adclicks is the depth of its device and browser targeting. Most networks let you split campaigns into “mobile” or “desktop.” Adclicks goes several layers deeper, letting you refine by specific operating systems, browser types, and even niche distributions. This precision matters especially for CPM campaigns, where you’re paying for impressions, not clicks. Every wasted impression on the wrong device is money lost.
Let’s break this down. Suppose you’re running an app promotion. It only works on iOS. If your CPM campaign is being served to Android devices, your impressions are effectively useless. By filtering only for iOS devices, you ensure every view has the potential to convert. The same goes for browser targeting. If you’re promoting a browser extension that works exclusively on Chrome, targeting Firefox or Safari users wastes your CPM spend.
Snipesearch even allows advanced combinations — such as serving ads only to Ubuntu Linux users on Firefox, or excluding Edge users on Windows 10 if that’s not your audience. Beginners may find the list intimidating, but this level of precision is what gives you a competitive edge. It allows you to cut irrelevant impressions out entirely and put every CPM dollar where it counts.
This step also allows you to test audience performance. For instance, run one ad targeting iOS Safari and another targeting Android Chrome. Compare which delivers the best results for your CPM investment, then double down on the winner. Treat device and browser targeting as both a filter and a testing tool. You can either targeting here, or leave it empty to target all of them and click update and next to continue, no matter what you select dont forget to hit update before hitting next to store the changes!
Action: Select devices and browsers → Update → Next.
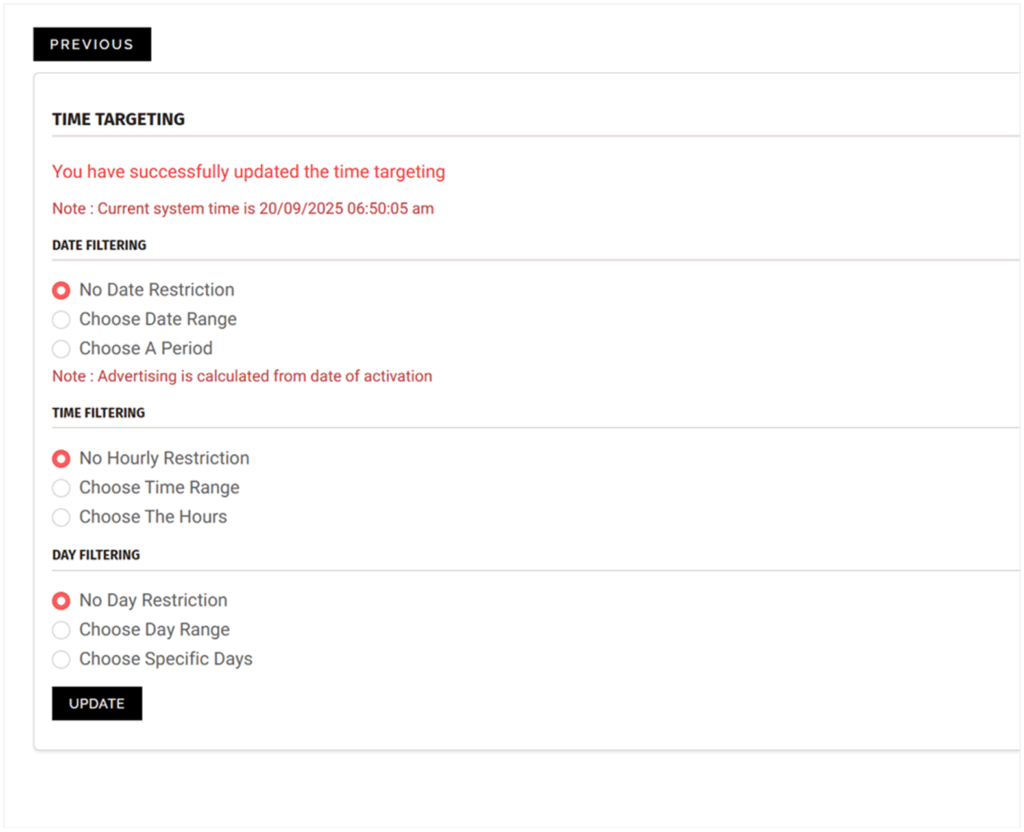
Step 13: Time Targeting
Time targeting is critical when running CPM campaigns. Since you’re paying per thousand impressions regardless of clicks, serving ads when your audience is inactive or when your business can’t respond means wasted budget. Snipesearch’s time targeting gives you three layers of control: Date filtering, Time filtering, and Day filtering.
Date Filtering allows you to run campaigns indefinitely or restrict them to a specific range. For example, a Christmas sale might run from December 1st to December 24th, ensuring your impressions only appear during the promotional period. This prevents waste outside of relevant dates.
Time Filtering lets you refine delivery to certain hours. If your business only operates 9–5, there’s little value in paying for impressions at 3 a.m. With CPM, this is even more important than CPC, since every off-hour impression costs you money whether or not it converts. Restaurants, for instance, can run ads during lunch and dinner hours only, ensuring impressions land at peak hunger times.
Day Filtering gives you the option to run ads every day, on weekdays only, or even pick specific days. This is perfect for offers tied to weekly events — like a Friday-night promotion or a Monday-only sale.
By combining these filters, you can create highly efficient schedules. Imagine running a CPM campaign that only serves ads during weekdays, between 8 a.m. and 6 p.m., within the two weeks leading up to a product launch. Every impression in that campaign has a better chance of hitting a relevant, active audience.
The key is precision. With CPM, every wasted impression reduces ROI, so align delivery with user behavior and business availability.
If you want your ad to run non-stop, simply leave all fields blank and proceed. Once your filters are configured, click Update and then Next.
Action: Set date, time, or day targeting → Update → Next.
Step 14: Choosing Languages
Finally, set language targeting to ensure impressions land with users who actually understand your message. Create dedicated ads for each language for better performance. Once updated, you’ll see a confirmation message, and your ad will be live. From here you can preview, adjust, or refine any setting without losing progress.
The system makes this easy to manage. After you select the languages, you’ll get a confirmation that targeting has been updated. From there, you can preview the ad in its final form, return to earlier steps to refine details, or leave the page knowing progress is saved. This flexibility lets you refine multilingual campaigns without risk. ONCE LANGUAGES ARE SELECTED YOU MUST PRESS UPDATE TO COMPLETE THE AD SETUP.
Clicking Update at this stage finalizes your language targeting. Unlike earlier steps, there is no Next button — this page is the endpoint of the setup process. If you need to tweak your selections, you can do so here and reapply Update, otherwise you can close out knowing the campaign is now locked in.
Action: Select languages → Update.
Relevant Links
Support: https://support.snipesearch.co.uk/
FAQ: https://adclick.snipesearch.co.uk/index.php?page=index/faq
Contact Form: https://adclick.snipesearch.co.uk/index.php?page=user/support
Stay Connected:
Snipesocial: https://www.snipesocial.co.uk/pages/snipesearch
Twitter: https://twitter.com/snipesearch_uk
Facebook: https://facebook.com/snipesearch
LinkedIn: https://linkedin.com/company/snipesearch/
YouTube: https://youtube.com/@snipesearch
Rommie Visitor Analytics: https://rommie.net/
StatCounter: https://statcounter.com/