Introduction: What CPV and VAST Mean for Advertisers
The digital advertising world has evolved rapidly in recent years, with video becoming one of the most powerful tools for engagement. Unlike static banners or text ads, video ads hold attention longer, convey more information, and create stronger brand recall. On Snipesearch Adclicks, this potential is unlocked through CPV (Cost Per View) campaigns, supported by the industry-standard VAST protocol (Video Ad Serving Template).
CPV means you only pay when a user actually watches your video ad. It shifts the focus away from impressions or clicks and places the advertiser’s investment directly on engaged views. This model is particularly attractive in 2025, where attention is scarce and advertisers want assurance that their money is spent on users who are actually consuming their content.
VAST ensures your video ads can be delivered consistently across different sites, devices, and players. It standardizes how ads load and play, so whether your campaign is running on a mobile blog, a desktop news site, or a niche publisher’s video hub, the delivery and tracking remain smooth.
Together, CPV and VAST give advertisers a way to scale video campaigns with both efficiency and precision. This guide walks through each step of launching a CPV video campaign on Snipesearch Adclicks, ensuring you make the most of these features.
Step 1: Switching to the Advertiser Dashboard
Before you can build a CPV campaign, you need to confirm you’re in the right dashboard. Snipesearch Adclicks supports both publishers (those who monetize sites with ads) and advertisers (those who launch campaigns). Since CPV video ads are created on the advertiser side, you must switch into the advertiser environment.
Here’s how you do it:
- In the top-right corner of the platform, click the circle or square containing the first letter of your username.
- A dropdown will appear — choose “Switch to Advertiser.”
- You will now be in the advertiser dashboard, where campaign tools live.
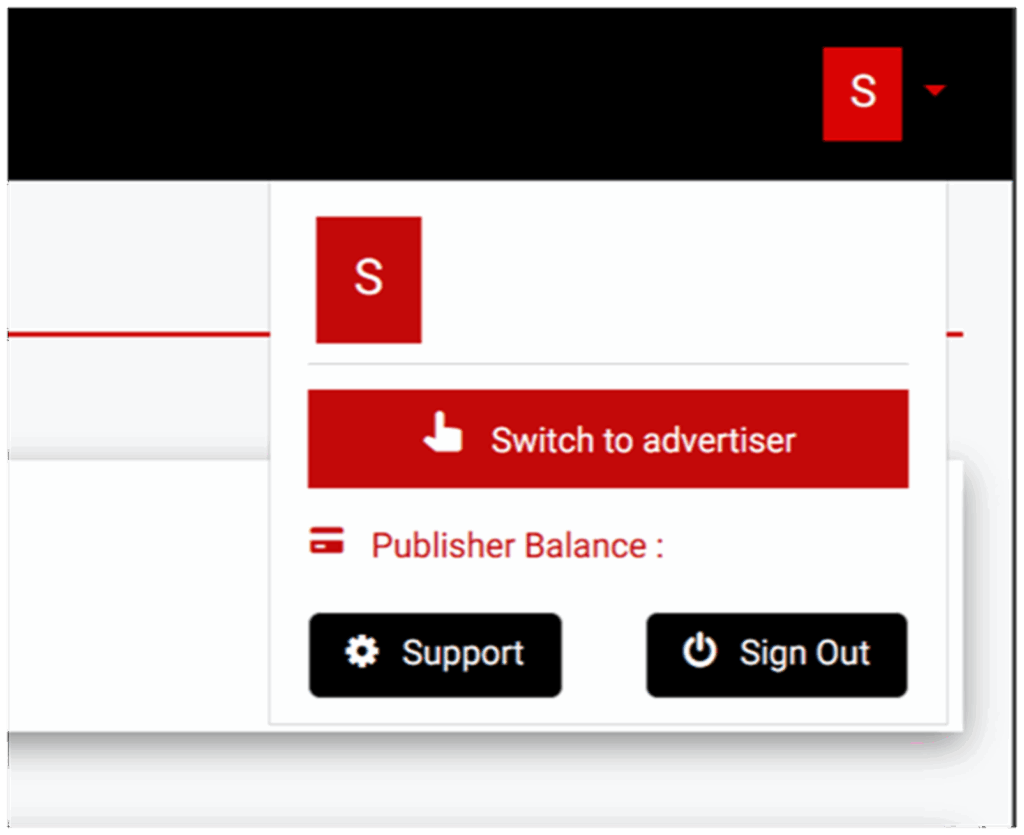
Action: Confirm you are in the advertiser dashboard before setting up any CPV video campaigns.
Step 2: Accessing the Ads Menu
Once inside the advertiser dashboard, the next stop is the Ads menu. This is the central hub for campaign creation and management. You’ll find it in the navigation panel on the left side of the screen. Clicking “Ads” opens up your advertising control center.
From the Ads menu, you can:
- Launch new campaigns, including CPV video ads.
- Review active, paused, or completed campaigns.
- Access detailed reporting on performance metrics such as views, completion rates, and costs.
Think of the Ads menu as your cockpit. Every major function you’ll need to build, adjust, or analyze campaigns exists here. Getting familiar with the layout early helps you move quickly later, especially once you’re running multiple campaigns at once.
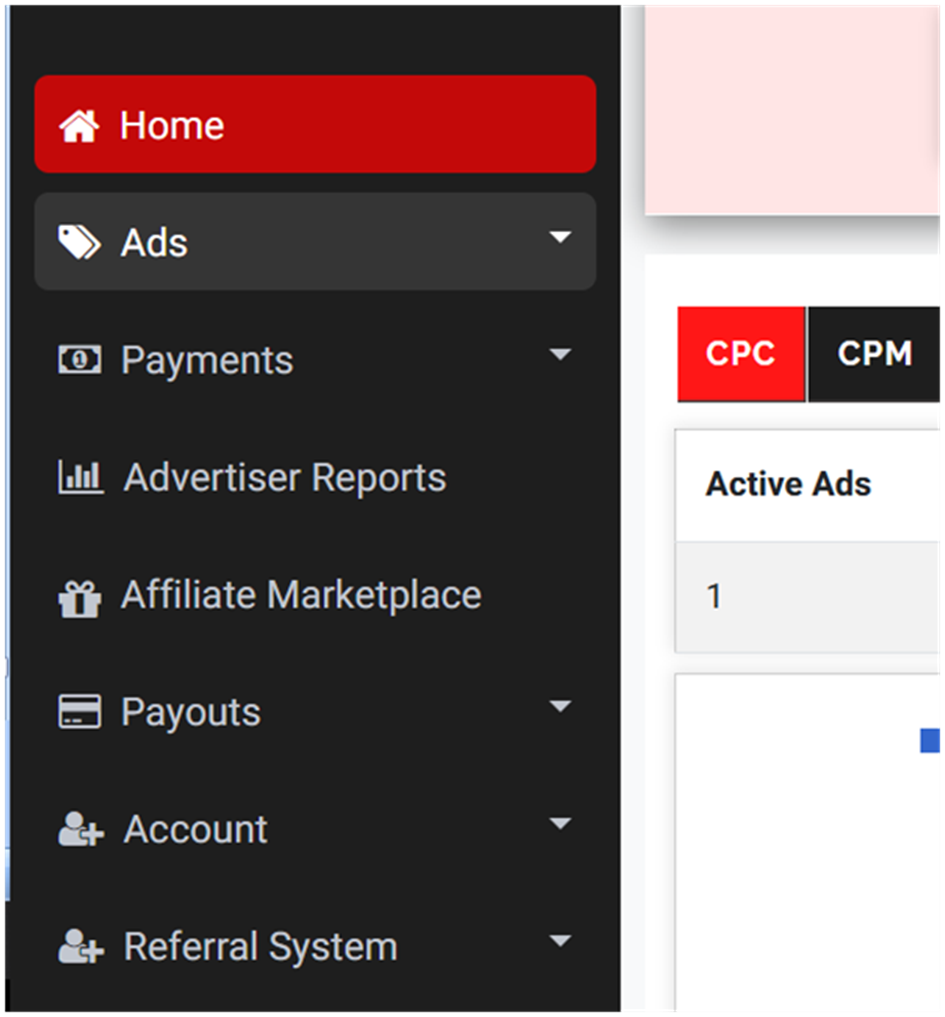
Action: Navigate to Ads → Ads menu to prepare for campaign creation.
Step 3: Creating a New Ad
Inside the Ads menu, click “Create Ads.” This launches the guided campaign builder, where you’ll provide all the details that define your CPV video campaign.
The builder will ask you to choose:
- Ad format (this is where you’ll select video).
- Pricing model (for CPV, you’ll select Cost Per View).
- Targeting settings (location, device, language, and time).
- Budget details.
- Video upload and destination URLs.
Each step of the builder is structured logically so that you move from the broadest campaign settings down to the finest details. Don’t rush this process. Every field you fill in determines how your ads will run, who will see them, and how much you’ll pay.

Action: Open the Ads menu → Create Ads → begin guided setup.
Step 4: Selecting the Ad Format
When you arrive at the ad format section inside the campaign builder, you’ll see multiple options ranging from banners to e-commerce ads. For this guide, the one you want is CPV. Once you choose CPV as your pricing model, the system automatically configures the format to video ads. There’s no second dropdown for “video” — the platform recognizes that CPV only applies to video, and it unlocks the upload fields for your creative file right away.
This workflow simplifies things for new advertisers. On many platforms, you have to make two separate selections: first “video,” then “CPV” as the payment method. Snipesearch Adclicks merges those steps, so by selecting CPV you’re confirming that this is a video campaign charged per view.
After the switch, you’ll notice new fields appear for your video upload. Supported file types include MP4, FLV, WMV, MPG, AVI, WEBM, and OGG. Maximum file size is 28 MB, and your video can run up to 300 seconds (five minutes). Both 16:9 and 4:3 aspect ratios are supported, with a minimum embed size of 240 pixels wide by 240 pixels high. These technical specifications ensure your ads will display consistently across different publishers’ sites, regardless of whether they’re shown on desktop or mobile.
Why it matters: You can’t run text, banners, or popups under CPV — the model is designed specifically for video. Understanding that the format is tied directly to the pricing model prevents confusion and helps you prepare the right creative from the start.
Action: Select CPV as your ad format. The builder will automatically switch your campaign into video mode and display the video upload requirements.
Step 5: Breaking Down the CPV Pricing Model
With CPV selected, the next task is to understand how the billing system works and set your rates accordingly. CPV (Cost Per View) means you only pay when a user watches your video ad. This is fundamentally different from CPC, CPM, or CPA. Instead of paying for clicks, impressions, or completed sign-ups, you’re buying attention — measured in views.
On Snipesearch Adclicks, CPV campaigns follow strict minimums and suggested rates:
- Minimum CPV rate: $0.01 per view
- System suggested CPV rate: $0.02 per view
- Minimum total budget: $25.00 per campaign
- Minimum daily budget: $1.00 (with support for two decimal places)
These guardrails make it possible for advertisers to start small without risking large sums, but also ensure the network maintains quality traffic.
How should you approach pricing? Many new advertisers assume they should always start at the absolute minimum, $0.01. While that will technically get your ad live, the system uses auction dynamics to decide which campaigns receive placement priority. If your bid is far below competing advertisers, your ad may receive fewer impressions or be placed in less premium inventory. By starting closer to the system’s suggested rate ($0.02), you increase the likelihood of reaching engaged audiences and building usable performance data quickly.
It’s also important to connect your budget to campaign goals. If your aim is to test creative performance, a small daily budget of $1–$2 with a CPV rate of $0.02 can generate hundreds of initial views in a controlled way. If your goal is wide exposure, you’ll want to raise both your CPV bid and your daily spend to secure higher distribution.
Why it matters: Understanding the CPV model ensures that you set realistic expectations for cost, reach, and performance. Instead of paying for impressions that might be ignored, you’re investing in actual views, giving you clearer insight into how audiences respond to your video.
Action: Define your CPV bid, set your daily and total budget, and align them with your campaign objectives. Starting at or near the suggested $0.02 rate is often the best balance between efficiency and visibility.
Step 6: Filling Out Basic Ad Information
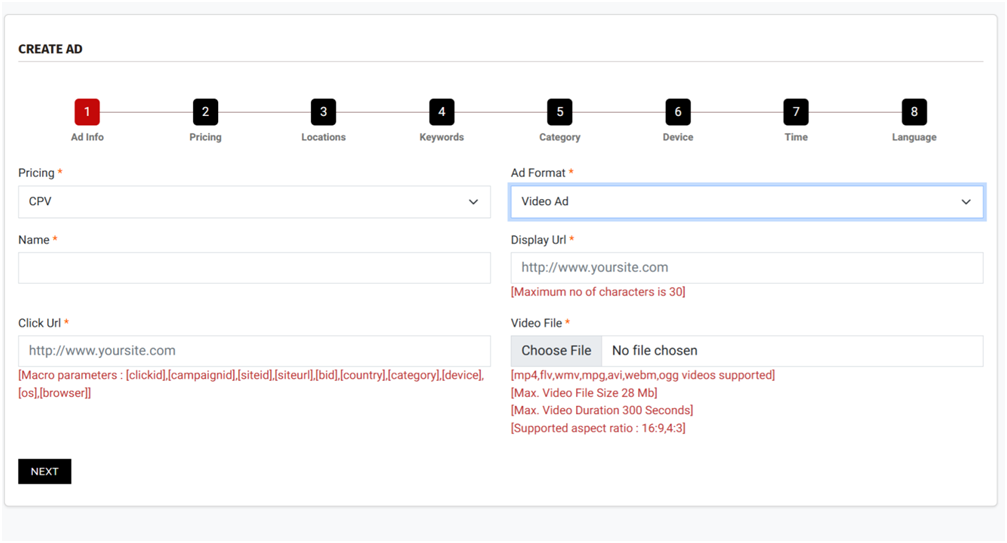
Now you enter the fundamental details that define your CPV video ad. Because you already selected CPV earlier, the Pricing* field is automatically set. The Ad Format* will also show as Video Ads, since CPV only runs in video mode.
You must then complete the following fields:
- Name*: An internal label for the campaign. Choose something clear and consistent, such as “Spring2025_Video_Test.”
- Display Url*: The short URL shown to users in the ad. Maximum of 30 characters, so keep it simple and branded.
- Click Url*: The destination page users are sent to after engaging with the video. Macros are supported here —
[clickid],[campaignid],[siteid],[siteurl],[bid],[country],[category],[device],[os],[browser]— which can be added for advanced tracking. - Video File*: Upload your creative. Supported file types are mp4, flv, wmv, mpg, avi, webm, ogg. The maximum size is 28 MB, maximum duration is 300 seconds, aspect ratios supported are 16:9 and 4:3, and the minimum adcode height is 240 px.
It’s critical that your Click Url resolves correctly and matches your campaign objective. Broken links mean wasted views. Similarly, your video must meet the technical requirements, or the system will reject it.
Why it matters: This is the foundation of your CPV ad. A mistake here — a wrong URL, oversized video, or missing field — can derail the campaign before it launches.
Action: Enter your Name, Display Url, Click Url (with macros if needed), and upload a compliant video file. When all fields are complete, press Next to save and move to the following step.
Step 7: Previewing Your Ad Example
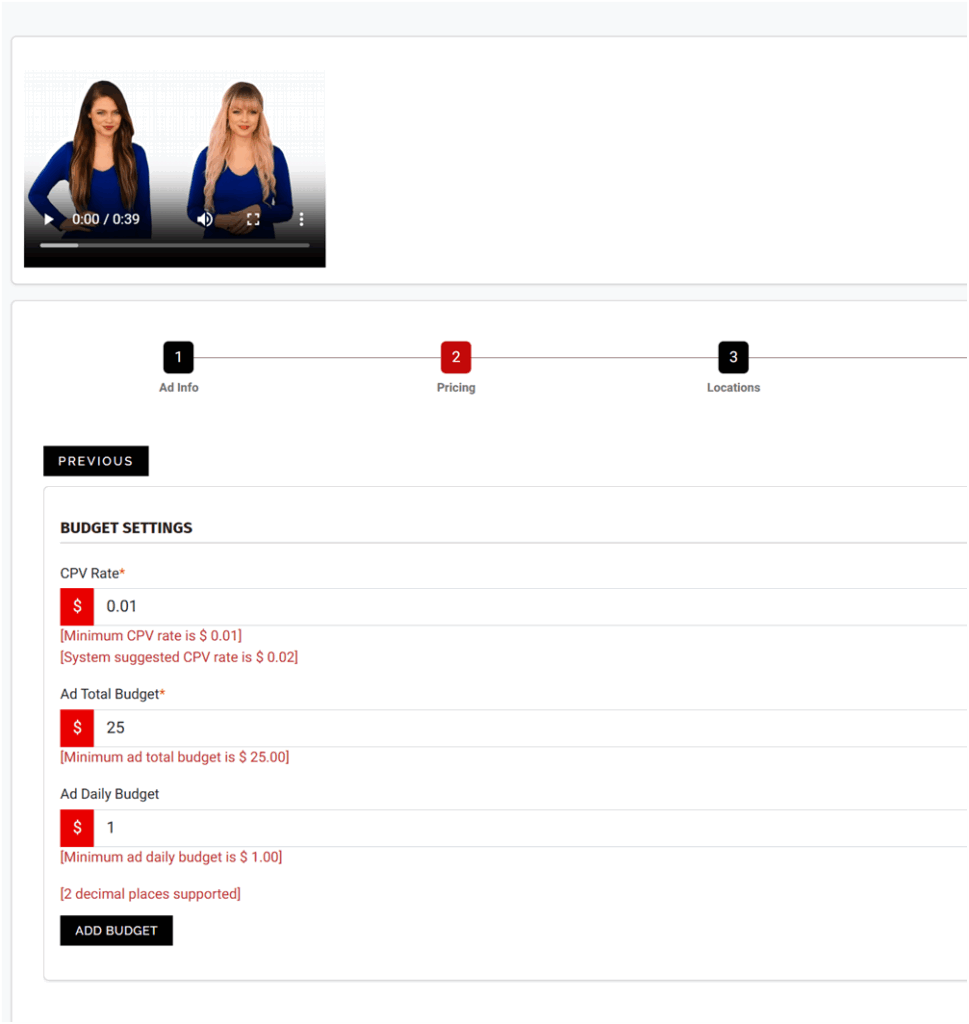
After uploading your video and filling out campaign details, the platform generates a live preview of your ad. This preview is displayed at the top of the page and remains visible throughout the rest of the setup process.
The preview allows you to Confirm that your video displays correctly and plays without error.
Don’t skip over this. Many advertisers rush past the preview, assuming their file is fine. But issues such as distorted aspect ratios, cropped visuals, or missing sound can slip through if you don’t watch the preview carefully. This is your chance to catch mistakes early.
Step 8: Setting Budgets and CPV Rates
With the creative verified, the next step is defining how much you want to spend and at what rate. In CPV campaigns, you control both the bid per view and the overall budget distribution.
There are three key inputs here:
- CPV Bid: The amount you’re willing to pay for each completed view. Minimum is $0.01, while the system suggests $0.02 as a competitive starting point.
- Total Budget: The maximum amount you want to spend on the campaign overall. The platform requires at least $25.00 to launch.
- Daily Budget: A cap on how much you’ll spend in a single day. The minimum is $1.00, which lets you pace campaigns gradually rather than burning through the budget too quickly.
Strategy comes into play here. If you’re testing new creative, a modest daily budget with a bid close to the suggested $0.02 ensures you gather meaningful data without overspending. For aggressive scaling, you may raise both your CPV rate and daily spend to secure priority placements and faster reach.
Why it matters: Budget settings control not just cost but also pacing and exposure. By balancing daily spend and CPV rates, you can test campaigns safely and then scale when results prove strong.
Action: Define your CPV rate, set total budget and daily budget → Add Budget → Next.
Step 9: Selecting Location Targeting
Relevance is everything in CPV video advertising. Serving ads in regions where your product or service isn’t available wastes budget and clouds your performance data. Location targeting ensures your campaign only reaches the right users in the right places.
Snipesearch Adclicks allows you to target:
- Global: Ads shown worldwide.
- Country-specific: Ads limited to selected countries.
- City-level: Precision targeting down to individual metropolitan areas.
For new campaigns, it’s usually smarter to start narrow. For example, if you’re promoting a service only available in the UK, set your targeting to UK cities rather than wasting impressions globally. Once you see positive performance, you can expand coverage.
A common mistake is forgetting to click Submit after selecting locations. If you don’t, the system defaults to global targeting — which can drain budget on irrelevant traffic. Always confirm your selections before moving on.
Why it matters: CPV charges you per view, so every wasted impression is literally money lost. Targeting correctly ensures your ad budget is spent only where your offer is relevant and legal.
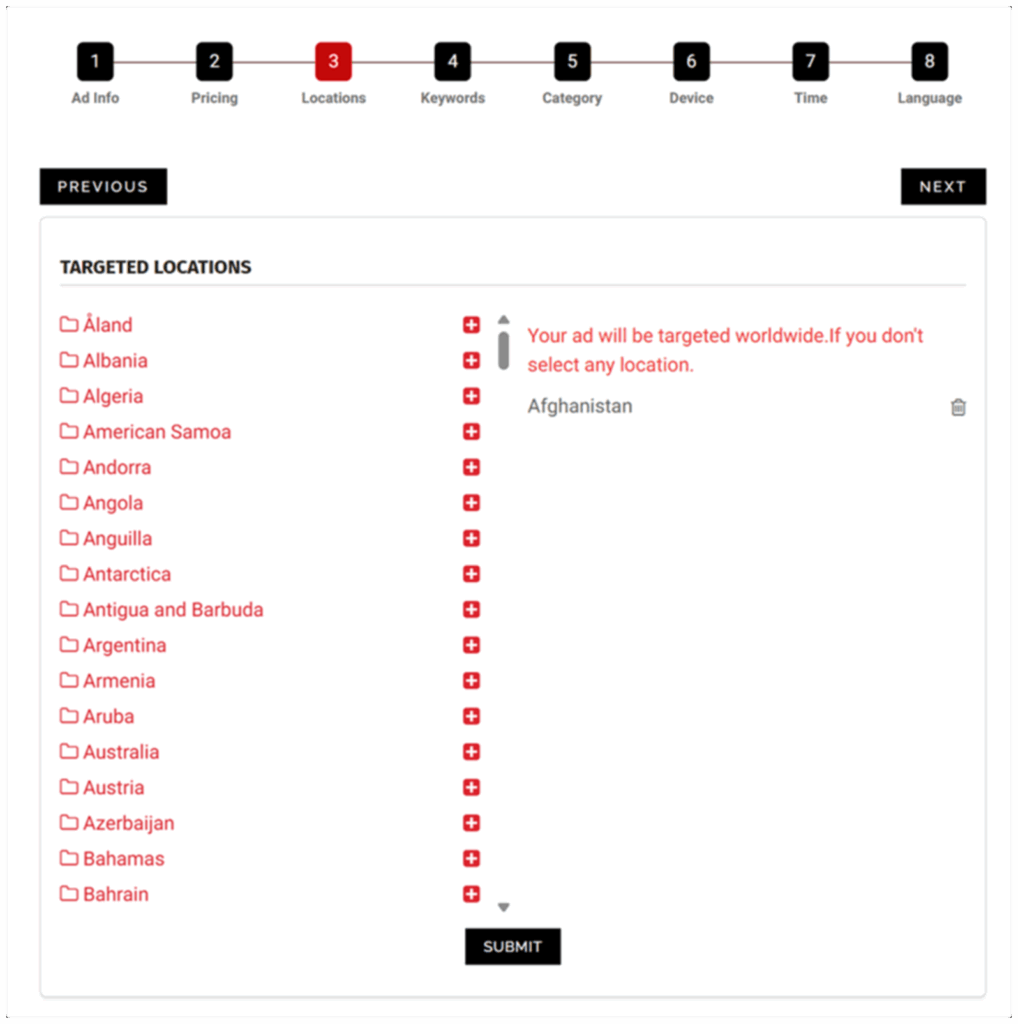
Action: Choose your target locations, click Submit, and verify before advancing.
Step 10: Adding Keywords
Keywords serve as the backbone of campaign targeting within Snipesearch Adclicks. In CPV video campaigns, keywords determine where your ads are more likely to be served, aligning your message with audiences already interested in related topics.
You can enter between 20 and 250 keywords per campaign. While it might be tempting to list broad terms, it’s often more effective to use long-tail keywords that capture specific intent. For example:
- Broad: “fitness.”
- Long-tail: “best 10-minute home workout video.”
The long-tail version aligns far better with user expectations and increases the chance your video resonates.
Another frequent error is typing keywords into the box without pressing the Add Keyword button. If you don’t confirm them, they won’t be saved — and your campaign may default to broad run-of-network placement.
Why it matters: Keywords help match your CPV video with viewers already predisposed to engage. Well-chosen terms increase completion rates and improve return on spend.
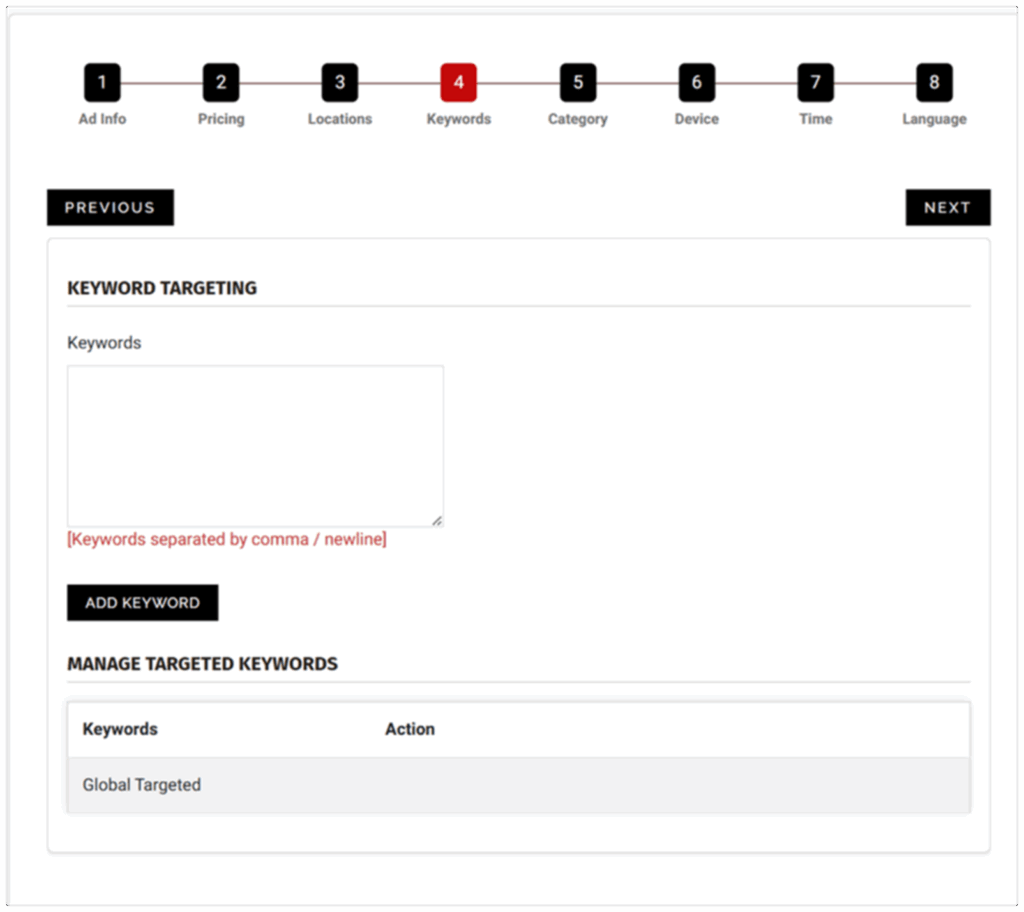
Action: Enter 20–250 targeted keywords, confirm each with the Add Keyword button, and review the list before moving forward.
Step 11: Selecting Categories
Every campaign on Snipesearch Adclicks must be placed into one of three categories: Adult, General Audience, or Suitable for Children. This is a compliance requirement, not an optional setting, and your choice determines whether the campaign is approved and where it can run. Adult is for explicit or implied NSFW content, General Audience is for mainstream offers such as blogs, software, or consumer products, and Suitable for Children is for ads targeted at under-13 audiences (toys, educational content, etc.). If even part of your offer leans toward adult or child-directed content, isolate it with a separate adcode or campaign to keep classification clean. Mislabeling slows approval, causes disapprovals, and can block your ad from serving until corrected.
- Adult: Explicit or NSFW implied content only.
- General: The default for mainstream campaigns.
- Suitable for Children: Strict rules for under-13 audiences.
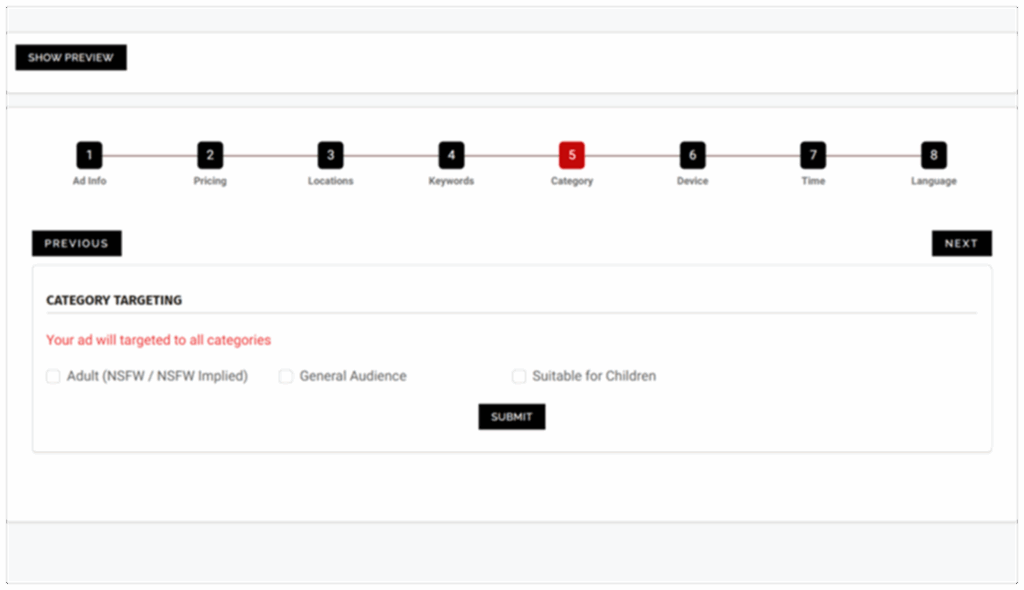
Action: Select the correct category for your ad → Submit → Next.
Step 12: Device and Browser Targeting
Snipesearch Adclicks provides refined targeting options beyond just desktop or mobile. You can narrow campaigns by operating system (Windows, iOS, Android, Linux, etc.) and by browser (Chrome, Safari, Edge, Firefox, etc.). This matters because compatibility and behavior differ: if your landing page requires Chrome, serving ads to Safari users wastes views; if your app is Android-only, showing it to iOS users delivers no value. Device and browser targeting also allows A/B testing by running separate campaigns for different environments and comparing completion rates. One common oversight is failing to press Update after choosing filters; if you skip this, the system defaults to “all devices and browsers,” which can dilute results.
- Target by device type (desktop, mobile, tablet) and OS.
- Target by browser for compatibility or behavior testing.
- Always click Update before Next, or the filters won’t apply.
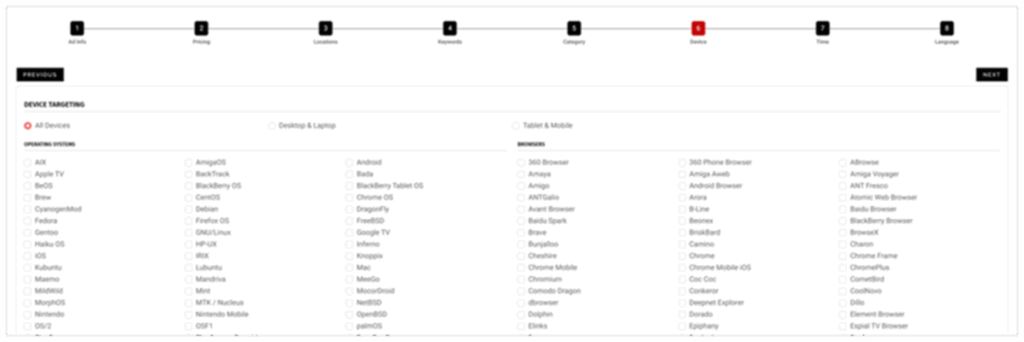
Action: Select your device and browser filters → Update → Next.
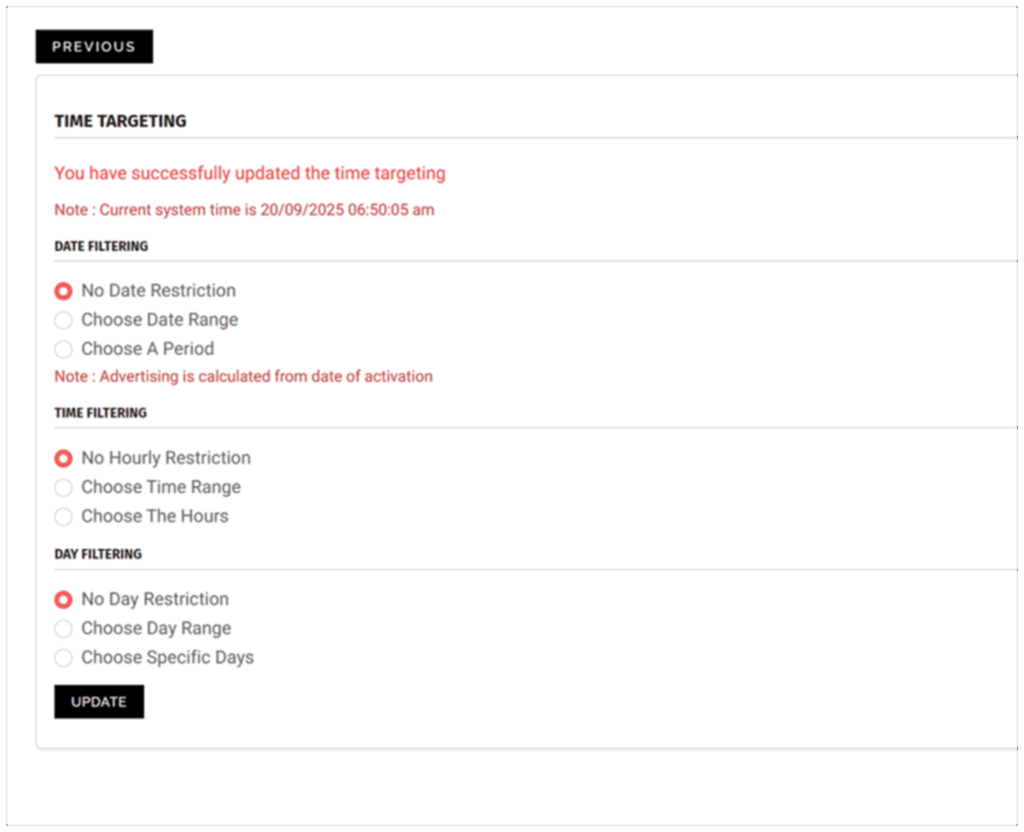
Step 13: Time Targeting
Time targeting ensures your ads run when they are most effective. You can filter by date range, specific hours of the day, or days of the week. This matters for CPV because you’re paying per view, and serving ads when audiences aren’t ready to engage can waste spend. For example, a restaurant campaign could run only on Thursdays and Fridays, between 10 a.m. and 7 p.m., in the weeks before a holiday. If you want ads to run continuously, you can leave all time fields blank, but most advertisers see better efficiency with schedules. Like device targeting, you must hit Update or the platform will assume no filters and run the campaign 24/7 by default.
- Filter by date ranges, hours, or weekdays.
- Align delivery with audience behavior (e.g., evenings for entertainment).
- Press Update to lock schedules before moving forward.
Action: Set time targeting parameters → Update → Next.
Step 14: Choosing Languages
Language targeting determines which users can see your CPV video ads based on their browser language. This is critical in CPV because the video message and landing page need to be understood to have value. Running an English-only ad to non-English browsers will reduce completion rates and burn through budget. The best practice is to build separate campaigns per language so you can tailor creative and compare performance. For example, one campaign can target English browsers while another uses Spanish creative and landing pages. As with other filters, forgetting to click Update means the system defaults to all languages, which is rarely desirable.
- Match ad language to browser language settings.
- Create separate campaigns for each major language.
- Always Update selections before proceeding.
Action: Select language targeting → Update → Next.
Once you press Update, your language selections are locked in and saved. Because this is the final step, there is no Next button — you remain on the same page so you can either make additional changes and update again, or simply exit when you are satisfied with your setup.
Relevant Links
Support: https://support.snipesearch.co.uk/
FAQ: https://adclick.snipesearch.co.uk/index.php?page=index/faq
Contact Form: https://adclick.snipesearch.co.uk/index.php?page=user/support
Stay Connected:
Snipesocial: https://www.snipesocial.co.uk/pages/snipesearch
Twitter: https://twitter.com/snipesearch_uk
Facebook: https://facebook.com/snipesearch
LinkedIn: https://linkedin.com/company/snipesearch/
YouTube: https://youtube.com/@snipesearch
Rommie Visitor Analytics: https://rommie.net/
StatCounter: https://statcounter.com/