What POP Means for Advertisers
POP advertising, short for pop-up, pop-under, and new tab–based ads, remains one of the most direct ways to place your offer in front of users. Unlike banners that compete with dozens of other placements on a page, POP ads command attention by opening a dedicated browser window or tab. On Snipesearch Adclicks, POP campaigns give advertisers the ability to decide whether an ad should appear on top of the active window (a pop-up), beneath it (a pop-under), or as a fresh tab launched in the background. Each format behaves differently in terms of visibility, user engagement, and compliance, but all three share the advantage of immediate reach.
For publishers, POP campaigns are an important source of monetization, while for advertisers they deliver guaranteed impressions with strong visibility. Unlike CPC (cost per click) or CPA (cost per acquisition), POP runs on a CPM model—you pay for every thousand impressions delivered, regardless of whether the user clicks. This makes campaign planning different: success depends on matching the right audience, context, and timing to make those impressions count.
Snipesearch Adclicks integrates POP alongside other campaign types, which means you can run these ads while also experimenting with CPC, CPM display, or CPA affiliate offers. This guide walks step by step through the process of building and launching a POP campaign. By the end, you’ll understand not only how to configure your ads, but also why each setting matters for performance and cost control.
POP Types, Their Strengths, and Blocker Resistance
On Snipesearch Adclicks POP campaigns, there are three primary variations you’ll choose between: pop-ups, pop-unders, and new tab/pop tab launches. Understanding their differences matters for performance, user reaction, and likelihood of being blocked.
Definitions and Use Cases
- Pop-ups appear above the main page window—immediately interrupting the user. Their visibility is high but the risk of user irritation is also high.
- Pop-unders open a window beneath the active tab or page; the user often does not notice it until they close or minimize the current page. Pop-unders tend to be subtler and less jarring.
- New tab / pop tab formats open a fresh browser tab instead of a window. The ad shows in that tab; the user’s main tab remains undisturbed until they switch. This format is a middle ground in intrusiveness.
You might opt for pop-ups when you have a time-sensitive message or want guaranteed front-of-screen visibility. Pop-unders are preferable when user experience matters more and you want the ad to be noticed later. New tab is useful when you want the ad to integrate into normal browsing flow without aggressively covering content.
Conversion Propensity
According to industry reports, pop formats often outperform banner or display ads in conversion potential. Some sources cite ROI uplifts of up to 250% vs standard banners when POP ads are configured smartly. Pop traffic often commands higher engagement because it can’t be passively ignored.
Between the types, pop-unders tend to convert better relative to their intrusiveness. Because they do not immediately disrupt the user, they allow a calmer decision window. Users may notice a tab later and engage. Some marketers believe pop-unders reduce bounce reaction while still delivering the message. Pop-ups often provoke immediate dismissal unless the content is extremely relevant.
That said, conversion success depends heavily on landing page quality, offer alignment, targeting, and pacing—not just the format.
Resistance to Blocking & Visibility Challenges
Ad blockers and browser defaults have grown more aggressive against pop-ups. Modern browsers like Chrome and Firefox automatically block many unsolicited pop-ups unless they are user-initiated (e.g. after a click) or whitelisted.
Because pop-unders and new tab formats launch behind or beside the active window, they are somewhat harder for blockers to suppress, especially when triggered via user interaction (e.g. clicks). These formats often bypass some automated filters because they don’t immediately interrupt.
However, no format is immune. Advanced ad blockers may detect window.open calls or monitor script behavior, including attempts to hijack click events. Also, some pop-ads are implemented as “in-page overlays” (floating HTML elements) rather than separate windows; these can be harder to block because they are part of the page DOM.
In summary:
- Pop-ups are the most visible but also the most likely to be blocked or dismissed.
- Pop-unders balance visibility with lower disruption and tend to evade some blockers.
- New tab/pop tab formats offer a compromise: less aggressive but still capable of engagement.
- Success depends on user interaction triggers (don’t open a pop unless something legitimate triggered it), reputable domains, and implementing the ad in contexts less likely to be flagged as spam.
Step 1: Switching to the Advertiser Dashboard
The first step in building a POP campaign on Snipesearch Adclicks is making sure you’re in the correct dashboard. The platform supports two roles: publishers (those who monetize sites with ads) and advertisers (those who launch and manage campaigns). POP campaigns can only be created from the advertiser side, so you need to switch if you aren’t already there.
To do this, click the circle or square in the top-right corner of the interface that contains the first letter of your username. A dropdown menu will appear, showing the option to Switch to Advertiser. Select it, and the system will reload into the advertiser environment. This environment contains the full suite of tools for creating, targeting, budgeting, and analyzing campaigns.
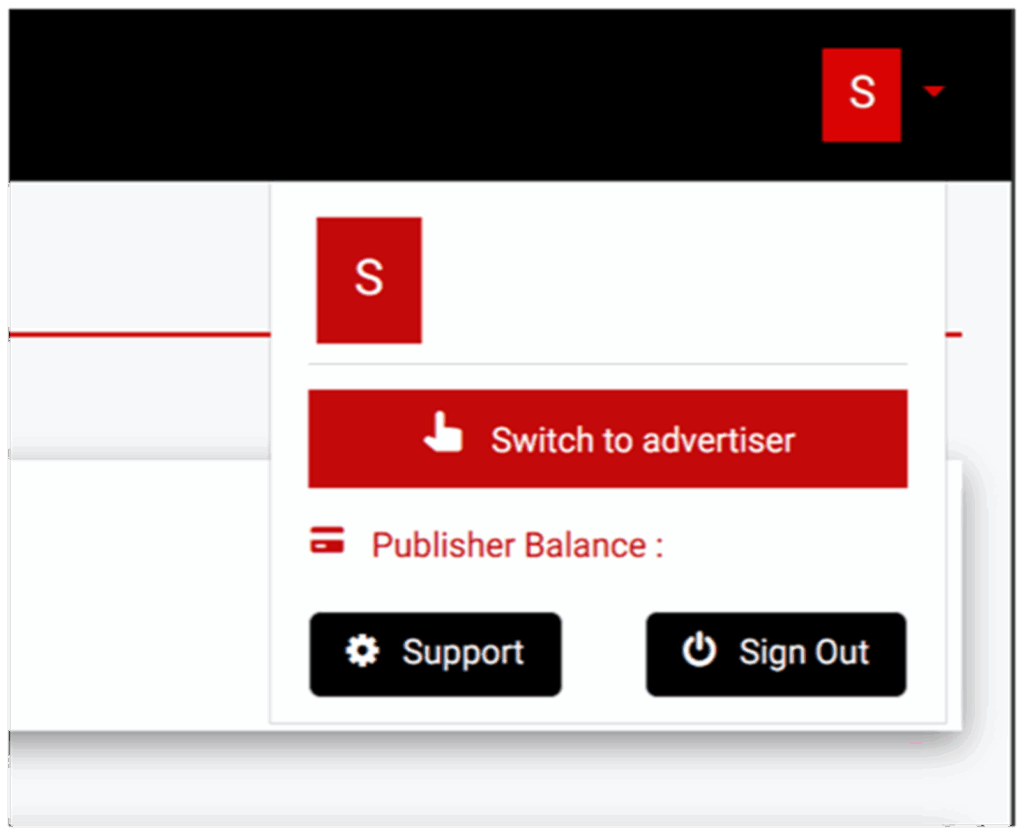
Action: Confirm you are in the advertiser dashboard before attempting to set up a POP campaign.
Step 2: Accessing the Ads Menu
Once you’re in the advertiser dashboard, the next stop is the Ads menu. This menu is the central hub for everything related to campaign management. Located on the left-hand navigation panel, it opens a control center where you can see all active, paused, or completed campaigns, as well as launch new ones.
Inside the Ads menu you can:
- Create new campaigns, including POP formats.
- Review existing campaigns and check their status.
- Access reporting tools that break down impressions, costs, and pacing.
Think of the Ads menu as your command cockpit. Every time you need to launch, monitor, or adjust a campaign, this is where you’ll return. Familiarity with its layout allows you to work quickly, which becomes especially important when running multiple campaigns simultaneously.
Action: Navigate to Ads → Ads menu to open your campaign control center.
Step 3: Creating a New Ad
With the Ads menu open, you’ll see the Create Ads button. Clicking this launches the guided campaign builder—a structured setup wizard that walks you through the process of configuring a POP campaign.
The builder will prompt you for several key details:
- Pricing model: For POP campaigns, you’ll select POP (CPM billing).
- Targeting: Location, device, browser, language, and scheduling.
- Budget: Total spend and daily spend, plus your CPM rate.
- Destination URL: The link users will land on when your POP ad opens.
Each stage of the builder flows logically from broad campaign-level choices down to specific details. Take your time, as every setting directly impacts how your ads are delivered. If you rush and misconfigure, you risk wasting budget on the wrong users or missing out on traffic that would have converted.

Action: Open Ads → Create Ads → follow the guided setup for POP.
Step 4: Selecting the Ad Format
Inside the campaign builder you’ll eventually reach the ad format section. Here, you’ll see a variety of options ranging from banners to e-commerce formats. For this walkthrough, the one you need is POP.
When you select POP, the builder automatically adjusts the campaign to operate under POP rules. This means your ad will be served as a pop-up, pop-under, or new tab depending on the configuration you choose later. All billing will be CPM-based, calculated on impressions delivered.
Making this choice early ensures you don’t waste time entering details for the wrong format. It also allows the system to display only the fields relevant to POP, streamlining the rest of your setup process.
Action: Choose POP as your ad format to lock your campaign into the correct mode.
Step 5: Breaking Down the POP Pricing Model
POP campaigns on Snipesearch Adclicks operate on a CPM (cost per thousand impressions) basis, rather than CPC or CPA. This means you’re paying for guaranteed delivery of your ads, not just for clicks or conversions. Understanding how this pricing works is essential for setting realistic budgets.
Here are the baseline rules:
- Minimum POP rate: $1.00 per 1,000 impressions.
- System suggested POP rate: $1.00 per 1,000 impressions (a default recommendation).
- Ad total budget: Minimum $20.00 per campaign.
- Daily budget: Minimum $2.00 per day.
The rate you set determines how competitive your ads will be in the POP auction. While you can choose the minimum, bidding slightly above often helps secure higher-quality placements. The total and daily budgets define the pacing of your spend. For example, if you set a $100 total budget with a $10 daily cap, the system will spread impressions over at least ten days.
Because POP delivers impressions immediately and aggressively, budget discipline is crucial. Without daily caps, it’s possible to burn through an entire campaign budget in hours. Proper pacing ensures you collect enough data to evaluate performance and refine targeting.
Step 6: Filling Out Basic Ad Information
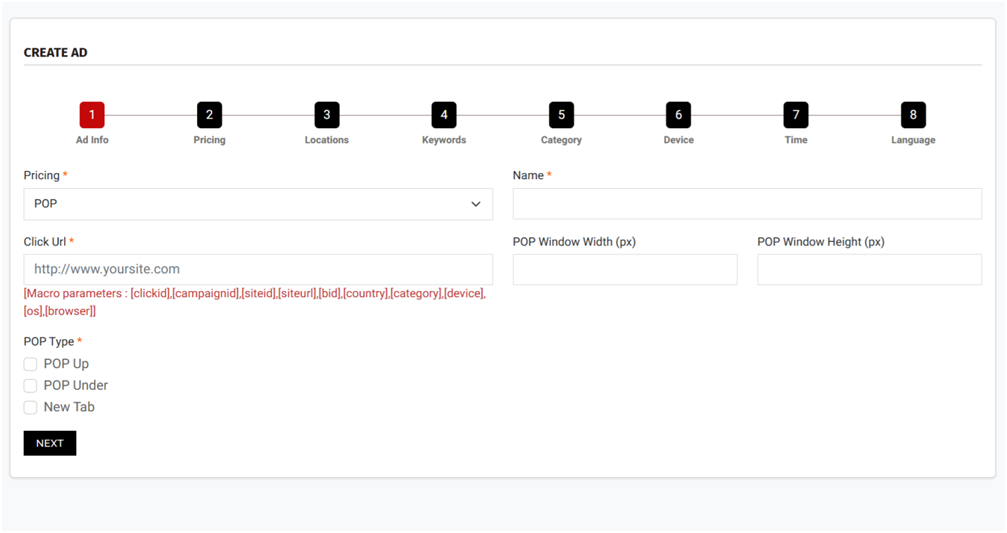
Once you’ve selected POP as your format and understood the CPM pricing model, the next stage is to provide the campaign’s core details. These fields are where you define how your ad will behave when it appears to users.
The builder will ask for:
- Pricing model: This will already show POP once you’ve chosen it.
- Campaign name: Give it a clear, descriptive title (e.g., “UK Tech Blog Promo – POP Under”).
- Click URL: The landing page users are sent to when the POP loads. This must be correct because the system cannot preview the entire creative; it only displays the destination URL. You can use macros such as [clickid], [campaignid], [siteid], [country], [device], and more to pass tracking parameters into your analytics.
- POP dimensions: Define the window width and height in pixels. This ensures your landing page displays correctly without distortion.
- POP type: Choose whether your ad should appear as a pop-up, pop-under, or new tab. You can select more than one if you want to test performance across formats.
Providing accurate information here avoids wasted impressions. For example, a landing page that isn’t mobile-optimized will underperform if you allow mobile traffic. By defining window size and matching it to your site design, you improve user experience and campaign efficiency.

Action: Complete all fields—name, click URL, window dimensions, and POP type—to set the foundation of your campaign, then click next
Step 7: Previewing Your Ad
Unlike banners or video creatives, POP campaigns don’t generate a visual preview within Snipesearch Adclicks. Instead, the preview section simply shows your target URL. That’s why it’s critical to test your link in a live browser before finalizing.
Here’s the process:
- Enter the destination URL into the builder.
- Check that the preview window lists the URL correctly.
- Open that URL in multiple browsers (Chrome, Firefox, Safari, Edge) to confirm it displays properly.
- Test the page on desktop and mobile to ensure it adapts to different screen sizes.
Think of this as quality assurance. A broken or misformatted landing page wastes impressions and damages user trust. Remember, POP ads are disruptive by nature—users don’t expect them. If your page loads quickly, looks professional, and provides immediate value, you turn an interruption into engagement.
Action: Use the preview section to confirm the correct URL, then manually test across browsers and devices.
Step 8: Setting Budgets and POP Rates
Budgeting for POP is where strategy meets math. Because campaigns run on CPM, you’re paying for every thousand impressions served. Snipesearch Adclicks enforces minimum thresholds to maintain quality delivery:
- Minimum POP rate: $1.00 CPM.
- System suggested POP rate: $1.00 CPM (a default starting point).
- Ad total budget: At least $20.00.
- Daily budget: At least $2.00 per day.
When setting budgets, think about both scale and pacing. A high daily budget can flood your impressions quickly, giving you fast data but little room for optimization. A lower daily budget stretches delivery over time, allowing you to monitor performance and adjust.
Suppose you want to test three variants of a landing page. Allocating $30 per campaign with a $5 daily cap ensures each runs for at least six days. This staggered pacing provides enough comparative data to judge which landing page performs best. Once you’ve identified a winner, you can raise the daily budget to scale results. Make sure after filling in these fields you click the add budget button before clicking next.
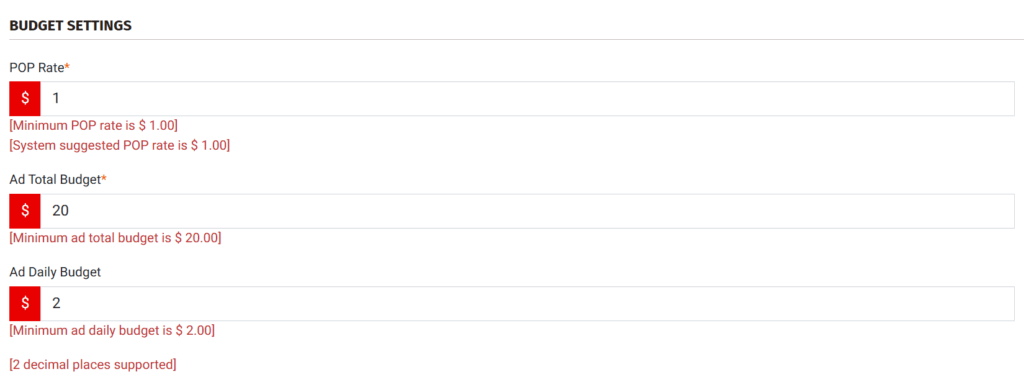
Action: Define your POP CPM rate, total budget, and daily budget to balance testing with controlled delivery. CLICK Add Budget → Next.
Step 9: Selecting Location Targeting
Location targeting is one of the most important levers in a POP campaign. It determines who actually sees your ad and ensures your impressions aren’t wasted on irrelevant users.
Snipesearch Adclicks offers three levels of location targeting:
- Global: Show ads worldwide. Useful for broad awareness but risky for localized offers.
- Country-level: Focus on specific countries where your product or service is available.
- City-level: Drill down to individual cities or metropolitan areas for precision targeting.
For most advertisers, starting narrow is the best strategy. If you’re promoting a UK-based e-commerce site, running global POP traffic will drain budget on users who cannot buy from you. Instead, set targeting to the UK or even to specific cities where your service operates.
A common mistake is forgetting to click Submit after selecting locations. If you skip this, the system defaults to global targeting, and your ads will run everywhere. Always double-check before moving on.
Why does this matter so much for POP? Because every impression costs you CPM. With banners, wasted impressions might blend into other page elements. With POP, each irrelevant impression is a full window or tab opened unnecessarily, burning budget and possibly annoying the wrong audience.
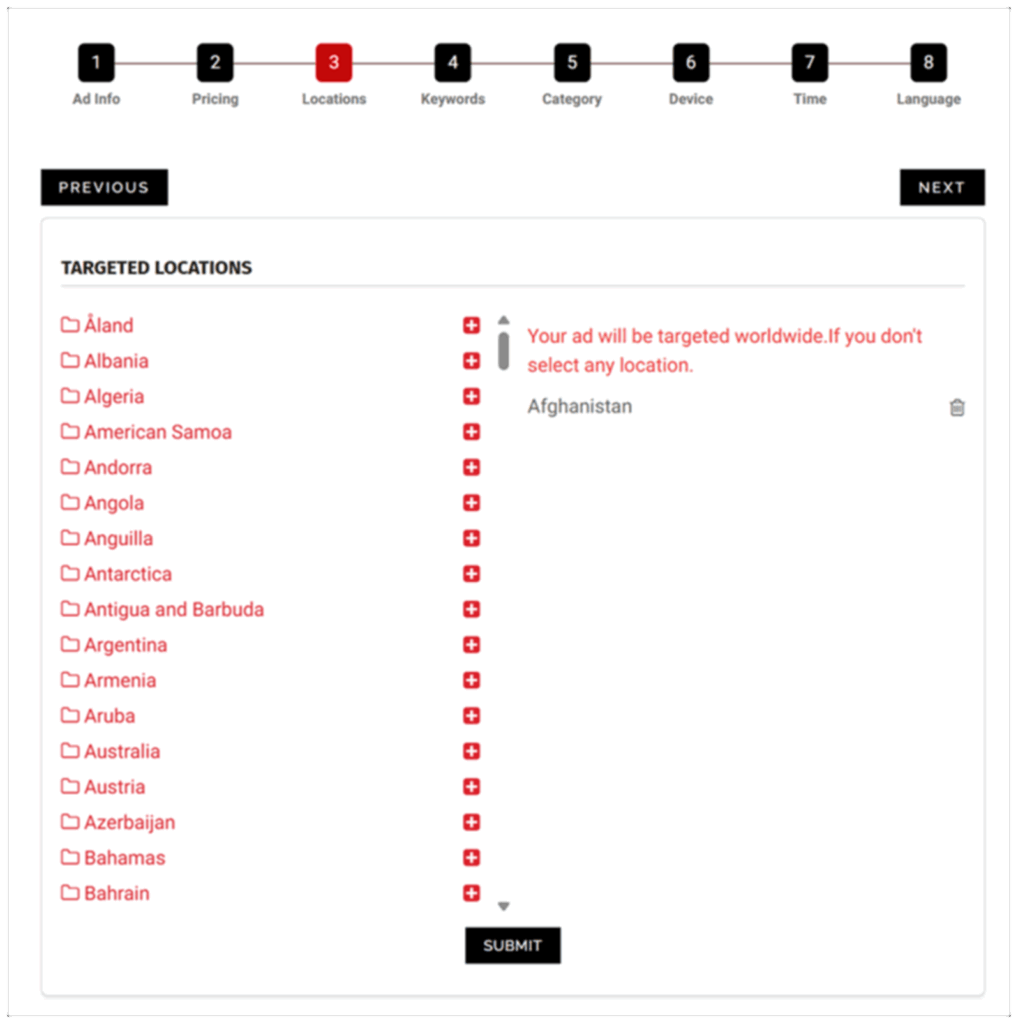
Action: Select precise locations, click Submit, and verify your targeting before advancing.
Step 10: Adding Keywords
Keyword targeting in POP campaigns works differently than in CPC search ads. Because POP traffic is impression-based, keywords serve as contextual signals rather than direct queries. They help the platform decide when and where to trigger your ad, ensuring better relevance.
Snipesearch Adclicks allows 20 to 1000 keywords per POP campaign. While it might be tempting to load broad terms, focusing on long-tail keywords provides better targeting.
For example:
- Broad keyword: “fitness.”
- Long-tail keyword: “10-minute beginner home workout.”
Long-tail terms narrow the targeting so your ad reaches users with specific intent. This improves engagement and reduces wasted impressions.
Why it matters: in POP, you’re already paying CPM regardless of clicks. By choosing more precise keywords, you increase the chance that your landing page resonates with the user, which can drive higher conversions and better ROI when combined with Adclicks tracking or external analytics tools like Rommie or StatCounter. However if you are promoting a video or stream even an album Run of network (no keywords) will serve you significantly between if the aim is simply traffic.
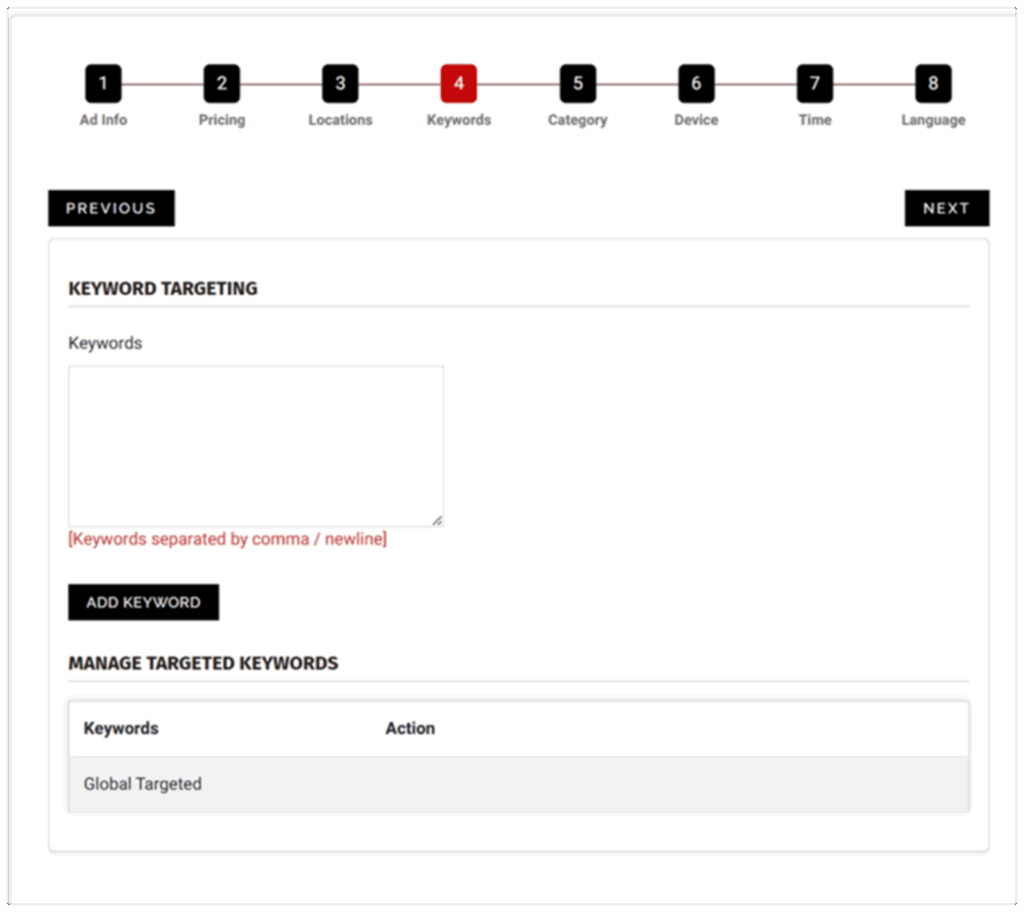
Action: Enter 20–1000 keywords, emphasizing long-tail phrases, and confirm with the Add Keyword button before moving forward.
Step 11: Selecting Categories
Every campaign on Snipesearch Adclicks must be assigned to a category before it can be approved. Categories exist to ensure ads are served in appropriate contexts and to maintain compliance across the network.
You have three options:
- Adult: For explicit or NSFW content.
- General Audience: For mainstream content such as blogs, apps, consumer products, or software.
- Suitable for Children: For ads designed for users under 13, such as educational platforms, toys, or family-safe services.
Selecting the wrong category can stall your campaign. For instance, if you classify an adult-oriented offer as “General Audience,” the ad is likely to be rejected or suspended until corrected. Mislabeling also risks your ads appearing in environments that are not compliant with regional regulations.
For advertisers running multiple offers across different audiences, the best practice is to set up separate campaigns for each category. This keeps reporting clean and prevents crossover that could slow approvals.
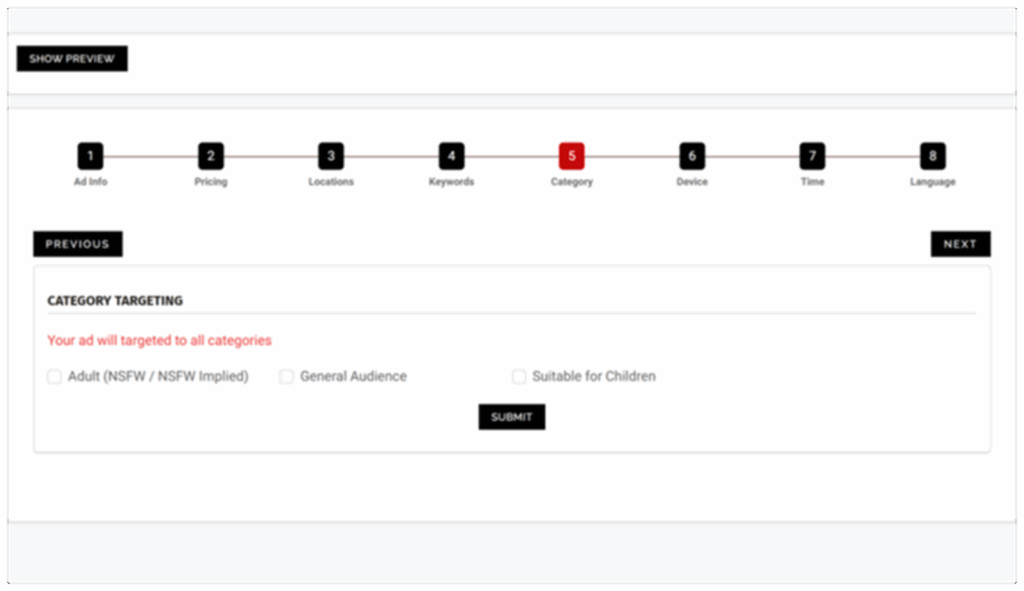
Action: Choose the correct category based on content, submit, and verify before moving on.
Step 12: Device and Browser Targeting
Snipesearch Adclicks allows you to refine your POP campaigns by targeting specific devices, operating systems, and browsers. This is particularly valuable because user behavior and compatibility vary widely.
For example:
- If your offer is an Android-only app, showing it to iOS users wastes impressions.
- If your landing page performs best in Chrome, you may want to exclude Safari to maximize ROI.
- If your service is desktop-focused, pop-ups triggered on mobile devices could frustrate users and hurt performance.
Device and browser targeting also allows for A/B testing. By running the same campaign across two different browsers or OS environments, you can compare completion rates and refine your strategy.
That said, because POP ads trigger impressions directly, sometimes going broad makes sense. If your landing page is fully responsive and your service works across all platforms, targeting “all devices and browsers” can maximize scale without unnecessary restrictions. The key is aligning targeting with actual compatibility.

Action: Select device and browser filters based on compatibility, click Update, and confirm before proceeding.
Step 13: Time Targeting
Time targeting determines when your POP ads are displayed, allowing you to sync delivery with user activity. Snipesearch Adclicks supports targeting by date range, day of the week, or specific hours.
Timing matters because POP impressions are disruptive. If your audience is more receptive in the evening (for example, for entertainment offers), serving ads at that time will yield better engagement than pushing them at 9 a.m. on a weekday. For B2B services, mornings and early afternoons may align better with office hours.
However, because POP campaigns run on CPM and deliver aggressively, time targeting can either stretch your budget or concentrate it. Setting narrow time slots helps control spend and improve efficiency, while broad delivery burns budget faster but provides more exposure.
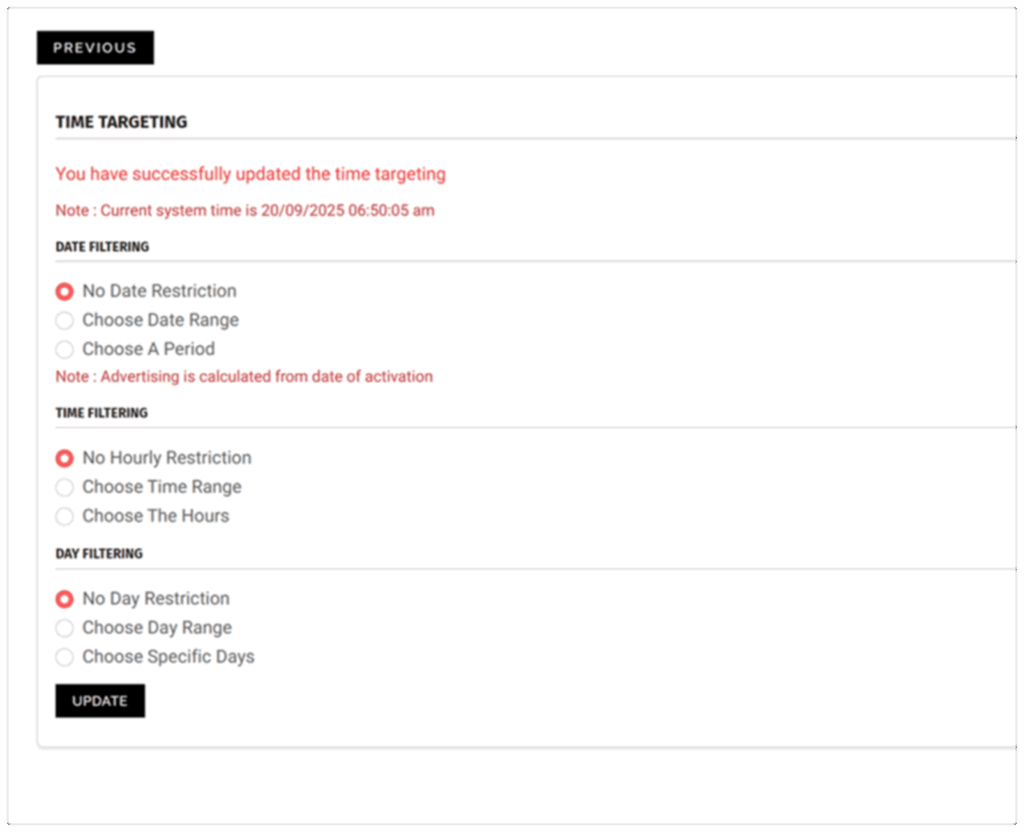
Action: Define your time targeting parameters—date ranges, hours, or days—click Update, and lock them in before advancing.
Step 14: Choosing Languages
The final step in campaign setup is language targeting. This filters impressions based on the browser language setting of the user.
Language targeting ensures your ad copy matches user expectations. If your landing page is in English but you deliver impressions to browsers set to Russian, bounce rates will skyrocket and budget will be wasted. Similarly, if you serve a bilingual audience, running separate campaigns for each language allows you to customize messaging and improve performance.
Snipesearch Adclicks allows multiple languages to be selected, but you must click Update to save your choices. Once updated, your language settings are locked in, and there’s no Next button—the builder leaves you on the same page so you can make further edits if necessary.
Action: Match language targeting to your campaign content, select carefully, click Update, and finalize your setup. Because this is the final step, there is no Next button — you remain on the same page so you can either make additional changes and update again, or simply exit when you are satisfied with your setup.
Bringing POP Campaigns Together
Running POP campaigns on Snipesearch Adclicks combines precision with reach. Unlike CPC or CPA models, POP gives you guaranteed impressions through disruptive formats—pop-ups, pop-unders, or new tabs. This makes careful targeting and budget control vital.
From switching to the advertiser dashboard, to setting campaign parameters, to refining targeting by device, location, time, and language, each step builds on the last. Success with POP doesn’t come from impressions alone—it comes from matching the right audience to a strong landing page and pacing your spend so you can learn and optimize.
Snipesearch Adclicks provides the tools to do this with clarity, from its CPM pricing model to its keyword and category controls. By combining disciplined setup with clean creative and a responsive landing page, you can turn disruptive attention into measurable engagement and revenue.
Relevant Links
Support: https://support.snipesearch.co.uk/
FAQ: https://adclick.snipesearch.co.uk/index.php?page=index/faq
Contact Form: https://adclick.snipesearch.co.uk/index.php?page=user/support
Stay Connected:
Snipesocial: https://www.snipesocial.co.uk/pages/snipesearch
Twitter: https://twitter.com/snipesearch_uk
Facebook: https://facebook.com/snipesearch
LinkedIn: https://linkedin.com/company/snipesearch/
YouTube: https://youtube.com/@snipesearch
Analytics Tools:
Rommie Visitor Analytics: https://rommie.net/
StatCounter: https://statcounter.com/